VOTING POWER100.00%
DOWNVOTE POWER100.00%
RESOURCE CREDITS100.00%
REPUTATION PROGRESS0.00%
Net Worth
0.118USD
STEEM
0.001STEEM
SBD
0.163SBD
Effective Power
5.007SP
├── Own SP
0.687SP
└── Incoming DelegationsDeleg
+4.320SP
Detailed Balance
| STEEM | ||
| balance | 0.001STEEM | STEEM |
| market_balance | 0.000STEEM | STEEM |
| savings_balance | 0.000STEEM | STEEM |
| reward_steem_balance | 0.000STEEM | STEEM |
| STEEM POWER | ||
| Own SP | 0.687SP | SP |
| Delegated Out | 0.000SP | SP |
| Delegation In | 4.320SP | SP |
| Effective Power | 5.007SP | SP |
| Reward SP (pending) | 0.000SP | SP |
| SBD | ||
| sbd_balance | 0.163SBD | SBD |
| sbd_conversions | 0.000SBD | SBD |
| sbd_market_balance | 0.000SBD | SBD |
| savings_sbd_balance | 0.000SBD | SBD |
| reward_sbd_balance | 0.000SBD | SBD |
{
  "balance": "0.001 STEEM",
  "savings_balance": "0.000 STEEM",
  "reward_steem_balance": "0.000 STEEM",
  "vesting_shares": "1117.521112 VESTS",
  "delegated_vesting_shares": "0.000000 VESTS",
  "received_vesting_shares": "7026.138694 VESTS",
  "sbd_balance": "0.163 SBD",
  "savings_sbd_balance": "0.000 SBD",
  "reward_sbd_balance": "0.000 SBD",
  "conversions": []
}
Account Info
| name | altlash |
| id | 651402 |
| rank | 1,293,940 |
| reputation | 951479900 |
| created | 2018-01-23T23:20:00 |
| recovery_account | steem |
| proxy | None |
| post_count | 15 |
| comment_count | 0 |
| lifetime_vote_count | 0 |
| witnesses_voted_for | 0 |
| last_post | 2020-03-11T03:08:54 |
| last_root_post | 2020-03-11T03:08:54 |
| last_vote_time | 2020-03-11T03:09:27 |
| proxied_vsf_votes | 0, 0, 0, 0 |
| can_vote | 1 |
| voting_power | 0 |
| delayed_votes | 0 |
| balance | 0.001 STEEM |
| savings_balance | 0.000 STEEM |
| sbd_balance | 0.163 SBD |
| savings_sbd_balance | 0.000 SBD |
| vesting_shares | 1117.521112 VESTS |
| delegated_vesting_shares | 0.000000 VESTS |
| received_vesting_shares | 7026.138694 VESTS |
| reward_vesting_balance | 0.000000 VESTS |
| vesting_balance | 0.000 STEEM |
| vesting_withdraw_rate | 0.000000 VESTS |
| next_vesting_withdrawal | 1969-12-31T23:59:59 |
| withdrawn | 0 |
| to_withdraw | 0 |
| withdraw_routes | 0 |
| savings_withdraw_requests | 0 |
| last_account_recovery | 1970-01-01T00:00:00 |
| reset_account | null |
| last_owner_update | 1970-01-01T00:00:00 |
| last_account_update | 2018-01-27T01:39:33 |
| mined | No |
| sbd_seconds | 0 |
| sbd_last_interest_payment | 2019-06-27T17:20:51 |
| savings_sbd_last_interest_payment | 1970-01-01T00:00:00 |
{
  "active": {
    "account_auths": [],
    "key_auths": [
      [
        "STM5rFmbataM2AEY2pokUmzWKsJQNjm5ZVZQPDkHtpWvW4jttE9NA",
        1
      ]
    ],
    "weight_threshold": 1
  },
  "balance": "0.001 STEEM",
  "can_vote": true,
  "comment_count": 0,
  "created": "2018-01-23T23:20:00",
  "curation_rewards": 8,
  "delegated_vesting_shares": "0.000000 VESTS",
  "downvote_manabar": {
    "current_mana": 2035914951,
    "last_update_time": 1779052497
  },
  "guest_bloggers": [],
  "id": 651402,
  "json_metadata": "{\"profile\":{\"profile_image\":\"https://scontent-atl3-1.xx.fbcdn.net/v/t1.0-9/26195971_10214996020563942_6353942225851003486_n.jpg?oh=901815fd7205130d3fd6dae67d70e9d7&oe=5ADE3FF6\"}}",
  "last_account_recovery": "1970-01-01T00:00:00",
  "last_account_update": "2018-01-27T01:39:33",
  "last_owner_update": "1970-01-01T00:00:00",
  "last_post": "2020-03-11T03:08:54",
  "last_root_post": "2020-03-11T03:08:54",
  "last_vote_time": "2020-03-11T03:09:27",
  "lifetime_vote_count": 0,
  "market_history": [],
  "memo_key": "STM5EK6bVEvgxFPmR87kje6eU2gJJBZAcVNtWUK3bomFKKzLnrxEc",
  "mined": false,
  "name": "altlash",
  "next_vesting_withdrawal": "1969-12-31T23:59:59",
  "other_history": [],
  "owner": {
    "account_auths": [],
    "key_auths": [
      [
        "STM6cy1i2bA6uxiQM99UWT7vbwz8KcvnaiBYhjgGNgrL4RL83X7Zn",
        1
      ]
    ],
    "weight_threshold": 1
  },
  "pending_claimed_accounts": 0,
  "post_bandwidth": 0,
  "post_count": 15,
  "post_history": [],
  "posting": {
    "account_auths": [],
    "key_auths": [
      [
        "STM5Hh11mCSSfYjT1fgjwswy2WFsBoJKJADurAs6dg2WkWbKP3vTx",
        1
      ]
    ],
    "weight_threshold": 1
  },
  "posting_json_metadata": "{\"profile\":{\"profile_image\":\"https://scontent-atl3-1.xx.fbcdn.net/v/t1.0-9/26195971_10214996020563942_6353942225851003486_n.jpg?oh=901815fd7205130d3fd6dae67d70e9d7&oe=5ADE3FF6\"}}",
  "posting_rewards": 75,
  "proxied_vsf_votes": [
    0,
    0,
    0,
    0
  ],
  "proxy": "",
  "received_vesting_shares": "7026.138694 VESTS",
  "recovery_account": "steem",
  "reputation": 951479900,
  "reset_account": "null",
  "reward_sbd_balance": "0.000 SBD",
  "reward_steem_balance": "0.000 STEEM",
  "reward_vesting_balance": "0.000000 VESTS",
  "reward_vesting_steem": "0.000 STEEM",
  "savings_balance": "0.000 STEEM",
  "savings_sbd_balance": "0.000 SBD",
  "savings_sbd_last_interest_payment": "1970-01-01T00:00:00",
  "savings_sbd_seconds": "0",
  "savings_sbd_seconds_last_update": "1970-01-01T00:00:00",
  "savings_withdraw_requests": 0,
  "sbd_balance": "0.163 SBD",
  "sbd_last_interest_payment": "2019-06-27T17:20:51",
  "sbd_seconds": "0",
  "sbd_seconds_last_update": "2019-06-27T17:20:51",
  "tags_usage": [],
  "to_withdraw": 0,
  "transfer_history": [],
  "vesting_balance": "0.000 STEEM",
  "vesting_shares": "1117.521112 VESTS",
  "vesting_withdraw_rate": "0.000000 VESTS",
  "vote_history": [],
  "voting_manabar": {
    "current_mana": "8143659806",
    "last_update_time": 1779052497
  },
  "voting_power": 0,
  "withdraw_routes": 0,
  "withdrawn": 0,
  "witness_votes": [],
  "witnesses_voted_for": 0,
  "rank": 1293940
}
Withdraw Routes
| Incoming | Outgoing |
|---|---|
Empty | Empty |
{
  "incoming": [],
  "outgoing": []
}From Date
To Date
2026/05/17 21:14:57
2026/05/17 21:14:57
| delegatee | altlash |
| delegator | steem |
| vesting shares | 7026.138694 VESTS |
| Transaction Info | Block #106139858/Trx a83ce3727cd04fb598054944ec1dfd596dafd3ee |
View Raw JSON Data
{
  "block": 106139858,
  "op": [
    "delegate_vesting_shares",
    {
      "delegatee": "altlash",
      "delegator": "steem",
      "vesting_shares": "7026.138694 VESTS"
    }
  ],
  "op_in_trx": 0,
  "timestamp": "2026-05-17T21:14:57",
  "trx_id": "a83ce3727cd04fb598054944ec1dfd596dafd3ee",
  "trx_in_block": 1,
  "virtual_op": 0
}2026/05/11 17:21:33
2026/05/11 17:21:33
| delegatee | altlash |
| delegator | steem |
| vesting shares | 4313.928289 VESTS |
| Transaction Info | Block #105963169/Trx 26a0de925743dd04cca3c8340f955056c2c20384 |
View Raw JSON Data
{
  "block": 105963169,
  "op": [
    "delegate_vesting_shares",
    {
      "delegatee": "altlash",
      "delegator": "steem",
      "vesting_shares": "4313.928289 VESTS"
    }
  ],
  "op_in_trx": 0,
  "timestamp": "2026-05-11T17:21:33",
  "trx_id": "26a0de925743dd04cca3c8340f955056c2c20384",
  "trx_in_block": 5,
  "virtual_op": 0
}2026/04/25 20:40:36
2026/04/25 20:40:36
| delegatee | altlash |
| delegator | steem |
| vesting shares | 7038.654450 VESTS |
| Transaction Info | Block #105507598/Trx 597ace21dbc7fc1dda6ced9896ecb465c7da8bb0 |
View Raw JSON Data
{
  "block": 105507598,
  "op": [
    "delegate_vesting_shares",
    {
      "delegatee": "altlash",
      "delegator": "steem",
      "vesting_shares": "7038.654450 VESTS"
    }
  ],
  "op_in_trx": 0,
  "timestamp": "2026-04-25T20:40:36",
  "trx_id": "597ace21dbc7fc1dda6ced9896ecb465c7da8bb0",
  "trx_in_block": 1,
  "virtual_op": 0
}2026/01/22 23:47:51
2026/01/22 23:47:51
| delegatee | altlash |
| delegator | steem |
| vesting shares | 4355.475108 VESTS |
| Transaction Info | Block #102842227/Trx 52feeb4083c294f1f16230fa09316e183b149dd2 |
View Raw JSON Data
{
  "block": 102842227,
  "op": [
    "delegate_vesting_shares",
    {
      "delegatee": "altlash",
      "delegator": "steem",
      "vesting_shares": "4355.475108 VESTS"
    }
  ],
  "op_in_trx": 0,
  "timestamp": "2026-01-22T23:47:51",
  "trx_id": "52feeb4083c294f1f16230fa09316e183b149dd2",
  "trx_in_block": 2,
  "virtual_op": 0
}2024/12/16 19:08:39
2024/12/16 19:08:39
| delegatee | altlash |
| delegator | steem |
| vesting shares | 4519.694305 VESTS |
| Transaction Info | Block #91288668/Trx 0c151da358093002e3709c79b5feab30e1e12c11 |
View Raw JSON Data
{
  "block": 91288668,
  "op": [
    "delegate_vesting_shares",
    {
      "delegatee": "altlash",
      "delegator": "steem",
      "vesting_shares": "4519.694305 VESTS"
    }
  ],
  "op_in_trx": 0,
  "timestamp": "2024-12-16T19:08:39",
  "trx_id": "0c151da358093002e3709c79b5feab30e1e12c11",
  "trx_in_block": 2,
  "virtual_op": 0
}2023/11/13 10:54:45
2023/11/13 10:54:45
| delegatee | altlash |
| delegator | steem |
| vesting shares | 4688.827837 VESTS |
| Transaction Info | Block #79842950/Trx ff28fde7bfb3a48f201e27a8e729f57865ade9d1 |
View Raw JSON Data
{
  "block": 79842950,
  "op": [
    "delegate_vesting_shares",
    {
      "delegatee": "altlash",
      "delegator": "steem",
      "vesting_shares": "4688.827837 VESTS"
    }
  ],
  "op_in_trx": 0,
  "timestamp": "2023-11-13T10:54:45",
  "trx_id": "ff28fde7bfb3a48f201e27a8e729f57865ade9d1",
  "trx_in_block": 3,
  "virtual_op": 0
}2023/09/21 18:18:15
2023/09/21 18:18:15
| delegatee | altlash |
| delegator | steem |
| vesting shares | 7626.106623 VESTS |
| Transaction Info | Block #78343617/Trx 73d635f925e6e6e1ee0ed4fb9c5743098e92c096 |
View Raw JSON Data
{
  "block": 78343617,
  "op": [
    "delegate_vesting_shares",
    {
      "delegatee": "altlash",
      "delegator": "steem",
      "vesting_shares": "7626.106623 VESTS"
    }
  ],
  "op_in_trx": 0,
  "timestamp": "2023-09-21T18:18:15",
  "trx_id": "73d635f925e6e6e1ee0ed4fb9c5743098e92c096",
  "trx_in_block": 2,
  "virtual_op": 0
}2022/11/03 08:30:48
2022/11/03 08:30:48
| delegatee | altlash |
| delegator | steem |
| vesting shares | 7847.788061 VESTS |
| Transaction Info | Block #69109450/Trx 5128403695102be3781021a482981c0d4e3cf422 |
View Raw JSON Data
{
  "block": 69109450,
  "op": [
    "delegate_vesting_shares",
    {
      "delegatee": "altlash",
      "delegator": "steem",
      "vesting_shares": "7847.788061 VESTS"
    }
  ],
  "op_in_trx": 0,
  "timestamp": "2022-11-03T08:30:48",
  "trx_id": "5128403695102be3781021a482981c0d4e3cf422",
  "trx_in_block": 0,
  "virtual_op": 0
}2022/01/17 08:03:39
2022/01/17 08:03:39
| delegatee | altlash |
| delegator | steem |
| vesting shares | 8068.321292 VESTS |
| Transaction Info | Block #60805961/Trx a25ca5629fb2eaddce8b5be2a7b50865015c5b4d |
View Raw JSON Data
{
  "block": 60805961,
  "op": [
    "delegate_vesting_shares",
    {
      "delegatee": "altlash",
      "delegator": "steem",
      "vesting_shares": "8068.321292 VESTS"
    }
  ],
  "op_in_trx": 0,
  "timestamp": "2022-01-17T08:03:39",
  "trx_id": "a25ca5629fb2eaddce8b5be2a7b50865015c5b4d",
  "trx_in_block": 23,
  "virtual_op": 0
}2021/06/13 22:06:06
2021/06/13 22:06:06
| delegatee | altlash |
| delegator | steem |
| vesting shares | 8252.089950 VESTS |
| Transaction Info | Block #54604495/Trx 6ccc14b2b01e2140ca6339a7c38c81c326d1b797 |
View Raw JSON Data
{
  "block": 54604495,
  "op": [
    "delegate_vesting_shares",
    {
      "delegatee": "altlash",
      "delegator": "steem",
      "vesting_shares": "8252.089950 VESTS"
    }
  ],
  "op_in_trx": 0,
  "timestamp": "2021-06-13T22:06:06",
  "trx_id": "6ccc14b2b01e2140ca6339a7c38c81c326d1b797",
  "trx_in_block": 3,
  "virtual_op": 0
}britvrupvoted (100.00%) @altlash / build-with-me-episode-0-hello-world-introductions2021/01/29 03:54:42
britvrupvoted (100.00%) @altlash / build-with-me-episode-0-hello-world-introductions
2021/01/29 03:54:42
| author | altlash |
| permlink | build-with-me-episode-0-hello-world-introductions |
| voter | britvr |
| weight | 10000 (100.00%) |
| Transaction Info | Block #50740318/Trx 3d6f6df759a4e897abbc036609fe0d7a3f66a98a |
View Raw JSON Data
{
  "block": 50740318,
  "op": [
    "vote",
    {
      "author": "altlash",
      "permlink": "build-with-me-episode-0-hello-world-introductions",
      "voter": "britvr",
      "weight": 10000
    }
  ],
  "op_in_trx": 0,
  "timestamp": "2021-01-29T03:54:42",
  "trx_id": "3d6f6df759a4e897abbc036609fe0d7a3f66a98a",
  "trx_in_block": 11,
  "virtual_op": 0
}2020/12/11 08:28:57
2020/12/11 08:28:57
| delegatee | altlash |
| delegator | steem |
| vesting shares | 8439.511924 VESTS |
| Transaction Info | Block #49352064/Trx 6d7b62485d68b0aaa664202b4d517a45428b64a7 |
View Raw JSON Data
{
  "block": 49352064,
  "op": [
    "delegate_vesting_shares",
    {
      "delegatee": "altlash",
      "delegator": "steem",
      "vesting_shares": "8439.511924 VESTS"
    }
  ],
  "op_in_trx": 0,
  "timestamp": "2020-12-11T08:28:57",
  "trx_id": "6d7b62485d68b0aaa664202b4d517a45428b64a7",
  "trx_in_block": 0,
  "virtual_op": 0
}2020/12/06 02:06:24
2020/12/06 02:06:24
| delegatee | altlash |
| delegator | steem |
| vesting shares | 1912.543513 VESTS |
| Transaction Info | Block #49203634/Trx 97ae7efc4ef879de275ae0854ad6dea676bcc114 |
View Raw JSON Data
{
  "block": 49203634,
  "op": [
    "delegate_vesting_shares",
    {
      "delegatee": "altlash",
      "delegator": "steem",
      "vesting_shares": "1912.543513 VESTS"
    }
  ],
  "op_in_trx": 0,
  "timestamp": "2020-12-06T02:06:24",
  "trx_id": "97ae7efc4ef879de275ae0854ad6dea676bcc114",
  "trx_in_block": 2,
  "virtual_op": 0
}2020/06/10 03:47:21
2020/06/10 03:47:21
| delegatee | altlash |
| delegator | steem |
| vesting shares | 8626.222560 VESTS |
| Transaction Info | Block #44118505/Trx b85ab475e8cdb70c8f8a249a1507b88ec5b20a1c |
View Raw JSON Data
{
  "block": 44118505,
  "op": [
    "delegate_vesting_shares",
    {
      "delegatee": "altlash",
      "delegator": "steem",
      "vesting_shares": "8626.222560 VESTS"
    }
  ],
  "op_in_trx": 0,
  "timestamp": "2020-06-10T03:47:21",
  "trx_id": "b85ab475e8cdb70c8f8a249a1507b88ec5b20a1c",
  "trx_in_block": 2,
  "virtual_op": 0
}2020/05/09 03:01:03
2020/05/09 03:01:03
| delegatee | altlash |
| delegator | steem |
| vesting shares | 28739.378192 VESTS |
| Transaction Info | Block #43213844/Trx df3ed8b51347d079ae918b30e7e6c1ef1ac58267 |
View Raw JSON Data
{
  "block": 43213844,
  "op": [
    "delegate_vesting_shares",
    {
      "delegatee": "altlash",
      "delegator": "steem",
      "vesting_shares": "28739.378192 VESTS"
    }
  ],
  "op_in_trx": 0,
  "timestamp": "2020-05-09T03:01:03",
  "trx_id": "df3ed8b51347d079ae918b30e7e6c1ef1ac58267",
  "trx_in_block": 13,
  "virtual_op": 0
}2020/05/08 06:12:21
2020/05/08 06:12:21
| delegatee | altlash |
| delegator | steem |
| vesting shares | 5301.172865 VESTS |
| Transaction Info | Block #43189456/Trx 2670d35d4996293a770d0782fc406672f7eb1666 |
View Raw JSON Data
{
  "block": 43189456,
  "op": [
    "delegate_vesting_shares",
    {
      "delegatee": "altlash",
      "delegator": "steem",
      "vesting_shares": "5301.172865 VESTS"
    }
  ],
  "op_in_trx": 0,
  "timestamp": "2020-05-08T06:12:21",
  "trx_id": "2670d35d4996293a770d0782fc406672f7eb1666",
  "trx_in_block": 2,
  "virtual_op": 0
}altlashcustom json: notify2020/03/13 03:00:03
altlashcustom json: notify
2020/03/13 03:00:03
| id | notify |
| json | ["setLastRead",{"date":"2020-03-13T03:00:03"}] |
| required auths | [] |
| required posting auths | ["altlash"] |
| Transaction Info | Block #41604306/Trx c47f176f68d8a9b59bd81ff5b298fc0f040de87f |
View Raw JSON Data
{
  "block": 41604306,
  "op": [
    "custom_json",
    {
      "id": "notify",
      "json": "[\"setLastRead\",{\"date\":\"2020-03-13T03:00:03\"}]",
      "required_auths": [],
      "required_posting_auths": [
        "altlash"
      ]
    }
  ],
  "op_in_trx": 0,
  "timestamp": "2020-03-13T03:00:03",
  "trx_id": "c47f176f68d8a9b59bd81ff5b298fc0f040de87f",
  "trx_in_block": 32,
  "virtual_op": 0
}2020/03/11 05:44:24
2020/03/11 05:44:24
| author | steemitboard |
| body | Congratulations @altlash! You have completed the following achievement on the Steem blockchain and have been rewarded with new badge(s) : <table><tr><td><img src="https://steemitimages.com/60x70/http://steemitboard.com/@altlash/votes.png?202003110535"></td><td>You distributed more than 50 upvotes. Your next target is to reach 100 upvotes.</td></tr> </table> <sub>_You can view [your badges on your Steem Board](https://steemitboard.com/@altlash) and compare to others on the [Steem Ranking](https://steemitboard.com/ranking/index.php?name=altlash)_</sub> <sub>_If you no longer want to receive notifications, reply to this comment with the word_ `STOP`</sub> **Do not miss the last post from @steemitboard:** <table><tr><td><a href="https://steemit.com/steemitboard/@steemitboard/downvote-challenge-add-up-to-3-funny-badges-to-your-board"><img src="https://steemitimages.com/64x128/https://steemitimages.com/0x0/"></a></td><td><a href="https://steemit.com/steemitboard/@steemitboard/downvote-challenge-add-up-to-3-funny-badges-to-your-board">Downvote challenge - Add up to 3 funny badges to your board</a></td></tr><tr><td><a href="https://steemit.com/steemitboard/@steemitboard/use-your-witness-votes-and-get-the-community-badge"><img src="https://steemitimages.com/64x128/https://cdn.steemitimages.com/DQmTugCUsoXX762vg1CuHRrpnPbfnjPogp8iCGv7F2kSVuj/image.png"></a></td><td><a href="https://steemit.com/steemitboard/@steemitboard/use-your-witness-votes-and-get-the-community-badge">Use your witness votes and get the Community Badge</a></td></tr></table> ###### [Vote for @Steemitboard as a witness](https://v2.steemconnect.com/sign/account-witness-vote?witness=steemitboard&approve=1) to get one more award and increased upvotes! |
| json metadata | {"image":["https://steemitboard.com/img/notify.png"]} |
| parent author | altlash |
| parent permlink | episode-2-part-1-aws-iam-groups-and-users-setup |
| permlink | steemitboard-notify-altlash-20200311t054426000z |
| title | |
| Transaction Info | Block #41550095/Trx 537422eb1c80792f9835a865f1ef82ae5c7ee84e |
View Raw JSON Data
{
"block": 41550095,
"op": [
"comment",
{
"author": "steemitboard",
"body": "Congratulations @altlash! You have completed the following achievement on the Steem blockchain and have been rewarded with new badge(s) :\n\n<table><tr><td><img src=\"https://steemitimages.com/60x70/http://steemitboard.com/@altlash/votes.png?202003110535\"></td><td>You distributed more than 50 upvotes. Your next target is to reach 100 upvotes.</td></tr>\n</table>\n\n<sub>_You can view [your badges on your Steem Board](https://steemitboard.com/@altlash) and compare to others on the [Steem Ranking](https://steemitboard.com/ranking/index.php?name=altlash)_</sub>\n<sub>_If you no longer want to receive notifications, reply to this comment with the word_ `STOP`</sub>\n\n\n\n**Do not miss the last post from @steemitboard:**\n<table><tr><td><a href=\"https://steemit.com/steemitboard/@steemitboard/downvote-challenge-add-up-to-3-funny-badges-to-your-board\"><img src=\"https://steemitimages.com/64x128/https://steemitimages.com/0x0/\"></a></td><td><a href=\"https://steemit.com/steemitboard/@steemitboard/downvote-challenge-add-up-to-3-funny-badges-to-your-board\">Downvote challenge - Add up to 3 funny badges to your board</a></td></tr><tr><td><a href=\"https://steemit.com/steemitboard/@steemitboard/use-your-witness-votes-and-get-the-community-badge\"><img src=\"https://steemitimages.com/64x128/https://cdn.steemitimages.com/DQmTugCUsoXX762vg1CuHRrpnPbfnjPogp8iCGv7F2kSVuj/image.png\"></a></td><td><a href=\"https://steemit.com/steemitboard/@steemitboard/use-your-witness-votes-and-get-the-community-badge\">Use your witness votes and get the Community Badge</a></td></tr></table>\n\n###### [Vote for @Steemitboard as a witness](https://v2.steemconnect.com/sign/account-witness-vote?witness=steemitboard&approve=1) to get one more award and increased upvotes!",
"json_metadata": "{\"image\":[\"https://steemitboard.com/img/notify.png\"]}",
"parent_author": "altlash",
"parent_permlink": "episode-2-part-1-aws-iam-groups-and-users-setup",
"permlink": "steemitboard-notify-altlash-20200311t054426000z",
"title": ""
}
],
"op_in_trx": 0,
"timestamp": "2020-03-11T05:44:24",
"trx_id": "537422eb1c80792f9835a865f1ef82ae5c7ee84e",
"trx_in_block": 19,
"virtual_op": 0
}altlashupvoted (100.00%) @altlash / episode-2-part-1-aws-iam-groups-and-users-setup2020/03/11 03:09:27
altlashupvoted (100.00%) @altlash / episode-2-part-1-aws-iam-groups-and-users-setup
2020/03/11 03:09:27
| author | altlash |
| permlink | episode-2-part-1-aws-iam-groups-and-users-setup |
| voter | altlash |
| weight | 10000 (100.00%) |
| Transaction Info | Block #41547000/Trx 769e27bde67fd707249219a3a4e18fcf00030d35 |
View Raw JSON Data
{
  "block": 41547000,
  "op": [
    "vote",
    {
      "author": "altlash",
      "permlink": "episode-2-part-1-aws-iam-groups-and-users-setup",
      "voter": "altlash",
      "weight": 10000
    }
  ],
  "op_in_trx": 0,
  "timestamp": "2020-03-11T03:09:27",
  "trx_id": "769e27bde67fd707249219a3a4e18fcf00030d35",
  "trx_in_block": 8,
  "virtual_op": 0
}altlashupdated options for episode-2-part-1-aws-iam-groups-and-users-setup2020/03/11 03:08:54
altlashupdated options for episode-2-part-1-aws-iam-groups-and-users-setup
2020/03/11 03:08:54
| allow curation rewards | true |
| allow votes | true |
| author | altlash |
| extensions | [] |
| max accepted payout | 1000000.000 SBD |
| percent steem dollars | 0 |
| permlink | episode-2-part-1-aws-iam-groups-and-users-setup |
| Transaction Info | Block #41546989/Trx 9df3907dfae4c616cea0c136115821e742668c94 |
View Raw JSON Data
{
  "block": 41546989,
  "op": [
    "comment_options",
    {
      "allow_curation_rewards": true,
      "allow_votes": true,
      "author": "altlash",
      "extensions": [],
      "max_accepted_payout": "1000000.000 SBD",
      "percent_steem_dollars": 0,
      "permlink": "episode-2-part-1-aws-iam-groups-and-users-setup"
    }
  ],
  "op_in_trx": 0,
  "timestamp": "2020-03-11T03:08:54",
  "trx_id": "9df3907dfae4c616cea0c136115821e742668c94",
  "trx_in_block": 7,
  "virtual_op": 0
}altlashpublished a new post: episode-2-part-1-aws-iam-groups-and-users-setup2020/03/11 03:08:54
altlashpublished a new post: episode-2-part-1-aws-iam-groups-and-users-setup
2020/03/11 03:08:54
| author | altlash |
| body | 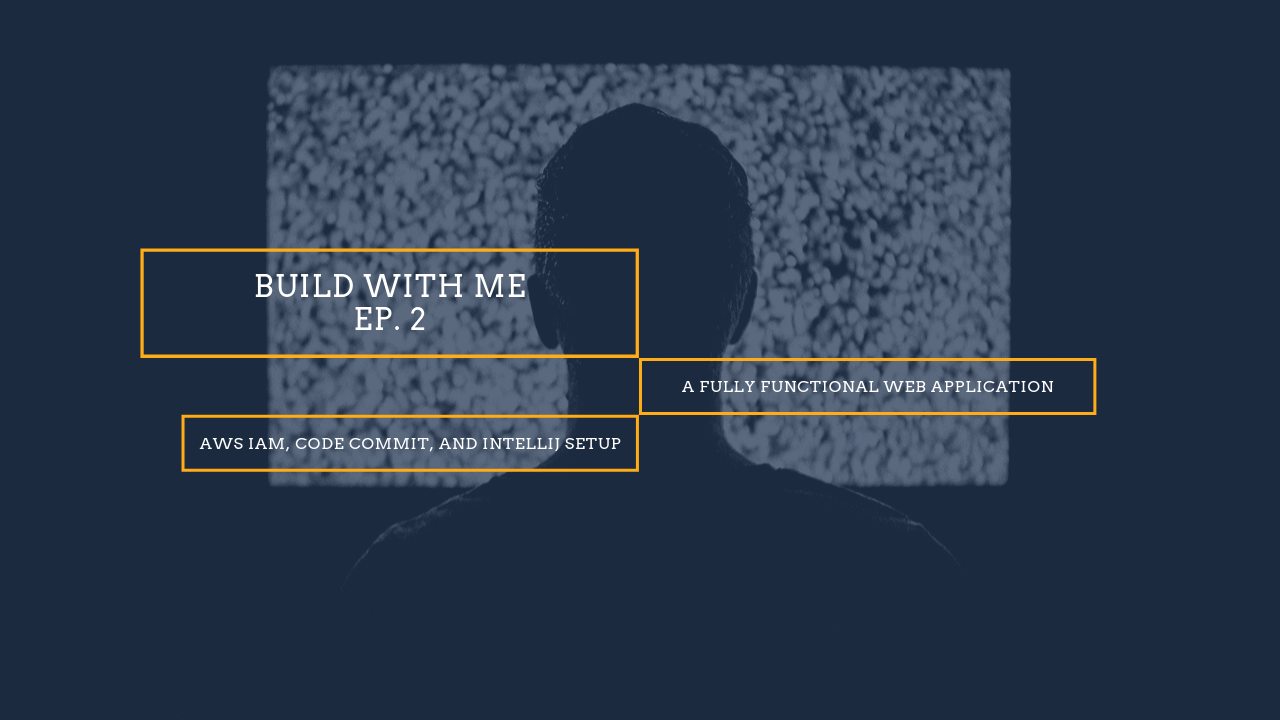 Official Blog: https://altlash.com YouTube channel: https://www.youtube.com/channel/UCz01y1iZGnSbk7RvTb6Lz6A (These episodes are all on there!) In the previous blog/video we created a fresh AWS account. Now, lets start to use that account by setting up some security, as well as getting a repository and development environment set up for us to start coding! When you create a new account, the email/password you used to create the account is your “Root” account. This is a very special account, and something we want to keep secure. The root account has absolute control over every service, setting, configuration, etc. So, if your root account is compromised, then a hacker can completely wreck everything you have on AWS. You cannot reduce the permissions to the root account, and there is limited support that AWS can give if your account is compromised. So, the first order of business is to take steps that will ensure this doesn’t happen. Go ahead and log into the AWS Console with the root account. This should be the only time you’ll log in as root, as long as you follow the steps outlined below. From the Console dashboard, search for IAM in the search bar to go to the IAM service. One of the first things you’ll notice is a Security Status section that calls out a number of things we can do to make our account more secure. 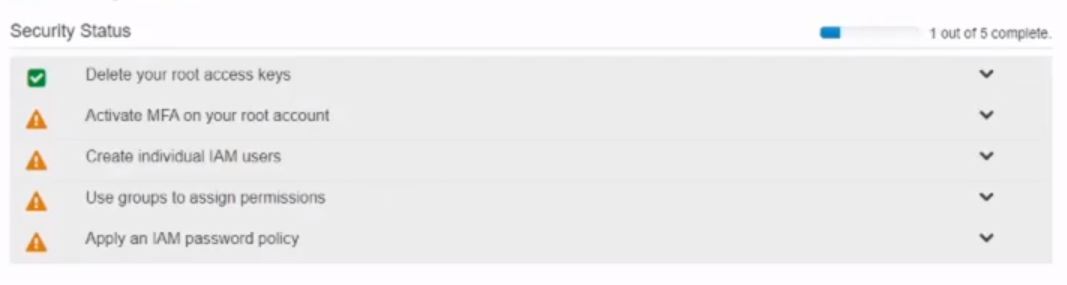 The idea with security in AWS is that you have Groups, Users, Roles, and Policies. Policies are configurations that specify access to specific functions and services within AWS. For instance, you can have a policy that allows EC2 instances to communicate with an Oracle database. Or, you can have policies that allow users to read from S3 buckets, but not create or write to those buckets. There are a number of policies that AWS has already created and manages that you can pick from, or you can create your own policies for more defined access. You may also create a policy that contains multiple accesses in a single policy, such as having an admin policy that allow admin actions across a number of services. Users, as the name suggests, are, well, users. These accounts can be individual, physical users that can sign into AWS to do different things, such as admins. Or, it can be functional users that can be set up to perform different actions. You can attach policies directly to the user, but that is not recommended. A better approach is to use Groups. Groups are a set of users that are bundled together, and have policies attached to the group as a whole. This is a much better approach to giving permissions to services, because if you need to change permissions you will not have to go to each user, but rather just update the policy attached to the group and have that change be applied to all users in the group. Roles is another mechanism that can be used to give permission and access to different actions within AWS. A role is more temporary and is used on a when-needed basis. You are also able to attach policies to roles as well. A good use of roles is for communications between services. For instance, an admin can delegate a role to a build pipeline that will give the pipeline access to build and deploy our code to different servers. So, lets actually do something with that knowledge! First, we will create a couple of groups. From the IAM Dashboard, go to the Groups section from the left hand navigation and select Create New Group button.  The first group we will create is for Admins. So, for Group Name, input Admin: 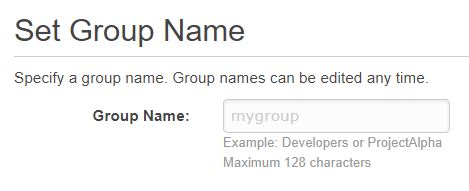 The next step is to attach policies for the group. The Admin group will need the following policy: AdministratorAccess The last step needed for creating a group is to Review your settings. After you are satisfied that everything looks good, hit Create Group! A good rule-of-thumb when thinking through security is to separate out accounts. We have an admin account, which is good for admin functions. But, we can create a second group that will have only access to Developer functions, such as to read and write to the AWS repository service CodeCommit. Let’s go ahead and create that second group with the following information: Group Name: Developers Policy: AWSCodeCommitFullAccess Now that we have a couple of groups, let’s create new Users for those groups. The first User we will create will be the admin user. Navigate to the Users section of IAM following the link on the left-hand navigation, and choose “Add User” from the top.  From here, we will need to start with supplying a user name and access type. For User name we will use “admin”, and access type we will go with is “AWS Management Console access”. Select that options will allow further fields to be filled in for the new user’s password. You can either supply a password, or have AWS generate a password for you. Further, you can force the user to reset their password the first time they log into the console if you wish. For us, we’ll have AWS generate a password for us, and not force a password reset after logging in. I’ll keep the password secure myself, and the auto generated password would be much more random than what I would come up with. 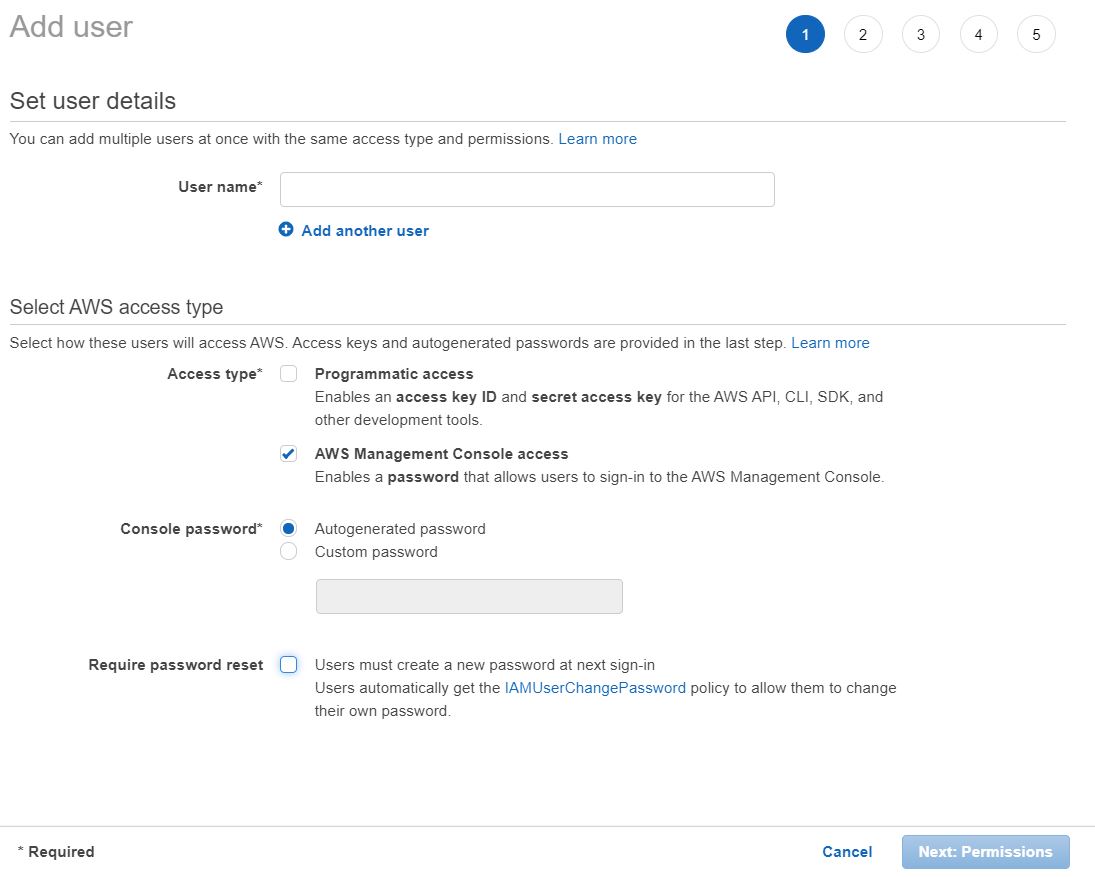 The next section is to add permissions for the user that you are creating. This is where we can select the group we have created for Admins. There are also options to select policies to attach to the user directly, or copy all of the permissions from an existing user. 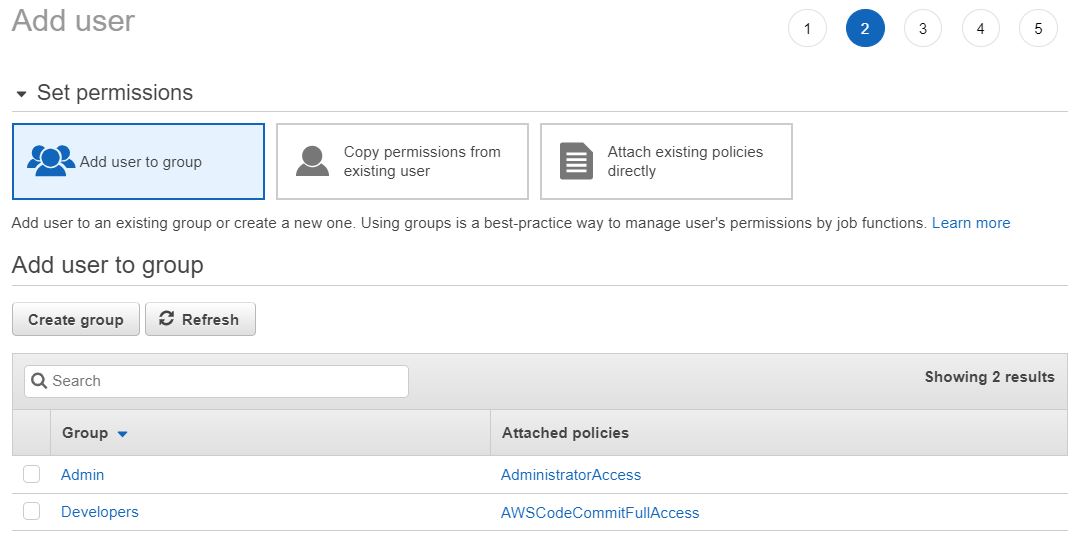 The next section is Tags, which we could use to define different things in AWS. Pretty much every service allows you to add tags in key/value pairs. Tags are optional, but could be used to find, filter, or generate reports. For instance, you can create a ‘role’ tag, and then search for all users where the role is ‘admin’ to find all of your admin users. We won’t use tags, so you can skip this step. Finally, there is a review step that will show all of the options you’ve gone with in creating the user. After looking it over, go ahead and create your first user. The next screen that comes up after your user is created is their password. You can also email login instructions to the user if you want, but we don’t need to do that. Go ahead and copy the password over to somewhere secure for when you need to log in as an admin. Now that we have our first user created, let’s go ahead and create a second user. Follow the same steps as above, but for the User name I use “coder”, and for the Permissions page, use the group “Developers”. After reviewing and creating your second user, go ahead and copy this password over to a secure area as well. The final thing we need in order to log into AWS with these users is our account id number. When you don’t log into AWS as the root user, you will need the account id number, username, and password. You can get this information by go to the top right corner where you have your name, and selecting “My Account”. This should redirect you to a new page that contains your account id. Go ahead and copy this last bit of data over to a secure location. Before moving on from the IAM service, there are 2 more recommendations that you are given. The first is to activate MFA on your root account. MFA is Multi Factor Authentication. It is pretty simple to set up, but I don’t show how to do it on screen. You can download an app, such as Google Authenticator, to your smart phone. Then, you can go through the steps in the AWS IAM service page to link your root account to your authenticator app. The authenticator app will display a random set of numbers that will time out and refresh every min. Now, if you need to log in as root again, you will need to use your email/password as before, and also open the authenticator app to put in the random number that shows. This will make it much harder for hackers to compromise our AWS account, even if they have your email and password!! The second task left that IAM wants us to do is to create a password policy. I also did this off screen, but it is pretty simple to set up. Just select that missing piece from the IAM dashboard, and there should be a button for “Manage Password Policy” that you can follow. Since this was a much longer video, I’m going to split it up into a couple of blog posts. For this post, you should have all of the IAM steps complete with a couple of new groups and users, as well as a password policy and MFA set up for the root account. In the next blog post we will start to set up our development environment. We’ll create a new SSH key and associate that to our “coder” user. We’ll create a new repository in AWS and clone that into a new IntelliJ project with our SSH keys. Finally, we’ll get an initial framework that IntelliJ generated for us pushed to CodeCommit. I hope you guys were able to follow along in getting our AWS account more secure with Groups, Users, and Policies. Let me know in the comments below what you think, and if you run into any issues! |
| json metadata | {"tags":["java","buildwithme","aws"],"image":["https://cdn.steemitimages.com/DQmNofWm1ejw4jS3mYSAXuKSSAsM9rZ7cUFeMNXsT4vGDAT/Build%20With%20Me%20EP%202.png","https://cdn.steemitimages.com/DQmQrvjGY73tNj1aaaW4ThJ1RtvWxCxs76r3gCoFEfwWomV/screen_1.JPG","https://cdn.steemitimages.com/DQmQMhAF4mgW6FmyhEKqvMjSY2K9iWUCa7xvfeBoVbYZqM3/screen_2.JPG","https://cdn.steemitimages.com/DQmaxp6SCkmrdnuErGEpSoAhzkbwg3dFgCFdfseJfjjXeMK/screen_3.JPG","https://cdn.steemitimages.com/DQmYjpE7pGNuat8UM5CKi5gxNKvekjDJW75tr7uLb9cTDzy/screen_4.JPG","https://cdn.steemitimages.com/DQmdaifqhzQi3HBsdRA16MpSgpf3q3PButUGYbomPLrdAE9/screen_5_updated.JPG","https://cdn.steemitimages.com/DQmSbEa4nPmtZg9521xJ4GjTWMUGi3ztpojqcRZQaTDxi4D/screen_6.JPG"],"links":["https://altlash.com","https://www.youtube.com/channel/UCz01y1iZGnSbk7RvTb6Lz6A"],"app":"steemit/0.2","format":"markdown"} |
| parent author | |
| parent permlink | java |
| permlink | episode-2-part-1-aws-iam-groups-and-users-setup |
| title | Episode 2 (Part 1): AWS IAM Groups and Users Setup |
| Transaction Info | Block #41546989/Trx 9df3907dfae4c616cea0c136115821e742668c94 |
View Raw JSON Data
{
"block": 41546989,
"op": [
"comment",
{
"author": "altlash",
"body": "\n\nOfficial Blog: https://altlash.com\nYouTube channel: https://www.youtube.com/channel/UCz01y1iZGnSbk7RvTb6Lz6A (These episodes are all on there!)\n\nIn the previous blog/video we created a fresh AWS account. Now, lets start to use that account by setting up some security, as well as getting a repository and development environment set up for us to start coding!\n\nWhen you create a new account, the email/password you used to create the account is your “Root” account. This is a very special account, and something we want to keep secure. The root account has absolute control over every service, setting, configuration, etc. So, if your root account is compromised, then a hacker can completely wreck everything you have on AWS. You cannot reduce the permissions to the root account, and there is limited support that AWS can give if your account is compromised. So, the first order of business is to take steps that will ensure this doesn’t happen.\n\nGo ahead and log into the AWS Console with the root account. This should be the only time you’ll log in as root, as long as you follow the steps outlined below.\n\nFrom the Console dashboard, search for IAM in the search bar to go to the IAM service. One of the first things you’ll notice is a Security Status section that calls out a number of things we can do to make our account more secure.\n\n\n\n\nThe idea with security in AWS is that you have Groups, Users, Roles, and Policies. Policies are configurations that specify access to specific functions and services within AWS. For instance, you can have a policy that allows EC2 instances to communicate with an Oracle database. Or, you can have policies that allow users to read from S3 buckets, but not create or write to those buckets. There are a number of policies that AWS has already created and manages that you can pick from, or you can create your own policies for more defined access. You may also create a policy that contains multiple accesses in a single policy, such as having an admin policy that allow admin actions across a number of services.\n\nUsers, as the name suggests, are, well, users. These accounts can be individual, physical users that can sign into AWS to do different things, such as admins. Or, it can be functional users that can be set up to perform different actions. You can attach policies directly to the user, but that is not recommended.\n\nA better approach is to use Groups. Groups are a set of users that are bundled together, and have policies attached to the group as a whole. This is a much better approach to giving permissions to services, because if you need to change permissions you will not have to go to each user, but rather just update the policy attached to the group and have that change be applied to all users in the group.\n\nRoles is another mechanism that can be used to give permission and access to different actions within AWS. A role is more temporary and is used on a when-needed basis. You are also able to attach policies to roles as well. A good use of roles is for communications between services. For instance, an admin can delegate a role to a build pipeline that will give the pipeline access to build and deploy our code to different servers.\n\nSo, lets actually do something with that knowledge! First, we will create a couple of groups. From the IAM Dashboard, go to the Groups section from the left hand navigation and select Create New Group button.\n\n\n\n\nThe first group we will create is for Admins. So, for Group Name, input Admin:\n\n\n\n\nThe next step is to attach policies for the group. The Admin group will need the following policy: AdministratorAccess\n\nThe last step needed for creating a group is to Review your settings. After you are satisfied that everything looks good, hit Create Group!\n\nA good rule-of-thumb when thinking through security is to separate out accounts. We have an admin account, which is good for admin functions. But, we can create a second group that will have only access to Developer functions, such as to read and write to the AWS repository service CodeCommit.\n\nLet’s go ahead and create that second group with the following information:\n\nGroup Name: Developers\n\nPolicy: AWSCodeCommitFullAccess\n\nNow that we have a couple of groups, let’s create new Users for those groups. The first User we will create will be the admin user. Navigate to the Users section of IAM following the link on the left-hand navigation, and choose “Add User” from the top.\n\n\n\n\nFrom here, we will need to start with supplying a user name and access type. For User name we will use “admin”, and access type we will go with is “AWS Management Console access”. Select that options will allow further fields to be filled in for the new user’s password. You can either supply a password, or have AWS generate a password for you. Further, you can force the user to reset their password the first time they log into the console if you wish. For us, we’ll have AWS generate a password for us, and not force a password reset after logging in. I’ll keep the password secure myself, and the auto generated password would be much more random than what I would come up with.\n\n\n\n\n\nThe next section is to add permissions for the user that you are creating. This is where we can select the group we have created for Admins. There are also options to select policies to attach to the user directly, or copy all of the permissions from an existing user.\n\n\n\n\n\nThe next section is Tags, which we could use to define different things in AWS. Pretty much every service allows you to add tags in key/value pairs. Tags are optional, but could be used to find, filter, or generate reports. For instance, you can create a ‘role’ tag, and then search for all users where the role is ‘admin’ to find all of your admin users. We won’t use tags, so you can skip this step.\n\nFinally, there is a review step that will show all of the options you’ve gone with in creating the user. After looking it over, go ahead and create your first user. The next screen that comes up after your user is created is their password. You can also email login instructions to the user if you want, but we don’t need to do that. Go ahead and copy the password over to somewhere secure for when you need to log in as an admin.\n\nNow that we have our first user created, let’s go ahead and create a second user. Follow the same steps as above, but for the User name I use “coder”, and for the Permissions page, use the group “Developers”. After reviewing and creating your second user, go ahead and copy this password over to a secure area as well.\n\nThe final thing we need in order to log into AWS with these users is our account id number. When you don’t log into AWS as the root user, you will need the account id number, username, and password. You can get this information by go to the top right corner where you have your name, and selecting “My Account”. This should redirect you to a new page that contains your account id. Go ahead and copy this last bit of data over to a secure location.\n\nBefore moving on from the IAM service, there are 2 more recommendations that you are given. The first is to activate MFA on your root account. MFA is Multi Factor Authentication. It is pretty simple to set up, but I don’t show how to do it on screen. You can download an app, such as Google Authenticator, to your smart phone. Then, you can go through the steps in the AWS IAM service page to link your root account to your authenticator app. The authenticator app will display a random set of numbers that will time out and refresh every min. Now, if you need to log in as root again, you will need to use your email/password as before, and also open the authenticator app to put in the random number that shows. This will make it much harder for hackers to compromise our AWS account, even if they have your email and password!!\n\nThe second task left that IAM wants us to do is to create a password policy. I also did this off screen, but it is pretty simple to set up. Just select that missing piece from the IAM dashboard, and there should be a button for “Manage Password Policy” that you can follow.\n\nSince this was a much longer video, I’m going to split it up into a couple of blog posts. For this post, you should have all of the IAM steps complete with a couple of new groups and users, as well as a password policy and MFA set up for the root account. In the next blog post we will start to set up our development environment. We’ll create a new SSH key and associate that to our “coder” user. We’ll create a new repository in AWS and clone that into a new IntelliJ project with our SSH keys. Finally, we’ll get an initial framework that IntelliJ generated for us pushed to CodeCommit.\n\nI hope you guys were able to follow along in getting our AWS account more secure with Groups, Users, and Policies. Let me know in the comments below what you think, and if you run into any issues!",
"json_metadata": "{\"tags\":[\"java\",\"buildwithme\",\"aws\"],\"image\":[\"https://cdn.steemitimages.com/DQmNofWm1ejw4jS3mYSAXuKSSAsM9rZ7cUFeMNXsT4vGDAT/Build%20With%20Me%20EP%202.png\",\"https://cdn.steemitimages.com/DQmQrvjGY73tNj1aaaW4ThJ1RtvWxCxs76r3gCoFEfwWomV/screen_1.JPG\",\"https://cdn.steemitimages.com/DQmQMhAF4mgW6FmyhEKqvMjSY2K9iWUCa7xvfeBoVbYZqM3/screen_2.JPG\",\"https://cdn.steemitimages.com/DQmaxp6SCkmrdnuErGEpSoAhzkbwg3dFgCFdfseJfjjXeMK/screen_3.JPG\",\"https://cdn.steemitimages.com/DQmYjpE7pGNuat8UM5CKi5gxNKvekjDJW75tr7uLb9cTDzy/screen_4.JPG\",\"https://cdn.steemitimages.com/DQmdaifqhzQi3HBsdRA16MpSgpf3q3PButUGYbomPLrdAE9/screen_5_updated.JPG\",\"https://cdn.steemitimages.com/DQmSbEa4nPmtZg9521xJ4GjTWMUGi3ztpojqcRZQaTDxi4D/screen_6.JPG\"],\"links\":[\"https://altlash.com\",\"https://www.youtube.com/channel/UCz01y1iZGnSbk7RvTb6Lz6A\"],\"app\":\"steemit/0.2\",\"format\":\"markdown\"}",
"parent_author": "",
"parent_permlink": "java",
"permlink": "episode-2-part-1-aws-iam-groups-and-users-setup",
"title": "Episode 2 (Part 1): AWS IAM Groups and Users Setup"
}
],
"op_in_trx": 0,
"timestamp": "2020-03-11T03:08:54",
"trx_id": "9df3907dfae4c616cea0c136115821e742668c94",
"trx_in_block": 7,
"virtual_op": 0
}filipinoupvoted (10.00%) @altlash / episode-1-aws-signup2020/03/06 12:43:12
filipinoupvoted (10.00%) @altlash / episode-1-aws-signup
2020/03/06 12:43:12
| author | altlash |
| permlink | episode-1-aws-signup |
| voter | filipino |
| weight | 1000 (10.00%) |
| Transaction Info | Block #41414775/Trx ec09de7c8d373f02cbd583dbfe2f2ac52404d625 |
View Raw JSON Data
{
  "block": 41414775,
  "op": [
    "vote",
    {
      "author": "altlash",
      "permlink": "episode-1-aws-signup",
      "voter": "filipino",
      "weight": 1000
    }
  ],
  "op_in_trx": 0,
  "timestamp": "2020-03-06T12:43:12",
  "trx_id": "ec09de7c8d373f02cbd583dbfe2f2ac52404d625",
  "trx_in_block": 9,
  "virtual_op": 0
}altlashupvoted (100.00%) @altlash / episode-1-aws-signup2020/03/06 04:16:39
altlashupvoted (100.00%) @altlash / episode-1-aws-signup
2020/03/06 04:16:39
| author | altlash |
| permlink | episode-1-aws-signup |
| voter | altlash |
| weight | 10000 (100.00%) |
| Transaction Info | Block #41404673/Trx 1ed9eaa91e42fa92a08dc60ccaf613335e01590a |
View Raw JSON Data
{
  "block": 41404673,
  "op": [
    "vote",
    {
      "author": "altlash",
      "permlink": "episode-1-aws-signup",
      "voter": "altlash",
      "weight": 10000
    }
  ],
  "op_in_trx": 0,
  "timestamp": "2020-03-06T04:16:39",
  "trx_id": "1ed9eaa91e42fa92a08dc60ccaf613335e01590a",
  "trx_in_block": 12,
  "virtual_op": 0
}altlashupvoted (100.00%) @altlash / build-with-me-episode-0-hello-world-introductions2020/03/06 04:16:36
altlashupvoted (100.00%) @altlash / build-with-me-episode-0-hello-world-introductions
2020/03/06 04:16:36
| author | altlash |
| permlink | build-with-me-episode-0-hello-world-introductions |
| voter | altlash |
| weight | 10000 (100.00%) |
| Transaction Info | Block #41404672/Trx 2bfe69d7a05b6af1415e8266cdc420006a2a0e84 |
View Raw JSON Data
{
  "block": 41404672,
  "op": [
    "vote",
    {
      "author": "altlash",
      "permlink": "build-with-me-episode-0-hello-world-introductions",
      "voter": "altlash",
      "weight": 10000
    }
  ],
  "op_in_trx": 0,
  "timestamp": "2020-03-06T04:16:36",
  "trx_id": "2bfe69d7a05b6af1415e8266cdc420006a2a0e84",
  "trx_in_block": 5,
  "virtual_op": 0
}altlashpublished a new post: episode-1-aws-signup2020/03/06 04:14:51
altlashpublished a new post: episode-1-aws-signup
2020/03/06 04:14:51
| author | altlash |
| body |  Official Blog: https://altlash.com YouTube channel: https://www.youtube.com/channel/UCz01y1iZGnSbk7RvTb6Lz6A (These episodes are all on there!) Before we get into code and development, lets take a moment to go over some of our infrastructure. We are going to want a full web application, so we will need somewhere to host that site for us, plus allow all of the back end operations that we need. For our purposes, AWS will be a great platform to build on top of. They offer a number of services, and even have a 12-month free tier to get your application off the ground. We will utilize this tier and build out a scaled down infrastructure for no cost. Then, when we have everything ready, we can pivot and build up our application by providing resiliency and distribution! Let’s start with creating a new AWS Account. Follow the link below, and there should be a ‘Create a new account’ link at the top. https://aws.amazon.com/console/  Next is a series of steps for normal account creation things. Screenshots came from the video, so there are some blur effects for my personal information. The required fields and steps should be pretty self-explanatory though. 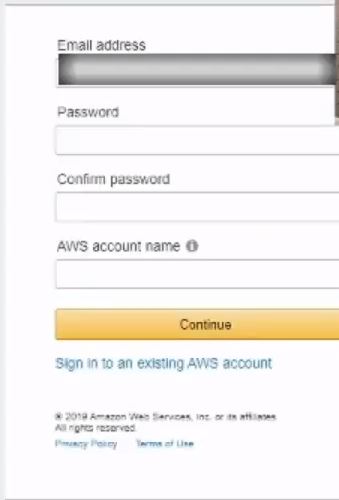 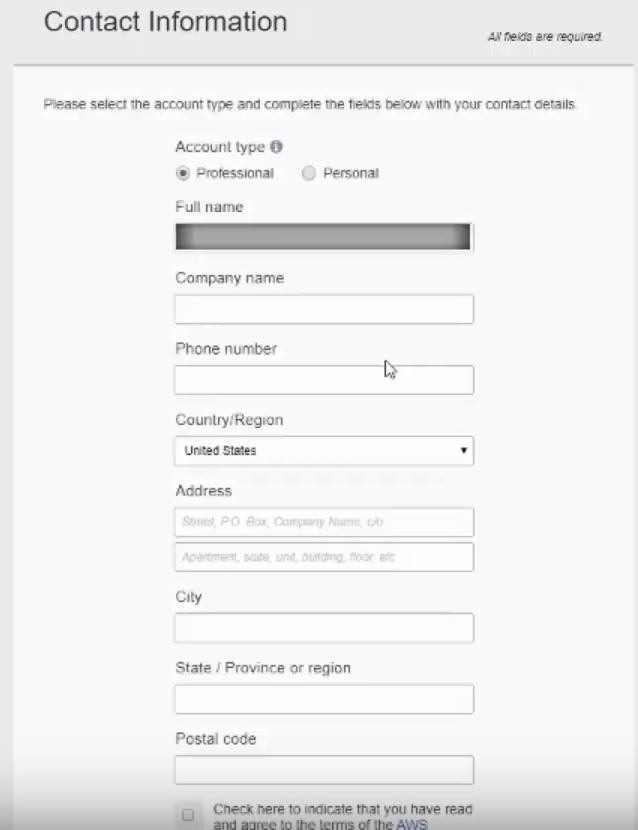 This next section is for payment information. For now, most all of the services we will be using would fall into the AWS Free Tier for 12 months. Some services will be free forever. But, just be aware that if you go over certain thresholds, AWS will charge the card you put in when you sign up. A couple of examples is if you have multiple EC2 instances running concurrently, or if you have more than 90 mins of build time in the CI/CD pipeline we will be building a few episodes from now! A final note about submitting payment information is that AWS will charge a couple of very small amounts to the card to verify it is a legitimate account. You should be reimbursed these charges though. 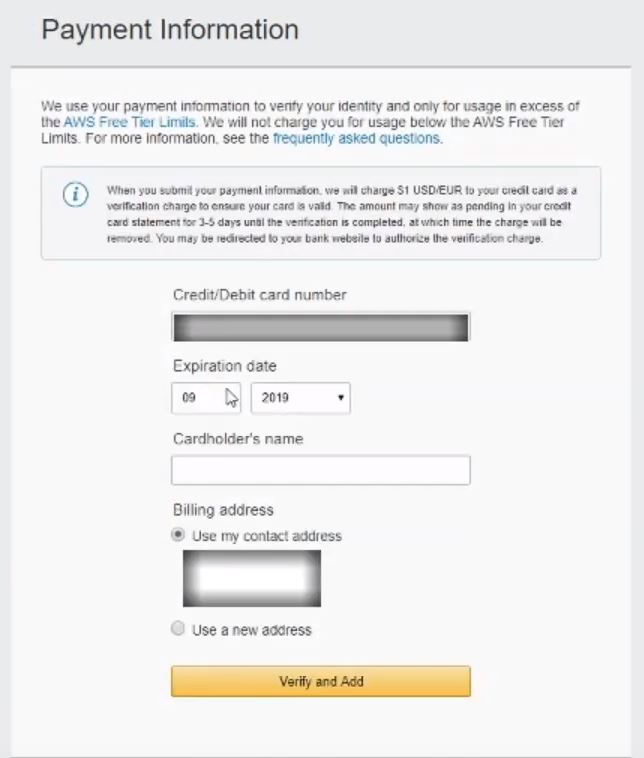 AWS will also need to confirm your identity. The next couple of steps is to add a cell number to your account. They will send a confirmation code that you will need to use in the next screen. 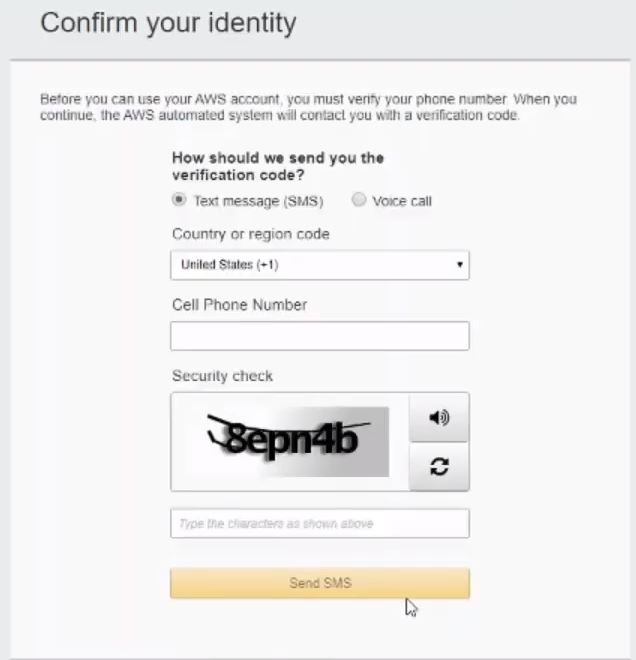  The last step for creating an account is to choose a Support Plan. For now we can stick with a Free Basic Plan.  And with that, you should be all set up! It will take a couple of days for everything to be finalized and set up for you. You are able to immediately log into your account, but there will be a screen that will prevent you from navigating to any services, and will look like this: 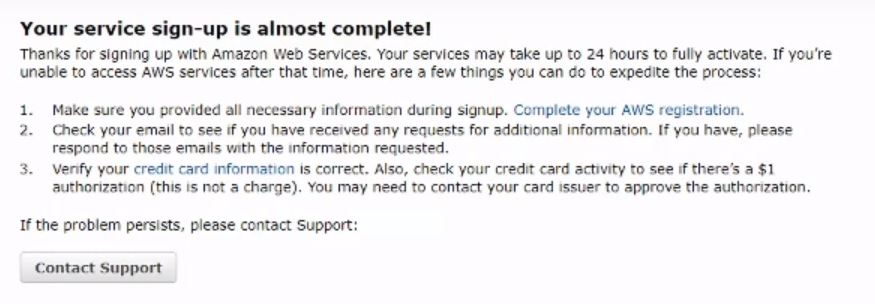 That will wrap up this video! It was super simple to get started on our journey. In our next video we will be do a little bit more in AWS dealing with security, as well as creating a repository from AWS. Finally, we will get our IntelliJ IDE set up for writing some code, and to make sure we can push changes to the AWS repository. I hope you guys are able create an account without any problems! Let me know what you think so far in the comments below. |
| json metadata | {"tags":["java","buildwithme","aws"],"image":["https://cdn.steemitimages.com/DQmNx86J2GvVhLFS1UdNKenR2G3NETG1kyFkEFks3xPHsiX/Build%20With%20Me%20EP%201.png","https://cdn.steemitimages.com/DQmPENcHraBJyNSuEzCk6uyiLi498F4KKx5hn6vkq46QRJu/create_account.JPG","https://cdn.steemitimages.com/DQmZUEBc2uVH2az84oFDr3HHJgxgux5rWbxE3MhPX2c9jbt/screen_1.JPG","https://cdn.steemitimages.com/DQmRMRwbmgSB7YQC4yMzp8pevfbXY844dwD3ScEK892Dfps/screen_2.JPG","https://cdn.steemitimages.com/DQmaFSRy5spxbBagiyPLfuBzEZK2kCgXdpS4yay4heYkZcN/screen_3.JPG","https://cdn.steemitimages.com/DQmXEr7N42aTyTerPZJBqCY6H1cAhsrkDkUyZdm8iSiTfUe/screen_4.JPG","https://cdn.steemitimages.com/DQmUhRZQm7rz7PPaZ1GCez1LN6xKpXraFHpStxce3kstqES/screen_5.JPG","https://cdn.steemitimages.com/DQmRUMvrAvPNHmmzxLQGzpGbBpvD4Yj6K4SEdhnC1b9tKSn/screen_6.JPG","https://cdn.steemitimages.com/DQmbGdJ4z7cY2XbD1wDCGuTPVpnpYP6GCyX1R4M3KqL42g6/screen_7.JPG"],"links":["https://altlash.com","https://www.youtube.com/channel/UCz01y1iZGnSbk7RvTb6Lz6A","https://aws.amazon.com/console/"],"app":"steemit/0.2","format":"markdown"} |
| parent author | |
| parent permlink | java |
| permlink | episode-1-aws-signup |
| title | Episode 1: AWS Signup |
| Transaction Info | Block #41404637/Trx ae3e7c5a9527fad9b4d2e210e8e953d8d5c10565 |
View Raw JSON Data
{
"block": 41404637,
"op": [
"comment",
{
"author": "altlash",
"body": "\n\nOfficial Blog: https://altlash.com\nYouTube channel: https://www.youtube.com/channel/UCz01y1iZGnSbk7RvTb6Lz6A (These episodes are all on there!)\n\nBefore we get into code and development, lets take a moment to go over some of our infrastructure. We are going to want a full web application, so we will need somewhere to host that site for us, plus allow all of the back end operations that we need. For our purposes, AWS will be a great platform to build on top of. They offer a number of services, and even have a 12-month free tier to get your application off the ground. We will utilize this tier and build out a scaled down infrastructure for no cost. Then, when we have everything ready, we can pivot and build up our application by providing resiliency and distribution!\n\nLet’s start with creating a new AWS Account. Follow the link below, and there should be a ‘Create a new account’ link at the top.\n\nhttps://aws.amazon.com/console/\n\n\n\n\nNext is a series of steps for normal account creation things. Screenshots came from the video, so there are some blur effects for my personal information. The required fields and steps should be pretty self-explanatory though.\n\n\n\n\n\n\n\nThis next section is for payment information. For now, most all of the services we will be using would fall into the AWS Free Tier for 12 months. Some services will be free forever. But, just be aware that if you go over certain thresholds, AWS will charge the card you put in when you sign up. A couple of examples is if you have multiple EC2 instances running concurrently, or if you have more than 90 mins of build time in the CI/CD pipeline we will be building a few episodes from now!\n\nA final note about submitting payment information is that AWS will charge a couple of very small amounts to the card to verify it is a legitimate account. You should be reimbursed these charges though.\n\n\n\n\nAWS will also need to confirm your identity. The next couple of steps is to add a cell number to your account. They will send a confirmation code that you will need to use in the next screen.\n\n\n\n\n\n\n\n\n\nThe last step for creating an account is to choose a Support Plan. For now we can stick with a Free Basic Plan.\n\n\n\n\n\nAnd with that, you should be all set up! It will take a couple of days for everything to be finalized and set up for you. You are able to immediately log into your account, but there will be a screen that will prevent you from navigating to any services, and will look like this:\n\n\n\n\nThat will wrap up this video! It was super simple to get started on our journey. In our next video we will be do a little bit more in AWS dealing with security, as well as creating a repository from AWS. Finally, we will get our IntelliJ IDE set up for writing some code, and to make sure we can push changes to the AWS repository.\n\nI hope you guys are able create an account without any problems! Let me know what you think so far in the comments below.",
"json_metadata": "{\"tags\":[\"java\",\"buildwithme\",\"aws\"],\"image\":[\"https://cdn.steemitimages.com/DQmNx86J2GvVhLFS1UdNKenR2G3NETG1kyFkEFks3xPHsiX/Build%20With%20Me%20EP%201.png\",\"https://cdn.steemitimages.com/DQmPENcHraBJyNSuEzCk6uyiLi498F4KKx5hn6vkq46QRJu/create_account.JPG\",\"https://cdn.steemitimages.com/DQmZUEBc2uVH2az84oFDr3HHJgxgux5rWbxE3MhPX2c9jbt/screen_1.JPG\",\"https://cdn.steemitimages.com/DQmRMRwbmgSB7YQC4yMzp8pevfbXY844dwD3ScEK892Dfps/screen_2.JPG\",\"https://cdn.steemitimages.com/DQmaFSRy5spxbBagiyPLfuBzEZK2kCgXdpS4yay4heYkZcN/screen_3.JPG\",\"https://cdn.steemitimages.com/DQmXEr7N42aTyTerPZJBqCY6H1cAhsrkDkUyZdm8iSiTfUe/screen_4.JPG\",\"https://cdn.steemitimages.com/DQmUhRZQm7rz7PPaZ1GCez1LN6xKpXraFHpStxce3kstqES/screen_5.JPG\",\"https://cdn.steemitimages.com/DQmRUMvrAvPNHmmzxLQGzpGbBpvD4Yj6K4SEdhnC1b9tKSn/screen_6.JPG\",\"https://cdn.steemitimages.com/DQmbGdJ4z7cY2XbD1wDCGuTPVpnpYP6GCyX1R4M3KqL42g6/screen_7.JPG\"],\"links\":[\"https://altlash.com\",\"https://www.youtube.com/channel/UCz01y1iZGnSbk7RvTb6Lz6A\",\"https://aws.amazon.com/console/\"],\"app\":\"steemit/0.2\",\"format\":\"markdown\"}",
"parent_author": "",
"parent_permlink": "java",
"permlink": "episode-1-aws-signup",
"title": "Episode 1: AWS Signup"
}
],
"op_in_trx": 0,
"timestamp": "2020-03-06T04:14:51",
"trx_id": "ae3e7c5a9527fad9b4d2e210e8e953d8d5c10565",
"trx_in_block": 4,
"virtual_op": 0
}2020/03/02 05:10:51
2020/03/02 05:10:51
| delegatee | altlash |
| delegator | steem |
| vesting shares | 28843.945566 VESTS |
| Transaction Info | Block #41291678/Trx 38aa97b0e18d600e53411719b6593bd51d339180 |
View Raw JSON Data
{
  "block": 41291678,
  "op": [
    "delegate_vesting_shares",
    {
      "delegatee": "altlash",
      "delegator": "steem",
      "vesting_shares": "28843.945566 VESTS"
    }
  ],
  "op_in_trx": 0,
  "timestamp": "2020-03-02T05:10:51",
  "trx_id": "38aa97b0e18d600e53411719b6593bd51d339180",
  "trx_in_block": 2,
  "virtual_op": 0
}beemenginesent 0.001 STEEM to @altlash- "💎 Awesome Community Offer: auto booster with 10x extra votes, passive curation earnings and more. Checkout https://www.steembeem.com 🤙 or try it for one month with ONLY 1 STEEM 🤯 to @beemengine wit..."2020/03/02 04:20:36
beemenginesent 0.001 STEEM to @altlash- "💎 Awesome Community Offer: auto booster with 10x extra votes, passive curation earnings and more. Checkout https://www.steembeem.com 🤙 or try it for one month with ONLY 1 STEEM 🤯 to @beemengine wit..."
2020/03/02 04:20:36
| amount | 0.001 STEEM |
| from | beemengine |
| memo | 💎 Awesome Community Offer: auto booster with 10x extra votes, passive curation earnings and more. Checkout https://www.steembeem.com 🤙 or try it for one month with ONLY 1 STEEM 🤯 to @beemengine with memo: subscribe |
| to | altlash |
| Transaction Info | Block #41290675/Trx 3bd50dedc40da1b1b543c9ce7bd0433319104d42 |
View Raw JSON Data
{
  "block": 41290675,
  "op": [
    "transfer",
    {
      "amount": "0.001 STEEM",
      "from": "beemengine",
      "memo": "💎 Awesome Community Offer: auto booster with 10x extra votes, passive curation earnings and more. Checkout https://www.steembeem.com 🤙 or try it for one month with ONLY 1 STEEM 🤯 to @beemengine with memo: subscribe",
      "to": "altlash"
    }
  ],
  "op_in_trx": 0,
  "timestamp": "2020-03-02T04:20:36",
  "trx_id": "3bd50dedc40da1b1b543c9ce7bd0433319104d42",
  "trx_in_block": 35,
  "virtual_op": 0
}altlashcustom json: notify2020/03/02 04:20:09
altlashcustom json: notify
2020/03/02 04:20:09
| id | notify |
| json | ["setLastRead",{"date":"2020-03-02T04:20:10"}] |
| required auths | [] |
| required posting auths | ["altlash"] |
| Transaction Info | Block #41290666/Trx 6ca1f8d689b0f2172e3b93467cfab715adc54f66 |
View Raw JSON Data
{
  "block": 41290666,
  "op": [
    "custom_json",
    {
      "id": "notify",
      "json": "[\"setLastRead\",{\"date\":\"2020-03-02T04:20:10\"}]",
      "required_auths": [],
      "required_posting_auths": [
        "altlash"
      ]
    }
  ],
  "op_in_trx": 0,
  "timestamp": "2020-03-02T04:20:09",
  "trx_id": "6ca1f8d689b0f2172e3b93467cfab715adc54f66",
  "trx_in_block": 24,
  "virtual_op": 0
}altlashpublished a new post: build-with-me-episode-0-hello-world-introductions2020/03/02 04:19:36
altlashpublished a new post: build-with-me-episode-0-hello-world-introductions
2020/03/02 04:19:36
| author | altlash |
| body |  Official site: http://altlash.com/ YouTube channel: https://www.youtube.com/channel/UCz01y1iZGnSbk7RvTb6Lz6A Hello World! And welcome to my grand experiment. I have been a software engineer for going on a decade. I've learned a lot over my career, and I want to start to share that experience with others! I have always found blogs and YouTube tutorials about programming useful, but they have always been very basic examples. Not anymore! I have had this idea for an adventure where I build out a full-featured, production ready web application from the ground floor. And when I say build a web application, I mean absolutely everything. We'll take a journey through software programming (both back end and front end), databases, dev ops, cloud, AWS, anything and everything. This will be a hands-on series where, if you follow every video (and these accompanying blogs), you will have your own web application!! How cool is that :) So, what will we be developing? Is it a simple Hello World? Perhaps a small, simple game??? NOPE! We will be building a much more complex application. The vision that I have is an Auto Trading platform for stocks/mutual funds/ETFs/etc. We will utilize other brokers' APIs, such as Robinhood, to hold our accounts and funds. But, it is our application that will be putting in buy/sell orders, streaming real-time stock data, and running algorithms for us behind the scenes. So, what features will it have in it? To start with, users will need to create accounts on various brokerages before they can utilize our application. After a user logs into our platform, they can connect their other accounts. They should be able to see account balances, open positions, past trades, etc. for each brokerage that they've linked. The next step is to have various algorithms and toggles that the user can fine tune their behavior. I'll probably have some simple algorithms that users can pick from, but the beauty will be that users can supply their own algorithm to use. They can control which ticker symbols to run their algorithm on, how much money to use for buys/sells, toggle the algorithm on/off, what times of the day to have the algorithm run, etc. etc. With this kind of platform, we will need to make sure we have the infrastructure to support it. We will be utilizing AWS services to build and maintain our application and its data. We will be creating brand new AWS account and starting with free service offerings that AWS provides. We will grow our infrastructure by using code pipelines to automatically detect code changes and deploy those changes to our environments. We will go over load balancing, databases, elastic IPs, the list goes on. As you can see, this is going to be a long-running series. I hope you will find it useful and inspiring. Let me know what you guys think by leaving comments below, or on YouTube!! PS: I know this first video is rough. It is my first time doing YouTube videos. Bear with me as I learn and grow my public speaking skill set :) I start to tweak lighting, sound, camera placement, etc. as I get more comfortable with being on camera. PPS: Robinhood is the first API we will be consuming. Even though you won't need an account until a few videos in, please consider signing up! This is my referral link. If you sign up using it, we will both receive a free stock!! https://invite.robinhood.com/alexb1359 |
| json metadata | {"tags":["java","buildwithme","robinhood","tradingplatform"],"image":["https://cdn.steemitimages.com/DQmeoPjJfrYHYoGanwQoREDzbriJVED2dhvy3KQoT1CDpLe/Build%20With%20Me%20EP%200.png"],"links":["http://altlash.com/","https://www.youtube.com/channel/UCz01y1iZGnSbk7RvTb6Lz6A","https://invite.robinhood.com/alexb1359"],"app":"steemit/0.2","format":"markdown"} |
| parent author | |
| parent permlink | java |
| permlink | build-with-me-episode-0-hello-world-introductions |
| title | Build With Me Episode 0: Hello World Introductions |
| Transaction Info | Block #41290655/Trx 6bc13f3236d6a273bf17e489cbe6e259afe6ad81 |
View Raw JSON Data
{
"block": 41290655,
"op": [
"comment",
{
"author": "altlash",
"body": "\n\nOfficial site: http://altlash.com/\nYouTube channel: https://www.youtube.com/channel/UCz01y1iZGnSbk7RvTb6Lz6A\n\nHello World! And welcome to my grand experiment. I have been a software engineer for going on a decade. I've learned a lot over my career, and I want to start to share that experience with others! I have always found blogs and YouTube tutorials about programming useful, but they have always been very basic examples. Not anymore! \n\nI have had this idea for an adventure where I build out a full-featured, production ready web application from the ground floor. And when I say build a web application, I mean absolutely everything. We'll take a journey through software programming (both back end and front end), databases, dev ops, cloud, AWS, anything and everything. This will be a hands-on series where, if you follow every video (and these accompanying blogs), you will have your own web application!! How cool is that :) \n\nSo, what will we be developing? Is it a simple Hello World? Perhaps a small, simple game??? NOPE! We will be building a much more complex application. The vision that I have is an Auto Trading platform for stocks/mutual funds/ETFs/etc. We will utilize other brokers' APIs, such as Robinhood, to hold our accounts and funds. But, it is our application that will be putting in buy/sell orders, streaming real-time stock data, and running algorithms for us behind the scenes.\n\nSo, what features will it have in it? To start with, users will need to create accounts on various brokerages before they can utilize our application. After a user logs into our platform, they can connect their other accounts. They should be able to see account balances, open positions, past trades, etc. for each brokerage that they've linked.\n\nThe next step is to have various algorithms and toggles that the user can fine tune their behavior. I'll probably have some simple algorithms that users can pick from, but the beauty will be that users can supply their own algorithm to use. They can control which ticker symbols to run their algorithm on, how much money to use for buys/sells, toggle the algorithm on/off, what times of the day to have the algorithm run, etc. etc.\n\nWith this kind of platform, we will need to make sure we have the infrastructure to support it. We will be utilizing AWS services to build and maintain our application and its data. We will be creating brand new AWS account and starting with free service offerings that AWS provides. We will grow our infrastructure by using code pipelines to automatically detect code changes and deploy those changes to our environments. We will go over load balancing, databases, elastic IPs, the list goes on.\n\nAs you can see, this is going to be a long-running series. I hope you will find it useful and inspiring. Let me know what you guys think by leaving comments below, or on YouTube!!\n\nPS: I know this first video is rough. It is my first time doing YouTube videos. Bear with me as I learn and grow my public speaking skill set :) I start to tweak lighting, sound, camera placement, etc. as I get more comfortable with being on camera.\n\nPPS: Robinhood is the first API we will be consuming. Even though you won't need an account until a few videos in, please consider signing up! This is my referral link. If you sign up using it, we will both receive a free stock!! https://invite.robinhood.com/alexb1359",
"json_metadata": "{\"tags\":[\"java\",\"buildwithme\",\"robinhood\",\"tradingplatform\"],\"image\":[\"https://cdn.steemitimages.com/DQmeoPjJfrYHYoGanwQoREDzbriJVED2dhvy3KQoT1CDpLe/Build%20With%20Me%20EP%200.png\"],\"links\":[\"http://altlash.com/\",\"https://www.youtube.com/channel/UCz01y1iZGnSbk7RvTb6Lz6A\",\"https://invite.robinhood.com/alexb1359\"],\"app\":\"steemit/0.2\",\"format\":\"markdown\"}",
"parent_author": "",
"parent_permlink": "java",
"permlink": "build-with-me-episode-0-hello-world-introductions",
"title": "Build With Me Episode 0: Hello World Introductions"
}
],
"op_in_trx": 0,
"timestamp": "2020-03-02T04:19:36",
"trx_id": "6bc13f3236d6a273bf17e489cbe6e259afe6ad81",
"trx_in_block": 21,
"virtual_op": 0
}2020/01/24 02:22:51
2020/01/24 02:22:51
| author | steemitboard |
| body | Congratulations @altlash! You received a personal award! <table><tr><td>https://steemitimages.com/70x70/http://steemitboard.com/@altlash/birthday2.png</td><td>Happy Birthday! - You are on the Steem blockchain for 2 years!</td></tr></table> <sub>_You can view [your badges on your Steem Board](https://steemitboard.com/@altlash) and compare to others on the [Steem Ranking](https://steemitboard.com/ranking/index.php?name=altlash)_</sub> ###### [Vote for @Steemitboard as a witness](https://v2.steemconnect.com/sign/account-witness-vote?witness=steemitboard&approve=1) to get one more award and increased upvotes! |
| json metadata | {"image":["https://steemitboard.com/img/notify.png"]} |
| parent author | altlash |
| parent permlink | java-how-to-do-a-factory-for-singletons-within-spring |
| permlink | steemitboard-notify-altlash-20200124t022251000z |
| title | |
| Transaction Info | Block #40196303/Trx edbc06ce5e49a9c848e44d62ee975ea80b7a5cdf |
View Raw JSON Data
{
  "block": 40196303,
  "op": [
    "comment",
    {
      "author": "steemitboard",
      "body": "Congratulations @altlash! You received a personal award!\n\n<table><tr><td>https://steemitimages.com/70x70/http://steemitboard.com/@altlash/birthday2.png</td><td>Happy Birthday! - You are on the Steem blockchain for 2 years!</td></tr></table>\n\n<sub>_You can view [your badges on your Steem Board](https://steemitboard.com/@altlash) and compare to others on the [Steem Ranking](https://steemitboard.com/ranking/index.php?name=altlash)_</sub>\n\n\n###### [Vote for @Steemitboard as a witness](https://v2.steemconnect.com/sign/account-witness-vote?witness=steemitboard&approve=1) to get one more award and increased upvotes!",
      "json_metadata": "{\"image\":[\"https://steemitboard.com/img/notify.png\"]}",
      "parent_author": "altlash",
      "parent_permlink": "java-how-to-do-a-factory-for-singletons-within-spring",
      "permlink": "steemitboard-notify-altlash-20200124t022251000z",
      "title": ""
    }
  ],
  "op_in_trx": 0,
  "timestamp": "2020-01-24T02:22:51",
  "trx_id": "edbc06ce5e49a9c848e44d62ee975ea80b7a5cdf",
  "trx_in_block": 7,
  "virtual_op": 0
}2019/09/30 10:14:18
2019/09/30 10:14:18
| delegatee | altlash |
| delegator | steem |
| vesting shares | 8773.803074 VESTS |
| Transaction Info | Block #36871321/Trx 8759d171cb7c627654c2754c819fc59cc06fd935 |
View Raw JSON Data
{
  "block": 36871321,
  "op": [
    "delegate_vesting_shares",
    {
      "delegatee": "altlash",
      "delegator": "steem",
      "vesting_shares": "8773.803074 VESTS"
    }
  ],
  "op_in_trx": 0,
  "timestamp": "2019-09-30T10:14:18",
  "trx_id": "8759d171cb7c627654c2754c819fc59cc06fd935",
  "trx_in_block": 28,
  "virtual_op": 0
}2019/09/06 14:07:15
2019/09/06 14:07:15
| delegatee | altlash |
| delegator | steem |
| vesting shares | 29158.291624 VESTS |
| Transaction Info | Block #36186578/Trx 4ceb06bdc9ce50dc448f635b18b09d1b472a4111 |
View Raw JSON Data
{
  "block": 36186578,
  "op": [
    "delegate_vesting_shares",
    {
      "delegatee": "altlash",
      "delegator": "steem",
      "vesting_shares": "29158.291624 VESTS"
    }
  ],
  "op_in_trx": 0,
  "timestamp": "2019-09-06T14:07:15",
  "trx_id": "4ceb06bdc9ce50dc448f635b18b09d1b472a4111",
  "trx_in_block": 24,
  "virtual_op": 0
}jessicabennettupvoted (100.00%) @altlash / java-how-to-do-a-factory-for-singletons-within-spring2019/07/01 12:13:03
jessicabennettupvoted (100.00%) @altlash / java-how-to-do-a-factory-for-singletons-within-spring
2019/07/01 12:13:03
| author | altlash |
| permlink | java-how-to-do-a-factory-for-singletons-within-spring |
| voter | jessicabennett |
| weight | 10000 (100.00%) |
| Transaction Info | Block #34280598/Trx d10686c4ee4553a5966ee4c1b41cc7517601fbd1 |
View Raw JSON Data
{
  "block": 34280598,
  "op": [
    "vote",
    {
      "author": "altlash",
      "permlink": "java-how-to-do-a-factory-for-singletons-within-spring",
      "voter": "jessicabennett",
      "weight": 10000
    }
  ],
  "op_in_trx": 0,
  "timestamp": "2019-07-01T12:13:03",
  "trx_id": "d10686c4ee4553a5966ee4c1b41cc7517601fbd1",
  "trx_in_block": 8,
  "virtual_op": 0
}altlashupvoted (100.00%) @altlash / java-how-to-do-a-factory-for-singletons-within-spring2019/07/01 08:31:33
altlashupvoted (100.00%) @altlash / java-how-to-do-a-factory-for-singletons-within-spring
2019/07/01 08:31:33
| author | altlash |
| permlink | java-how-to-do-a-factory-for-singletons-within-spring |
| voter | altlash |
| weight | 10000 (100.00%) |
| Transaction Info | Block #34276169/Trx c93acdac2fff5ecdd31e0ee32884bb48d5c52e76 |
View Raw JSON Data
{
  "block": 34276169,
  "op": [
    "vote",
    {
      "author": "altlash",
      "permlink": "java-how-to-do-a-factory-for-singletons-within-spring",
      "voter": "altlash",
      "weight": 10000
    }
  ],
  "op_in_trx": 0,
  "timestamp": "2019-07-01T08:31:33",
  "trx_id": "c93acdac2fff5ecdd31e0ee32884bb48d5c52e76",
  "trx_in_block": 5,
  "virtual_op": 0
}altlashpublished a new post: java-how-to-do-a-factory-for-singletons-within-spring2019/07/01 03:03:36
altlashpublished a new post: java-how-to-do-a-factory-for-singletons-within-spring
2019/07/01 03:03:36
| author | altlash |
| body |  For this post I wanted to go over a bit of a conundrum that I faced not too long ago. I began writing an auto trading program utilizing the Robinhood trading platform. For this program, there would need to be a lot of REST client calls, so I wanted to build in a good design to be able to add more client calls easily and quickly. The solution I came up with was to have an interface that would define a client service call (which are also singletons), and to return anything that implemented this interface from behind a factory. In a typical factory the returned object would be created brand new. But, I wanted Spring to manage both the factory and the service call beans for me. This would pose a problem, because Spring would need to create all of the beans on application startup, and if my factory created new objects then Spring wouldn't know what to do with them and wouldn't be able to autowire into where they needed to go. Now that the problem has been stated, let's jump into some code on how to overcome these obstacles. The first thing to do is to create the interface that each client call will need to implement. ``` public interface ClientService { ServiceCall getServiceCall(); RestResponse send(Payload payload); } ``` So, let's look at this interface a bit closer so we can understand all of the pieces. The first method that is declared returns a ServiceCall. For us, this will be a basic enum whose purpose is to allow the implementors of this interface identify themselves. We'll see how that works when we make some sample classes that do that. The second method is used to send a rest request to the Robinhood API and return the response. We will define both RestResponse and Payload to be abstract classes that we can extend to contain the data that each request and response will expect. Now that we have gone over the pieces, let's code them out! The first one up is the ServiceCall enum. Our example will have 3 generic services that we'll define soon. ``` public enum ServiceCall { ACCOUNT_SERVICE, LOGIN_SERVICE, POSITIONS_SERVICE } ``` Next up are the abstract classes that will service as the top level request and response objects for our send method. ``` public abstract class RestResponse { } ``` ``` public abstract class Payload { } ``` Now that we have our interface and supporting classes defined, we can go ahead and create our 3 services that implement our interface. For the sake of brevity, assume that for each service there is a corresponding request and response class that extend the appropriate abstract classes. Also assume that each service may have their own dependencies injected in to be used, such as object mappers, http client libraries, etc. ``` @Service public class AccountService implements ClientService { public ServiceCall getServiceCall() { return ServiceCall.ACCOUNT_SERVICE; } public RestResponse send(Payload payload) { RestResponse response = null; // Do stuff to send and receive via REST call for this service (and populate the response object!!) return response; } } ``` ``` @Service public class LoginService implements ClientService { public ServiceCall getServiceCall() { return ServiceCall.LOGIN_SERVICE; } public RestResponse send(Payload payload) { RestResponse response = null; // Do stuff to send and receive via REST call for this service (and populate the response object!!) return response; } } ``` ``` @Service public class PositionsService implements ClientService { public ServiceCall getServiceCall() { return ServiceCall.POSITIONS_SERVICE; } public RestResponse send(Payload payload) { RestResponse response = null; // Do stuff to send and receive via REST call for this service (and populate the response object!!) return response; } } ``` So, now that we have that, let's talk through a couple of key points here. First, we need Spring to manage these singletons for us, so we have to have the @Service annotation (or @Component if you prefer). Second, each service needs to use a different option in the ServiceCall enum. If 2 services return the same ServiceCall, then our factory will have unexpected results, which we will walk through next. Now that we have some services, let's write a factory class that will return the service when needed. There's going to be some magic at work here, but I'll explain what is going on after we get the code completed. ``` @Service public class ServiceFactory { private List<ClientService> clientServices; private static final Map<ServiceOptions, ClientService> cachedServices = new HashMap<>(); @Autowired public ServiceFactory(List<ClientService> clientServices) { this.clientServices = clientServices; } @PostConstruct private void populateCache() { for (ClientService service : clientServices) { cachedServices.put(service.getServiceCall(), service); } } public ClientService getService(ServiceCall serviceCall) { if (cachedServices.containsKey(serviceCall)) { return cachedServices.get(serviceCall); } throw new InvalidServiceException("Unknown service call: " + serviceCall); } } ``` And there you have it! Now, to explain what all is going on with this factory. First, the factory itself is managed by Spring due to the @Service annotation. Next, any Spring managed bean that implements the ClientService interface is auto-wired into the clientServices list. Our factory needs to be able to return the correct service that the caller wants, so we need to identify each service, which is where the Map comes into play. The @PostConstruct annotation will kick off the populateCache() method after the factory is created, which will populate our Map with the ServiceCall as the key, and the actual service as the value. This is why it is important to not have 2 classes that implement our ClientService interface use the same ServiceCall option. After the Map is populated, all that is left is the getService method. Here, the only thing to note is that I check to make sure my map contains the ServiceCall being requested for, and if not I create a custom RuntimeException called InvalidServiceException. Before wrapping up this post, let's take a quick look at how we might use this factory. ``` public class MyDelegate { private ServiceFactory serviceFactory; @Autowired public MyDelegate(ServiceFactory serviceFactory) { this.serviceFactory = serviceFactory; } public void someMethod() { // Do stuff before needing to send a rest request serviceFactory.getService(ServiceCall.ACCOUNT_SERVICE).send(accountPayload); // Do stuff after receiving a response } } ``` Well, that's pretty much it. Just to recap, we've created a generic interface, request and response classes, and made some classes that implement out interface. Then, we introduced a factory as a way of retrieving the service that we want. Finally, we have an example on how we can utilize the factory in a clean way. A few closing remarks to keep in mind. Each class that implements our interface has to be annotated with @Service or @Component to be managed by Spring. Spring will autowire anything that it is managing that implements the interface into a List. The @PostConstuct annotation will kick off after an object is created, which we use to populate our Map, which in turn gives each of our services a key that can be used to identify the service. If we want to add more service calls, all that we need to do is add a new option to the ServiceCall enum and create a new service class that implements our ClientService interface. We don't have to touch the factory at all, since Spring will use its magic to autowire for us! Please let me know what you thing of this design approach by leaving a comment below. |
| json metadata | {"tags":["java","factory","spring","cleancode"],"users":["service","component","postconstruct","postconstuct"],"image":["https://cdn.steemitimages.com/DQmZmuStzkK58edB4kZ2ue1ThiyA2bRt5RQJ9phFH8B6a3Z/spring.png"],"app":"steemit/0.1","format":"markdown"} |
| parent author | |
| parent permlink | java |
| permlink | java-how-to-do-a-factory-for-singletons-within-spring |
| title | Java: How to do a Factory for Singletons within Spring |
| Transaction Info | Block #34269616/Trx 8bdc503831abe65e8c0c38c25f279665620400e1 |
View Raw JSON Data
{
"block": 34269616,
"op": [
"comment",
{
"author": "altlash",
"body": "\n\nFor this post I wanted to go over a bit of a conundrum that I faced not too long ago. I began writing an auto trading program utilizing the Robinhood trading platform. For this program, there would need to be a lot of REST client calls, so I wanted to build in a good design to be able to add more client calls easily and quickly. The solution I came up with was to have an interface that would define a client service call (which are also singletons), and to return anything that implemented this interface from behind a factory. In a typical factory the returned object would be created brand new. But, I wanted Spring to manage both the factory and the service call beans for me. This would pose a problem, because Spring would need to create all of the beans on application startup, and if my factory created new objects then Spring wouldn't know what to do with them and wouldn't be able to autowire into where they needed to go.\n\nNow that the problem has been stated, let's jump into some code on how to overcome these obstacles. The first thing to do is to create the interface that each client call will need to implement.\n\n```\npublic interface ClientService {\n ServiceCall getServiceCall();\n RestResponse send(Payload payload);\n}\n```\n\nSo, let's look at this interface a bit closer so we can understand all of the pieces. The first method that is declared returns a ServiceCall. For us, this will be a basic enum whose purpose is to allow the implementors of this interface identify themselves. We'll see how that works when we make some sample classes that do that. The second method is used to send a rest request to the Robinhood API and return the response. We will define both RestResponse and Payload to be abstract classes that we can extend to contain the data that each request and response will expect.\n\nNow that we have gone over the pieces, let's code them out! The first one up is the ServiceCall enum. Our example will have 3 generic services that we'll define soon.\n\n```\npublic enum ServiceCall {\n ACCOUNT_SERVICE, LOGIN_SERVICE, POSITIONS_SERVICE\n}\n```\n\nNext up are the abstract classes that will service as the top level request and response objects for our send method.\n\n```\npublic abstract class RestResponse {\n}\n```\n```\npublic abstract class Payload {\n}\n```\n\nNow that we have our interface and supporting classes defined, we can go ahead and create our 3 services that implement our interface. For the sake of brevity, assume that for each service there is a corresponding request and response class that extend the appropriate abstract classes. Also assume that each service may have their own dependencies injected in to be used, such as object mappers, http client libraries, etc.\n\n```\n@Service\npublic class AccountService implements ClientService {\n public ServiceCall getServiceCall() {\n return ServiceCall.ACCOUNT_SERVICE;\n }\n\n public RestResponse send(Payload payload) {\n RestResponse response = null;\n // Do stuff to send and receive via REST call for this service (and populate the response object!!)\n return response;\n }\n}\n```\n\n```\n@Service\npublic class LoginService implements ClientService {\n public ServiceCall getServiceCall() {\n return ServiceCall.LOGIN_SERVICE;\n }\n\n public RestResponse send(Payload payload) {\n RestResponse response = null;\n // Do stuff to send and receive via REST call for this service (and populate the response object!!)\n return response;\n }\n}\n```\n\n```\n@Service\npublic class PositionsService implements ClientService {\n public ServiceCall getServiceCall() {\n return ServiceCall.POSITIONS_SERVICE;\n }\n\n public RestResponse send(Payload payload) {\n RestResponse response = null;\n // Do stuff to send and receive via REST call for this service (and populate the response object!!)\n return response;\n }\n}\n```\n\nSo, now that we have that, let's talk through a couple of key points here. First, we need Spring to manage these singletons for us, so we have to have the @Service annotation (or @Component if you prefer). Second, each service needs to use a different option in the ServiceCall enum. If 2 services return the same ServiceCall, then our factory will have unexpected results, which we will walk through next. \n\nNow that we have some services, let's write a factory class that will return the service when needed. There's going to be some magic at work here, but I'll explain what is going on after we get the code completed.\n\n```\n@Service\npublic class ServiceFactory {\n\n private List<ClientService> clientServices;\n\n private static final Map<ServiceOptions, ClientService> cachedServices = new HashMap<>();\n\n @Autowired\n public ServiceFactory(List<ClientService> clientServices) {\n this.clientServices = clientServices;\n }\n\n @PostConstruct\n private void populateCache() {\n for (ClientService service : clientServices) {\n cachedServices.put(service.getServiceCall(), service);\n }\n }\n\n public ClientService getService(ServiceCall serviceCall) {\n if (cachedServices.containsKey(serviceCall)) {\n return cachedServices.get(serviceCall);\n }\n \n throw new InvalidServiceException(\"Unknown service call: \" + serviceCall);\n }\n}\n```\n\nAnd there you have it! Now, to explain what all is going on with this factory. First, the factory itself is managed by Spring due to the @Service annotation. Next, any Spring managed bean that implements the ClientService interface is auto-wired into the clientServices list. Our factory needs to be able to return the correct service that the caller wants, so we need to identify each service, which is where the Map comes into play. The @PostConstruct annotation will kick off the populateCache() method after the factory is created, which will populate our Map with the ServiceCall as the key, and the actual service as the value. This is why it is important to not have 2 classes that implement our ClientService interface use the same ServiceCall option. After the Map is populated, all that is left is the getService method. Here, the only thing to note is that I check to make sure my map contains the ServiceCall being requested for, and if not I create a custom RuntimeException called InvalidServiceException.\n\nBefore wrapping up this post, let's take a quick look at how we might use this factory.\n\n```\npublic class MyDelegate {\n \n private ServiceFactory serviceFactory;\n\n @Autowired\n public MyDelegate(ServiceFactory serviceFactory) {\n this.serviceFactory = serviceFactory;\n }\n\n public void someMethod() {\n // Do stuff before needing to send a rest request\n\n serviceFactory.getService(ServiceCall.ACCOUNT_SERVICE).send(accountPayload);\n\n // Do stuff after receiving a response\n }\n}\n```\n\nWell, that's pretty much it. Just to recap, we've created a generic interface, request and response classes, and made some classes that implement out interface. Then, we introduced a factory as a way of retrieving the service that we want. Finally, we have an example on how we can utilize the factory in a clean way. A few closing remarks to keep in mind. Each class that implements our interface has to be annotated with @Service or @Component to be managed by Spring. Spring will autowire anything that it is managing that implements the interface into a List. The @PostConstuct annotation will kick off after an object is created, which we use to populate our Map, which in turn gives each of our services a key that can be used to identify the service. \n\nIf we want to add more service calls, all that we need to do is add a new option to the ServiceCall enum and create a new service class that implements our ClientService interface. We don't have to touch the factory at all, since Spring will use its magic to autowire for us!\n\nPlease let me know what you thing of this design approach by leaving a comment below.",
"json_metadata": "{\"tags\":[\"java\",\"factory\",\"spring\",\"cleancode\"],\"users\":[\"service\",\"component\",\"postconstruct\",\"postconstuct\"],\"image\":[\"https://cdn.steemitimages.com/DQmZmuStzkK58edB4kZ2ue1ThiyA2bRt5RQJ9phFH8B6a3Z/spring.png\"],\"app\":\"steemit/0.1\",\"format\":\"markdown\"}",
"parent_author": "",
"parent_permlink": "java",
"permlink": "java-how-to-do-a-factory-for-singletons-within-spring",
"title": "Java: How to do a Factory for Singletons within Spring"
}
],
"op_in_trx": 0,
"timestamp": "2019-07-01T03:03:36",
"trx_id": "8bdc503831abe65e8c0c38c25f279665620400e1",
"trx_in_block": 15,
"virtual_op": 0
}altlashupvoted (100.00%) @altlash / starting-a-java-blog2019/06/27 22:42:09
altlashupvoted (100.00%) @altlash / starting-a-java-blog
2019/06/27 22:42:09
| author | altlash |
| permlink | starting-a-java-blog |
| voter | altlash |
| weight | 10000 (100.00%) |
| Transaction Info | Block #34178072/Trx 1daf404e2a3108e7e9f719812a137e4a1dec92ec |
View Raw JSON Data
{
  "block": 34178072,
  "op": [
    "vote",
    {
      "author": "altlash",
      "permlink": "starting-a-java-blog",
      "voter": "altlash",
      "weight": 10000
    }
  ],
  "op_in_trx": 0,
  "timestamp": "2019-06-27T22:42:09",
  "trx_id": "1daf404e2a3108e7e9f719812a137e4a1dec92ec",
  "trx_in_block": 6,
  "virtual_op": 0
}2019/06/27 22:41:45
2019/06/27 22:41:45
| delegatee | altlash |
| delegator | steem |
| vesting shares | 28725.728893 VESTS |
| Transaction Info | Block #34178064/Trx 0b90a829b492123e2e279d54d56da5534844c261 |
View Raw JSON Data
{
  "block": 34178064,
  "op": [
    "delegate_vesting_shares",
    {
      "delegatee": "altlash",
      "delegator": "steem",
      "vesting_shares": "28725.728893 VESTS"
    }
  ],
  "op_in_trx": 0,
  "timestamp": "2019-06-27T22:41:45",
  "trx_id": "0b90a829b492123e2e279d54d56da5534844c261",
  "trx_in_block": 10,
  "virtual_op": 0
}lockoutupvoted (100.00%) @altlash / starting-a-java-blog2019/06/27 21:50:36
lockoutupvoted (100.00%) @altlash / starting-a-java-blog
2019/06/27 21:50:36
| author | altlash |
| permlink | starting-a-java-blog |
| voter | lockout |
| weight | 10000 (100.00%) |
| Transaction Info | Block #34177043/Trx b902918f2e9a74528c2f3154cb347c6f2165bd6c |
View Raw JSON Data
{
  "block": 34177043,
  "op": [
    "vote",
    {
      "author": "altlash",
      "permlink": "starting-a-java-blog",
      "voter": "lockout",
      "weight": 10000
    }
  ],
  "op_in_trx": 0,
  "timestamp": "2019-06-27T21:50:36",
  "trx_id": "b902918f2e9a74528c2f3154cb347c6f2165bd6c",
  "trx_in_block": 0,
  "virtual_op": 0
}altlashpublished a new post: starting-a-java-blog2019/06/27 21:28:45
altlashpublished a new post: starting-a-java-blog
2019/06/27 21:28:45
| author | altlash |
| body |  Hello World! One of the first programs that new developers is, inevitably, a 'Hello World' program. This is a classic in Software Development that introduces a new coder to a new language, or a default template that shows everything is working right, or any number of things. This blog post is my own 'Hello World' to the idea of blogging. My goal is to introduce myself, mention a bit on my experience and how I've gotten to this point, and to set a beginning point on what all kinds of things this blog will be touching on. So, first off is introductions. The fly-by version is that my name is Alex, happily married to an amazing wife, and currently have 3 amazing daughters ages 4, 3, and 1 (at least at the time of this writing!!). I began my software development career by attending Purdue University's Computer Science program, and graduating with a BS in Computer Science in 2010. From here, I started my first full-time job with my degree working with a consulting company for a very well known company (I probably won't disclose anybody that I've worked for). I worked on a legacy application for 6 years for my first project. I didn't know any better at the time, but looking back I can see what it was like working in a legacy system. The basic architecture was HTML/CSS/JS front end and Java back end. The data layer was using a product called Enovia (for anybody interested in that kind of thing!). This thing was all custom code, and it was massive. If memory serves, the largest class was 20-30k lines long, just to give you an idea. It was, at times, painful to work in, even though at the time I didn't even realize it. It was just myself and a tech lead that had worked on the application since it's inception, plus a few offshore developers that worked on various things from time-to-time. Obviously, we wore all the hats. We would gather requirements, code, test, deploy, etc. etc. It was my first taste of an enterprise-wide application. For the next year or so I was a contractor for the same company, but had switched teams. This time, we were working on a lot newer tech stack. It was just myself, a co-worker, and some offshore developers still, but it was all fresh features. I came on board just after the application went to production, but it wasn't used a whole lot yet. It was written in Angular 1 for the front end, and Java for the back end. We used WebSockets to pipe real time data into our application for the end users to visualize in different ways. It was fun and exciting compared to working in the legacy system, and I continued to grow. But, I still had a long way to go (and still do to this day!). With both of these first 2 applications I had grown a lot. But, the quality of my code was very, very poor, even though I didn't realize it. Obviously I would try to use objects, inheritance, polymorphism, and other cool words that I learned from my college days. But, the name of the game was FEATURES. Get more functionality out to the users as quickly as we could. We didn't have any automated tests, everything was ad hoc by our development team, our product owner, and maybe a couple of end users. I don't recall writing a single unit test for the first 7 years of my career. Then, everything changed. My family moved states so that I could work for an amazing company. It was much smaller than where I was at before, but the culture there was top notch. This group of developers cared about the quality of their code, and treated it like their craft. It was not just about doing something. It was about doing that something the right way. It was thinking about doing things in a way that wouldn't slow us down if requirements change (which they do!), or if we needed to add/extend functionality, or needed to scale up more. Basically everybody there had a copy of Clean Code, and actually used and referenced it while coming up with solutions, instead of just having it sit somewhere on a dusty bookshelf. It was here that I learned the importance of unit testing, Test Driven Development, design patterns, QUALITY. Also here we had code reviews for any and all code that was written. It wasn't just a rubber stamp signoff. It was used to make sure things were done thoughtfully, for using the right design pattern, to the names of variables. I grew more there in a 1 1/2 years than the previous 7 years combined. But, alas, things change. We decided that we needed to move back for a while to be around family. I truly miss the culture that I had grown to love, and hope to return to in the future. I am now at another very large company, and have been here for 6 months now. Although a very different culture yet again, I am still excited about what I can bring to the company. And, as always, this new company comes with its own challenges to overcome. I'm having to expand my skill set by working with multiple teams across multiple applications, having coordinated releases, and working with a much larger team with different development backgrounds with different styles. I guess that brings me to why I am writing all of this. After seeing and feeling what it was like to work with a company that has high code quality, I want to pass on the importance that has in our field. Much to often we are against deadlines where quality will slip. Management always wants the projects completed yesterday, and developers start to cut corners and sacrifice quality. A copy-paste here, leaving commented code there, pushing off unit tests for another day that will never come. The aim of these blog articles will be to equip you with knowledge on how to write code the right way. I'm planning on starting off with a series of blogs about different design patterns. This will help me out with learning the ropes with blogging, while giving you readers some tools to add to your toolbox. Then, more of the "fun" posts will come. Things that are not as clear cut as explaining a design pattern. Some might be controversial topics that are debated back and forth on which was is better. Things like whether it is better to throw exceptions or return error codes (Hint: I am in the camp of using exceptions!). Small disclaimer: I do not claim to know all things, to be a defacto expert on all things, or anything of the sort. These blogs will be my opinions, understandings, and views based on what I've learned, used, and prefer. That said, any code that I use as examples are of my own creation. I look forward to writing out these blogs, and hope that I can pass along some tidbits that will help you become better programmers!! -Altash |
| json metadata | {"tags":["java","programming","patterns","cleancode"],"image":["https://cdn.steemitimages.com/DQmSd4xKjEUooWLak4UuDL2gLLG3GH2L5UfC8aieQcnTuQk/java.png"],"app":"steemit/0.1","format":"markdown"} |
| parent author | |
| parent permlink | java |
| permlink | starting-a-java-blog |
| title | Starting a Java Blog |
| Transaction Info | Block #34176606/Trx 231a77e95d8fae15dbbdb6a3fe0a22874b063da3 |
View Raw JSON Data
{
"block": 34176606,
"op": [
"comment",
{
"author": "altlash",
"body": "\n\nHello World!\n\nOne of the first programs that new developers is, inevitably, a 'Hello World' program. This is a classic in Software Development that introduces a new coder to a new language, or a default template that shows everything is working right, or any number of things. This blog post is my own 'Hello World' to the idea of blogging. My goal is to introduce myself, mention a bit on my experience and how I've gotten to this point, and to set a beginning point on what all kinds of things this blog will be touching on.\n\nSo, first off is introductions. The fly-by version is that my name is Alex, happily married to an amazing wife, and currently have 3 amazing daughters ages 4, 3, and 1 (at least at the time of this writing!!).\n\nI began my software development career by attending Purdue University's Computer Science program, and graduating with a BS in Computer Science in 2010. From here, I started my first full-time job with my degree working with a consulting company for a very well known company (I probably won't disclose anybody that I've worked for). I worked on a legacy application for 6 years for my first project. I didn't know any better at the time, but looking back I can see what it was like working in a legacy system. The basic architecture was HTML/CSS/JS front end and Java back end. The data layer was using a product called Enovia (for anybody interested in that kind of thing!). This thing was all custom code, and it was massive. If memory serves, the largest class was 20-30k lines long, just to give you an idea. It was, at times, painful to work in, even though at the time I didn't even realize it. It was just myself and a tech lead that had worked on the application since it's inception, plus a few offshore developers that worked on various things from time-to-time. Obviously, we wore all the hats. We would gather requirements, code, test, deploy, etc. etc. It was my first taste of an enterprise-wide application.\n\nFor the next year or so I was a contractor for the same company, but had switched teams. This time, we were working on a lot newer tech stack. It was just myself, a co-worker, and some offshore developers still, but it was all fresh features. I came on board just after the application went to production, but it wasn't used a whole lot yet. It was written in Angular 1 for the front end, and Java for the back end. We used WebSockets to pipe real time data into our application for the end users to visualize in different ways. It was fun and exciting compared to working in the legacy system, and I continued to grow. But, I still had a long way to go (and still do to this day!). \n\nWith both of these first 2 applications I had grown a lot. But, the quality of my code was very, very poor, even though I didn't realize it. Obviously I would try to use objects, inheritance, polymorphism, and other cool words that I learned from my college days. But, the name of the game was FEATURES. Get more functionality out to the users as quickly as we could. We didn't have any automated tests, everything was ad hoc by our development team, our product owner, and maybe a couple of end users. I don't recall writing a single unit test for the first 7 years of my career.\n\nThen, everything changed. My family moved states so that I could work for an amazing company. It was much smaller than where I was at before, but the culture there was top notch. This group of developers cared about the quality of their code, and treated it like their craft. It was not just about doing something. It was about doing that something the right way. It was thinking about doing things in a way that wouldn't slow us down if requirements change (which they do!), or if we needed to add/extend functionality, or needed to scale up more. Basically everybody there had a copy of Clean Code, and actually used and referenced it while coming up with solutions, instead of just having it sit somewhere on a dusty bookshelf. It was here that I learned the importance of unit testing, Test Driven Development, design patterns, QUALITY. Also here we had code reviews for any and all code that was written. It wasn't just a rubber stamp signoff. It was used to make sure things were done thoughtfully, for using the right design pattern, to the names of variables. I grew more there in a 1 1/2 years than the previous 7 years combined.\n\nBut, alas, things change. We decided that we needed to move back for a while to be around family. I truly miss the culture that I had grown to love, and hope to return to in the future. I am now at another very large company, and have been here for 6 months now. Although a very different culture yet again, I am still excited about what I can bring to the company. And, as always, this new company comes with its own challenges to overcome. I'm having to expand my skill set by working with multiple teams across multiple applications, having coordinated releases, and working with a much larger team with different development backgrounds with different styles.\n\nI guess that brings me to why I am writing all of this. After seeing and feeling what it was like to work with a company that has high code quality, I want to pass on the importance that has in our field. Much to often we are against deadlines where quality will slip. Management always wants the projects completed yesterday, and developers start to cut corners and sacrifice quality. A copy-paste here, leaving commented code there, pushing off unit tests for another day that will never come. \n\nThe aim of these blog articles will be to equip you with knowledge on how to write code the right way. I'm planning on starting off with a series of blogs about different design patterns. This will help me out with learning the ropes with blogging, while giving you readers some tools to add to your toolbox. Then, more of the \"fun\" posts will come. Things that are not as clear cut as explaining a design pattern. Some might be controversial topics that are debated back and forth on which was is better. Things like whether it is better to throw exceptions or return error codes (Hint: I am in the camp of using exceptions!). Small disclaimer: I do not claim to know all things, to be a defacto expert on all things, or anything of the sort. These blogs will be my opinions, understandings, and views based on what I've learned, used, and prefer. That said, any code that I use as examples are of my own creation.\n\nI look forward to writing out these blogs, and hope that I can pass along some tidbits that will help you become better programmers!!\n\n-Altash",
"json_metadata": "{\"tags\":[\"java\",\"programming\",\"patterns\",\"cleancode\"],\"image\":[\"https://cdn.steemitimages.com/DQmSd4xKjEUooWLak4UuDL2gLLG3GH2L5UfC8aieQcnTuQk/java.png\"],\"app\":\"steemit/0.1\",\"format\":\"markdown\"}",
"parent_author": "",
"parent_permlink": "java",
"permlink": "starting-a-java-blog",
"title": "Starting a Java Blog"
}
],
"op_in_trx": 0,
"timestamp": "2019-06-27T21:28:45",
"trx_id": "231a77e95d8fae15dbbdb6a3fe0a22874b063da3",
"trx_in_block": 18,
"virtual_op": 0
}altlashclaimed reward balance: 0.004 SP2019/06/27 17:20:51
altlashclaimed reward balance: 0.004 SP
2019/06/27 17:20:51
| account | altlash |
| reward sbd | 0.000 SBD |
| reward steem | 0.000 STEEM |
| reward vests | 6.132674 VESTS |
| Transaction Info | Block #34171654/Trx 60b0f99836199f5bae1529b2975b4e0bb06aa2e8 |
View Raw JSON Data
{
  "block": 34171654,
  "op": [
    "claim_reward_balance",
    {
      "account": "altlash",
      "reward_sbd": "0.000 SBD",
      "reward_steem": "0.000 STEEM",
      "reward_vests": "6.132674 VESTS"
    }
  ],
  "op_in_trx": 0,
  "timestamp": "2019-06-27T17:20:51",
  "trx_id": "60b0f99836199f5bae1529b2975b4e0bb06aa2e8",
  "trx_in_block": 18,
  "virtual_op": 0
}2019/05/12 11:07:09
2019/05/12 11:07:09
| delegatee | altlash |
| delegator | steem |
| vesting shares | 8863.315295 VESTS |
| Transaction Info | Block #32840946/Trx d08801ec0504944e64cbbbe059e4cc84711935f3 |
View Raw JSON Data
{
  "block": 32840946,
  "op": [
    "delegate_vesting_shares",
    {
      "delegatee": "altlash",
      "delegator": "steem",
      "vesting_shares": "8863.315295 VESTS"
    }
  ],
  "op_in_trx": 0,
  "timestamp": "2019-05-12T11:07:09",
  "trx_id": "d08801ec0504944e64cbbbe059e4cc84711935f3",
  "trx_in_block": 12,
  "virtual_op": 0
}2019/01/24 02:07:57
2019/01/24 02:07:57
| author | steemitboard |
| body | Congratulations @altlash! You received a personal award! <table><tr><td>https://steemitimages.com/70x70/http://steemitboard.com/@altlash/birthday1.png</td><td>Happy Birthday! - You are on the Steem blockchain for 1 year!</td></tr></table> <sub>_[Click here to view your Board](https://steemitboard.com/@altlash)_</sub> > Support [SteemitBoard's project](https://steemit.com/@steemitboard)! **[Vote for its witness](https://v2.steemconnect.com/sign/account-witness-vote?witness=steemitboard&approve=1)** and **get one more award**! |
| json metadata | {"image":["https://steemitboard.com/img/notify.png"]} |
| parent author | altlash |
| parent permlink | week-1-recap |
| permlink | steemitboard-notify-altlash-20190124t020757000z |
| title | |
| Transaction Info | Block #29723492/Trx 1b01ca582962a51bf13a54c73794a70ff5b67fa3 |
View Raw JSON Data
{
  "block": 29723492,
  "op": [
    "comment",
    {
      "author": "steemitboard",
      "body": "Congratulations @altlash! You received a personal award!\n\n<table><tr><td>https://steemitimages.com/70x70/http://steemitboard.com/@altlash/birthday1.png</td><td>Happy Birthday! - You are on the Steem blockchain for 1 year!</td></tr></table>\n\n<sub>_[Click here to view your Board](https://steemitboard.com/@altlash)_</sub>\n\n\n> Support [SteemitBoard's project](https://steemit.com/@steemitboard)! **[Vote for its witness](https://v2.steemconnect.com/sign/account-witness-vote?witness=steemitboard&approve=1)** and **get one more award**!",
      "json_metadata": "{\"image\":[\"https://steemitboard.com/img/notify.png\"]}",
      "parent_author": "altlash",
      "parent_permlink": "week-1-recap",
      "permlink": "steemitboard-notify-altlash-20190124t020757000z",
      "title": ""
    }
  ],
  "op_in_trx": 0,
  "timestamp": "2019-01-24T02:07:57",
  "trx_id": "1b01ca582962a51bf13a54c73794a70ff5b67fa3",
  "trx_in_block": 2,
  "virtual_op": 0
}smitopblockchain operation: transfer from savings2018/08/01 23:15:51
smitopblockchain operation: transfer from savings
2018/08/01 23:15:51
| amount | 0.001 SBD |
| from | smitop |
| memo | Hi, it looks like you're not voting for any witnesses. Witnesses help secure the Steem network. You should vote for some, at https://steemit.com/~witnesses, or by pressing 'Vote for witnesses' in the Steemit sidebar (top right corner). I'm a bot. |
| request id | 12754 |
| to | altlash |
| Transaction Info | Block #24698966/Trx 65b9e0a53c131f5ebc43e20659bd54e20e7ba5f3 |
View Raw JSON Data
{
  "block": 24698966,
  "op": [
    "transfer_from_savings",
    {
      "amount": "0.001 SBD",
      "from": "smitop",
      "memo": "Hi, it looks like you're not voting for any witnesses. Witnesses help secure the Steem network. You should vote for some, at https://steemit.com/~witnesses, or by pressing 'Vote for witnesses' in the Steemit sidebar (top right corner). I'm a bot.",
      "request_id": 12754,
      "to": "altlash"
    }
  ],
  "op_in_trx": 0,
  "timestamp": "2018-08-01T23:15:51",
  "trx_id": "65b9e0a53c131f5ebc43e20659bd54e20e7ba5f3",
  "trx_in_block": 1,
  "virtual_op": 0
}2018/05/16 20:05:09
2018/05/16 20:05:09
| delegatee | altlash |
| delegator | steem |
| vesting shares | 9062.810470 VESTS |
| Transaction Info | Block #22489605/Trx 1ce92c29e15a39c6403a12fece3a0afbfd02f8d4 |
View Raw JSON Data
{
  "block": 22489605,
  "op": [
    "delegate_vesting_shares",
    {
      "delegatee": "altlash",
      "delegator": "steem",
      "vesting_shares": "9062.810470 VESTS"
    }
  ],
  "op_in_trx": 0,
  "timestamp": "2018-05-16T20:05:09",
  "trx_id": "1ce92c29e15a39c6403a12fece3a0afbfd02f8d4",
  "trx_in_block": 16,
  "virtual_op": 0
}2018/03/30 19:05:24
2018/03/30 19:05:24
| delegatee | altlash |
| delegator | steem |
| vesting shares | 29486.220565 VESTS |
| Transaction Info | Block #21135694/Trx 7aee0a7692dbf2b939d270859113d6c44848837f |
View Raw JSON Data
{
  "block": 21135694,
  "op": [
    "delegate_vesting_shares",
    {
      "delegatee": "altlash",
      "delegator": "steem",
      "vesting_shares": "29486.220565 VESTS"
    }
  ],
  "op_in_trx": 0,
  "timestamp": "2018-03-30T19:05:24",
  "trx_id": "7aee0a7692dbf2b939d270859113d6c44848837f",
  "trx_in_block": 24,
  "virtual_op": 0
}altlashreceived 0.004 SP curation reward for @jessicabennett / tiny-houses2018/02/18 03:07:42
altlashreceived 0.004 SP curation reward for @jessicabennett / tiny-houses
2018/02/18 03:07:42
| comment author | jessicabennett |
| comment permlink | tiny-houses |
| curator | altlash |
| reward | 6.132674 VESTS |
| Transaction Info | Block #19966218/Virtual Operation #3 |
View Raw JSON Data
{
  "block": 19966218,
  "op": [
    "curation_reward",
    {
      "comment_author": "jessicabennett",
      "comment_permlink": "tiny-houses",
      "curator": "altlash",
      "reward": "6.132674 VESTS"
    }
  ],
  "op_in_trx": 0,
  "timestamp": "2018-02-18T03:07:42",
  "trx_id": "0000000000000000000000000000000000000000",
  "trx_in_block": 4294967295,
  "virtual_op": 3
}altlashupvoted (100.00%) @balake / binance-down-for-13-plus-hours2018/02/13 12:32:30
altlashupvoted (100.00%) @balake / binance-down-for-13-plus-hours
2018/02/13 12:32:30
| author | balake |
| permlink | binance-down-for-13-plus-hours |
| voter | altlash |
| weight | 10000 (100.00%) |
| Transaction Info | Block #19833633/Trx 5ecfa98ced5369c0c3f3150cc37c3f51864c76f2 |
View Raw JSON Data
{
  "block": 19833633,
  "op": [
    "vote",
    {
      "author": "balake",
      "permlink": "binance-down-for-13-plus-hours",
      "voter": "altlash",
      "weight": 10000
    }
  ],
  "op_in_trx": 0,
  "timestamp": "2018-02-13T12:32:30",
  "trx_id": "5ecfa98ced5369c0c3f3150cc37c3f51864c76f2",
  "trx_in_block": 6,
  "virtual_op": 0
}altlashclaimed reward balance: 0.006 SP2018/02/13 12:31:09
altlashclaimed reward balance: 0.006 SP
2018/02/13 12:31:09
| account | altlash |
| reward sbd | 0.000 SBD |
| reward steem | 0.000 STEEM |
| reward vests | 10.224401 VESTS |
| Transaction Info | Block #19833606/Trx b0848ebd3fa79f630f1d14dd24dce3f467411e77 |
View Raw JSON Data
{
  "block": 19833606,
  "op": [
    "claim_reward_balance",
    {
      "account": "altlash",
      "reward_sbd": "0.000 SBD",
      "reward_steem": "0.000 STEEM",
      "reward_vests": "10.224401 VESTS"
    }
  ],
  "op_in_trx": 0,
  "timestamp": "2018-02-13T12:31:09",
  "trx_id": "b0848ebd3fa79f630f1d14dd24dce3f467411e77",
  "trx_in_block": 17,
  "virtual_op": 0
}altlashupvoted (100.00%) @jessicabennett / to-the-tiger-in-the-zoo2018/02/13 12:30:42
altlashupvoted (100.00%) @jessicabennett / to-the-tiger-in-the-zoo
2018/02/13 12:30:42
| author | jessicabennett |
| permlink | to-the-tiger-in-the-zoo |
| voter | altlash |
| weight | 10000 (100.00%) |
| Transaction Info | Block #19833597/Trx 054ffb425d3158967ceaf1eba3b88b5d5db2ab1f |
View Raw JSON Data
{
  "block": 19833597,
  "op": [
    "vote",
    {
      "author": "jessicabennett",
      "permlink": "to-the-tiger-in-the-zoo",
      "voter": "altlash",
      "weight": 10000
    }
  ],
  "op_in_trx": 0,
  "timestamp": "2018-02-13T12:30:42",
  "trx_id": "054ffb425d3158967ceaf1eba3b88b5d5db2ab1f",
  "trx_in_block": 19,
  "virtual_op": 0
}altlashupvoted (100.00%) @jessicabennett / haveallthebabies2018/02/13 12:30:33
altlashupvoted (100.00%) @jessicabennett / haveallthebabies
2018/02/13 12:30:33
| author | jessicabennett |
| permlink | haveallthebabies |
| voter | altlash |
| weight | 10000 (100.00%) |
| Transaction Info | Block #19833594/Trx 85f5277014f3adabcb930184ce9a1322eef9c790 |
View Raw JSON Data
{
  "block": 19833594,
  "op": [
    "vote",
    {
      "author": "jessicabennett",
      "permlink": "haveallthebabies",
      "voter": "altlash",
      "weight": 10000
    }
  ],
  "op_in_trx": 0,
  "timestamp": "2018-02-13T12:30:33",
  "trx_id": "85f5277014f3adabcb930184ce9a1322eef9c790",
  "trx_in_block": 10,
  "virtual_op": 0
}altlashupvoted (100.00%) @jessicabennett / wild-west-fun2018/02/13 12:30:27
altlashupvoted (100.00%) @jessicabennett / wild-west-fun
2018/02/13 12:30:27
| author | jessicabennett |
| permlink | wild-west-fun |
| voter | altlash |
| weight | 10000 (100.00%) |
| Transaction Info | Block #19833592/Trx fa8713ff3df8a6e43328d65c81be266eaafd899f |
View Raw JSON Data
{
  "block": 19833592,
  "op": [
    "vote",
    {
      "author": "jessicabennett",
      "permlink": "wild-west-fun",
      "voter": "altlash",
      "weight": 10000
    }
  ],
  "op_in_trx": 0,
  "timestamp": "2018-02-13T12:30:27",
  "trx_id": "fa8713ff3df8a6e43328d65c81be266eaafd899f",
  "trx_in_block": 57,
  "virtual_op": 0
}2018/02/13 12:30:18
2018/02/13 12:30:18
| author | jessicabennett |
| permlink | the-greatest-thing-a-father-can-do-for-his-daughter-is-to-love-her-mother |
| voter | altlash |
| weight | 10000 (100.00%) |
| Transaction Info | Block #19833589/Trx ae309223ca72c32421170348b9bf177ab9887ff1 |
View Raw JSON Data
{
  "block": 19833589,
  "op": [
    "vote",
    {
      "author": "jessicabennett",
      "permlink": "the-greatest-thing-a-father-can-do-for-his-daughter-is-to-love-her-mother",
      "voter": "altlash",
      "weight": 10000
    }
  ],
  "op_in_trx": 0,
  "timestamp": "2018-02-13T12:30:18",
  "trx_id": "ae309223ca72c32421170348b9bf177ab9887ff1",
  "trx_in_block": 1,
  "virtual_op": 0
}altlashupvoted (100.00%) @jessicabennett / where-the-wild-grapes-grow2018/02/13 12:29:57
altlashupvoted (100.00%) @jessicabennett / where-the-wild-grapes-grow
2018/02/13 12:29:57
| author | jessicabennett |
| permlink | where-the-wild-grapes-grow |
| voter | altlash |
| weight | 10000 (100.00%) |
| Transaction Info | Block #19833582/Trx b29e295e8d185e3186dd3ca392dc0337a7bcdb08 |
View Raw JSON Data
{
  "block": 19833582,
  "op": [
    "vote",
    {
      "author": "jessicabennett",
      "permlink": "where-the-wild-grapes-grow",
      "voter": "altlash",
      "weight": 10000
    }
  ],
  "op_in_trx": 0,
  "timestamp": "2018-02-13T12:29:57",
  "trx_id": "b29e295e8d185e3186dd3ca392dc0337a7bcdb08",
  "trx_in_block": 30,
  "virtual_op": 0
}rechellomataroupvoted (100.00%) @altlash / week-1-recap2018/02/12 21:16:03
rechellomataroupvoted (100.00%) @altlash / week-1-recap
2018/02/12 21:16:03
| author | altlash |
| permlink | week-1-recap |
| voter | rechellomataro |
| weight | 10000 (100.00%) |
| Transaction Info | Block #19815318/Trx a7731fe69700b033cad872947d3af331a2636e30 |
View Raw JSON Data
{
  "block": 19815318,
  "op": [
    "vote",
    {
      "author": "altlash",
      "permlink": "week-1-recap",
      "voter": "rechellomataro",
      "weight": 10000
    }
  ],
  "op_in_trx": 0,
  "timestamp": "2018-02-12T21:16:03",
  "trx_id": "a7731fe69700b033cad872947d3af331a2636e30",
  "trx_in_block": 17,
  "virtual_op": 0
}altlashreceived 0.006 SP curation reward for @jessicabennett / when-your-blogger-friend-writes-about-your-vaccine-status-in-her-latest-post-an-open-letter-to-this-friend2018/02/12 00:51:54
altlashreceived 0.006 SP curation reward for @jessicabennett / when-your-blogger-friend-writes-about-your-vaccine-status-in-her-latest-post-an-open-letter-to-this-friend
2018/02/12 00:51:54
| comment author | jessicabennett |
| comment permlink | when-your-blogger-friend-writes-about-your-vaccine-status-in-her-latest-post-an-open-letter-to-this-friend |
| curator | altlash |
| reward | 10.224401 VESTS |
| Transaction Info | Block #19790849/Virtual Operation #6 |
View Raw JSON Data
{
  "block": 19790849,
  "op": [
    "curation_reward",
    {
      "comment_author": "jessicabennett",
      "comment_permlink": "when-your-blogger-friend-writes-about-your-vaccine-status-in-her-latest-post-an-open-letter-to-this-friend",
      "curator": "altlash",
      "reward": "10.224401 VESTS"
    }
  ],
  "op_in_trx": 0,
  "timestamp": "2018-02-12T00:51:54",
  "trx_id": "0000000000000000000000000000000000000000",
  "trx_in_block": 4294967295,
  "virtual_op": 6
}altlashupvoted (100.00%) @jessicabennett / why-the-starbucks-credit-card-is-a-dumb-idea2018/02/11 04:00:21
altlashupvoted (100.00%) @jessicabennett / why-the-starbucks-credit-card-is-a-dumb-idea
2018/02/11 04:00:21
| author | jessicabennett |
| permlink | why-the-starbucks-credit-card-is-a-dumb-idea |
| voter | altlash |
| weight | 10000 (100.00%) |
| Transaction Info | Block #19765843/Trx ba3732e3812c4b77a7e72dbbbc311c9c0f8da33e |
View Raw JSON Data
{
  "block": 19765843,
  "op": [
    "vote",
    {
      "author": "jessicabennett",
      "permlink": "why-the-starbucks-credit-card-is-a-dumb-idea",
      "voter": "altlash",
      "weight": 10000
    }
  ],
  "op_in_trx": 0,
  "timestamp": "2018-02-11T04:00:21",
  "trx_id": "ba3732e3812c4b77a7e72dbbbc311c9c0f8da33e",
  "trx_in_block": 3,
  "virtual_op": 0
}altlashupvoted (100.00%) @jessicabennett / tiny-houses2018/02/11 04:00:15
altlashupvoted (100.00%) @jessicabennett / tiny-houses
2018/02/11 04:00:15
| author | jessicabennett |
| permlink | tiny-houses |
| voter | altlash |
| weight | 10000 (100.00%) |
| Transaction Info | Block #19765841/Trx 93ff647b86f862554d4fdd3d5c010612a94b7b6c |
View Raw JSON Data
{
  "block": 19765841,
  "op": [
    "vote",
    {
      "author": "jessicabennett",
      "permlink": "tiny-houses",
      "voter": "altlash",
      "weight": 10000
    }
  ],
  "op_in_trx": 0,
  "timestamp": "2018-02-11T04:00:15",
  "trx_id": "93ff647b86f862554d4fdd3d5c010612a94b7b6c",
  "trx_in_block": 13,
  "virtual_op": 0
}altlashclaimed reward balance: 0.152 SBD, 0.045 SP2018/02/07 03:05:15
altlashclaimed reward balance: 0.152 SBD, 0.045 SP
2018/02/07 03:05:15
| account | altlash |
| reward sbd | 0.152 SBD |
| reward steem | 0.000 STEEM |
| reward vests | 73.641719 VESTS |
| Transaction Info | Block #19649831/Trx d98f5e225097ce99b7c8691bcfc449294fd3999d |
View Raw JSON Data
{
  "block": 19649831,
  "op": [
    "claim_reward_balance",
    {
      "account": "altlash",
      "reward_sbd": "0.152 SBD",
      "reward_steem": "0.000 STEEM",
      "reward_vests": "73.641719 VESTS"
    }
  ],
  "op_in_trx": 0,
  "timestamp": "2018-02-07T03:05:15",
  "trx_id": "d98f5e225097ce99b7c8691bcfc449294fd3999d",
  "trx_in_block": 43,
  "virtual_op": 0
}altlashupvoted (100.00%) @jessicabennett / card-making2018/02/07 03:04:45
altlashupvoted (100.00%) @jessicabennett / card-making
2018/02/07 03:04:45
| author | jessicabennett |
| permlink | card-making |
| voter | altlash |
| weight | 10000 (100.00%) |
| Transaction Info | Block #19649821/Trx 94ee1b2133a117f42f5ef71a5aaf8c56d6b975f9 |
View Raw JSON Data
{
  "block": 19649821,
  "op": [
    "vote",
    {
      "author": "jessicabennett",
      "permlink": "card-making",
      "voter": "altlash",
      "weight": 10000
    }
  ],
  "op_in_trx": 0,
  "timestamp": "2018-02-07T03:04:45",
  "trx_id": "94ee1b2133a117f42f5ef71a5aaf8c56d6b975f9",
  "trx_in_block": 4,
  "virtual_op": 0
}altlashupvoted (100.00%) @jessicabennett / fluff-mail2018/02/07 03:04:33
altlashupvoted (100.00%) @jessicabennett / fluff-mail
2018/02/07 03:04:33
| author | jessicabennett |
| permlink | fluff-mail |
| voter | altlash |
| weight | 10000 (100.00%) |
| Transaction Info | Block #19649817/Trx d8827f078c1c24c7ae843fb59cf34879ee9e5811 |
View Raw JSON Data
{
  "block": 19649817,
  "op": [
    "vote",
    {
      "author": "jessicabennett",
      "permlink": "fluff-mail",
      "voter": "altlash",
      "weight": 10000
    }
  ],
  "op_in_trx": 0,
  "timestamp": "2018-02-07T03:04:33",
  "trx_id": "d8827f078c1c24c7ae843fb59cf34879ee9e5811",
  "trx_in_block": 13,
  "virtual_op": 0
}altlashupvoted (100.00%) @jessicabennett / mid-morning-coffee-and-devotion2018/02/07 03:04:27
altlashupvoted (100.00%) @jessicabennett / mid-morning-coffee-and-devotion
2018/02/07 03:04:27
| author | jessicabennett |
| permlink | mid-morning-coffee-and-devotion |
| voter | altlash |
| weight | 10000 (100.00%) |
| Transaction Info | Block #19649815/Trx 7bbd4441d134cc426225b7e7a5f12d18b185dc06 |
View Raw JSON Data
{
  "block": 19649815,
  "op": [
    "vote",
    {
      "author": "jessicabennett",
      "permlink": "mid-morning-coffee-and-devotion",
      "voter": "altlash",
      "weight": 10000
    }
  ],
  "op_in_trx": 0,
  "timestamp": "2018-02-07T03:04:27",
  "trx_id": "7bbd4441d134cc426225b7e7a5f12d18b185dc06",
  "trx_in_block": 73,
  "virtual_op": 0
}altlashupvoted (100.00%) @jessicabennett / mom-sticker-book-giveaway2018/02/07 03:04:24
altlashupvoted (100.00%) @jessicabennett / mom-sticker-book-giveaway
2018/02/07 03:04:24
| author | jessicabennett |
| permlink | mom-sticker-book-giveaway |
| voter | altlash |
| weight | 10000 (100.00%) |
| Transaction Info | Block #19649814/Trx 269a1d2996a70ef371c83a422e39bc317463fe6a |
View Raw JSON Data
{
  "block": 19649814,
  "op": [
    "vote",
    {
      "author": "jessicabennett",
      "permlink": "mom-sticker-book-giveaway",
      "voter": "altlash",
      "weight": 10000
    }
  ],
  "op_in_trx": 0,
  "timestamp": "2018-02-07T03:04:24",
  "trx_id": "269a1d2996a70ef371c83a422e39bc317463fe6a",
  "trx_in_block": 54,
  "virtual_op": 0
}altlashupvoted (100.00%) @jessicabennett / qdw5vlnv2018/02/07 03:04:21
altlashupvoted (100.00%) @jessicabennett / qdw5vlnv
2018/02/07 03:04:21
| author | jessicabennett |
| permlink | qdw5vlnv |
| voter | altlash |
| weight | 10000 (100.00%) |
| Transaction Info | Block #19649813/Trx 1a79ef0ca7c5dfb0380be9cc8f325287fd7ee146 |
View Raw JSON Data
{
  "block": 19649813,
  "op": [
    "vote",
    {
      "author": "jessicabennett",
      "permlink": "qdw5vlnv",
      "voter": "altlash",
      "weight": 10000
    }
  ],
  "op_in_trx": 0,
  "timestamp": "2018-02-07T03:04:21",
  "trx_id": "1a79ef0ca7c5dfb0380be9cc8f325287fd7ee146",
  "trx_in_block": 52,
  "virtual_op": 0
}altlashupvoted (100.00%) @jessicabennett / do-you-like-coffee-with-your-cream2018/02/07 03:04:18
altlashupvoted (100.00%) @jessicabennett / do-you-like-coffee-with-your-cream
2018/02/07 03:04:18
| author | jessicabennett |
| permlink | do-you-like-coffee-with-your-cream |
| voter | altlash |
| weight | 10000 (100.00%) |
| Transaction Info | Block #19649812/Trx 34b477917474a4a296c9a414b5db6e063e688d8c |
View Raw JSON Data
{
  "block": 19649812,
  "op": [
    "vote",
    {
      "author": "jessicabennett",
      "permlink": "do-you-like-coffee-with-your-cream",
      "voter": "altlash",
      "weight": 10000
    }
  ],
  "op_in_trx": 0,
  "timestamp": "2018-02-07T03:04:18",
  "trx_id": "34b477917474a4a296c9a414b5db6e063e688d8c",
  "trx_in_block": 11,
  "virtual_op": 0
}2018/02/07 03:04:03
2018/02/07 03:04:03
| author | jessicabennett |
| permlink | it-laughs-at-fear-afraid-of-nothing-it-does-not-shy-away-from-the-sword |
| voter | altlash |
| weight | 10000 (100.00%) |
| Transaction Info | Block #19649807/Trx 7fdf647676690e21e21ae408cad4b19116d6c232 |
View Raw JSON Data
{
  "block": 19649807,
  "op": [
    "vote",
    {
      "author": "jessicabennett",
      "permlink": "it-laughs-at-fear-afraid-of-nothing-it-does-not-shy-away-from-the-sword",
      "voter": "altlash",
      "weight": 10000
    }
  ],
  "op_in_trx": 0,
  "timestamp": "2018-02-07T03:04:03",
  "trx_id": "7fdf647676690e21e21ae408cad4b19116d6c232",
  "trx_in_block": 5,
  "virtual_op": 0
}altlashcustom json: follow2018/02/07 03:03:39
altlashcustom json: follow
2018/02/07 03:03:39
| id | follow |
| json | ["reblog",{"account":"altlash","author":"jessicabennett","permlink":"our-love-story"}] |
| required auths | [] |
| required posting auths | ["altlash"] |
| Transaction Info | Block #19649799/Trx 36fa29f63dcefb458c0d3b532c2adaae8beda55d |
View Raw JSON Data
{
  "block": 19649799,
  "op": [
    "custom_json",
    {
      "id": "follow",
      "json": "[\"reblog\",{\"account\":\"altlash\",\"author\":\"jessicabennett\",\"permlink\":\"our-love-story\"}]",
      "required_auths": [],
      "required_posting_auths": [
        "altlash"
      ]
    }
  ],
  "op_in_trx": 0,
  "timestamp": "2018-02-07T03:03:39",
  "trx_id": "36fa29f63dcefb458c0d3b532c2adaae8beda55d",
  "trx_in_block": 26,
  "virtual_op": 0
}altlashupvoted (100.00%) @jessicabennett / our-love-story2018/02/07 03:03:12
altlashupvoted (100.00%) @jessicabennett / our-love-story
2018/02/07 03:03:12
| author | jessicabennett |
| permlink | our-love-story |
| voter | altlash |
| weight | 10000 (100.00%) |
| Transaction Info | Block #19649790/Trx ff7253f6aae750194a4f0d778f9848e676061ac8 |
View Raw JSON Data
{
  "block": 19649790,
  "op": [
    "vote",
    {
      "author": "jessicabennett",
      "permlink": "our-love-story",
      "voter": "altlash",
      "weight": 10000
    }
  ],
  "op_in_trx": 0,
  "timestamp": "2018-02-07T03:03:12",
  "trx_id": "ff7253f6aae750194a4f0d778f9848e676061ac8",
  "trx_in_block": 1,
  "virtual_op": 0
}2018/02/05 23:00:30
2018/02/05 23:00:30
| author | altlash |
| permlink | re-firepower-let-s-talk-have-you-planned-for-your-cryptocurrency-legal-heir-20180127t013420386z |
| voter | jessicabennett |
| weight | 10000 (100.00%) |
| Transaction Info | Block #19616151/Trx 3f92ab43812cbef3c8155b0e0cbd47da55d186f4 |
View Raw JSON Data
{
  "block": 19616151,
  "op": [
    "vote",
    {
      "author": "altlash",
      "permlink": "re-firepower-let-s-talk-have-you-planned-for-your-cryptocurrency-legal-heir-20180127t013420386z",
      "voter": "jessicabennett",
      "weight": 10000
    }
  ],
  "op_in_trx": 0,
  "timestamp": "2018-02-05T23:00:30",
  "trx_id": "3f92ab43812cbef3c8155b0e0cbd47da55d186f4",
  "trx_in_block": 75,
  "virtual_op": 0
}jessicabennettupvoted (100.00%) @altlash / re-balake-binance-withdrawal-fees-20180128t014542440z2018/02/05 23:00:30
jessicabennettupvoted (100.00%) @altlash / re-balake-binance-withdrawal-fees-20180128t014542440z
2018/02/05 23:00:30
| author | altlash |
| permlink | re-balake-binance-withdrawal-fees-20180128t014542440z |
| voter | jessicabennett |
| weight | 10000 (100.00%) |
| Transaction Info | Block #19616151/Trx 1937f7a54e81f7d17d445586190f366ede3355d0 |
View Raw JSON Data
{
  "block": 19616151,
  "op": [
    "vote",
    {
      "author": "altlash",
      "permlink": "re-balake-binance-withdrawal-fees-20180128t014542440z",
      "voter": "jessicabennett",
      "weight": 10000
    }
  ],
  "op_in_trx": 0,
  "timestamp": "2018-02-05T23:00:30",
  "trx_id": "1937f7a54e81f7d17d445586190f366ede3355d0",
  "trx_in_block": 49,
  "virtual_op": 0
}jessicabennettupvoted (100.00%) @altlash / re-zemiatin-re-altlash-minergate-review-20180129t095135898z2018/02/05 23:00:27
jessicabennettupvoted (100.00%) @altlash / re-zemiatin-re-altlash-minergate-review-20180129t095135898z
2018/02/05 23:00:27
| author | altlash |
| permlink | re-zemiatin-re-altlash-minergate-review-20180129t095135898z |
| voter | jessicabennett |
| weight | 10000 (100.00%) |
| Transaction Info | Block #19616150/Trx 8d3cd2b28de4d54726a5553fc96af5e3025ee2ec |
View Raw JSON Data
{
  "block": 19616150,
  "op": [
    "vote",
    {
      "author": "altlash",
      "permlink": "re-zemiatin-re-altlash-minergate-review-20180129t095135898z",
      "voter": "jessicabennett",
      "weight": 10000
    }
  ],
  "op_in_trx": 0,
  "timestamp": "2018-02-05T23:00:27",
  "trx_id": "8d3cd2b28de4d54726a5553fc96af5e3025ee2ec",
  "trx_in_block": 18,
  "virtual_op": 0
}jessicabennettupvoted (100.00%) @altlash / re-jason7282-re-altlash-minergate-review-20180129t095223352z2018/02/05 23:00:24
jessicabennettupvoted (100.00%) @altlash / re-jason7282-re-altlash-minergate-review-20180129t095223352z
2018/02/05 23:00:24
| author | altlash |
| permlink | re-jason7282-re-altlash-minergate-review-20180129t095223352z |
| voter | jessicabennett |
| weight | 10000 (100.00%) |
| Transaction Info | Block #19616149/Trx 0ad1f41cf7301a85b9a4aeb669b64a84d279a473 |
View Raw JSON Data
{
  "block": 19616149,
  "op": [
    "vote",
    {
      "author": "altlash",
      "permlink": "re-jason7282-re-altlash-minergate-review-20180129t095223352z",
      "voter": "jessicabennett",
      "weight": 10000
    }
  ],
  "op_in_trx": 0,
  "timestamp": "2018-02-05T23:00:24",
  "trx_id": "0ad1f41cf7301a85b9a4aeb669b64a84d279a473",
  "trx_in_block": 26,
  "virtual_op": 0
}jessicabennettupvoted (100.00%) @altlash / re-balake-quick-trading-tip-sell-walls-20180201t021849240z2018/02/05 23:00:21
jessicabennettupvoted (100.00%) @altlash / re-balake-quick-trading-tip-sell-walls-20180201t021849240z
2018/02/05 23:00:21
| author | altlash |
| permlink | re-balake-quick-trading-tip-sell-walls-20180201t021849240z |
| voter | jessicabennett |
| weight | 10000 (100.00%) |
| Transaction Info | Block #19616148/Trx b67441ac3bf0c96c0aeea6c9ce73db16021db7e7 |
View Raw JSON Data
{
  "block": 19616148,
  "op": [
    "vote",
    {
      "author": "altlash",
      "permlink": "re-balake-quick-trading-tip-sell-walls-20180201t021849240z",
      "voter": "jessicabennett",
      "weight": 10000
    }
  ],
  "op_in_trx": 0,
  "timestamp": "2018-02-05T23:00:21",
  "trx_id": "b67441ac3bf0c96c0aeea6c9ce73db16021db7e7",
  "trx_in_block": 65,
  "virtual_op": 0
}2018/02/05 20:06:06
2018/02/05 20:06:06
| author | jessicabennett |
| body | I need to start reading up on this stuff! |
| json metadata | {"tags":["crypto"],"app":"steemit/0.1"} |
| parent author | altlash |
| parent permlink | my-first-check-in |
| permlink | re-altlash-my-first-check-in-20180205t200606106z |
| title | |
| Transaction Info | Block #19612664/Trx 3d68db1617933592d56ea02eaaeb0e3c1304484d |
View Raw JSON Data
{
  "block": 19612664,
  "op": [
    "comment",
    {
      "author": "jessicabennett",
      "body": "I need to start reading up on this stuff!",
      "json_metadata": "{\"tags\":[\"crypto\"],\"app\":\"steemit/0.1\"}",
      "parent_author": "altlash",
      "parent_permlink": "my-first-check-in",
      "permlink": "re-altlash-my-first-check-in-20180205t200606106z",
      "title": ""
    }
  ],
  "op_in_trx": 0,
  "timestamp": "2018-02-05T20:06:06",
  "trx_id": "3d68db1617933592d56ea02eaaeb0e3c1304484d",
  "trx_in_block": 15,
  "virtual_op": 0
}carramrodupvoted (100.00%) @altlash / re-altlash-week-1-recap-20180202t034132110z2018/02/05 07:14:30
carramrodupvoted (100.00%) @altlash / re-altlash-week-1-recap-20180202t034132110z
2018/02/05 07:14:30
| author | altlash |
| permlink | re-altlash-week-1-recap-20180202t034132110z |
| voter | carramrod |
| weight | 10000 (100.00%) |
| Transaction Info | Block #19597240/Trx 5631818bca3a91e069014850e10543a8541cbc18 |
View Raw JSON Data
{
  "block": 19597240,
  "op": [
    "vote",
    {
      "author": "altlash",
      "permlink": "re-altlash-week-1-recap-20180202t034132110z",
      "voter": "carramrod",
      "weight": 10000
    }
  ],
  "op_in_trx": 0,
  "timestamp": "2018-02-05T07:14:30",
  "trx_id": "5631818bca3a91e069014850e10543a8541cbc18",
  "trx_in_block": 39,
  "virtual_op": 0
}2018/02/05 07:14:12
2018/02/05 07:14:12
| author | carramrod |
| body | im about to be practicing with small trades myself. I have a hard time not spending whatever BTC i do buy though. So many promising alt coins i want to buy. |
| json metadata | {"tags":["invest"],"app":"steemit/0.1"} |
| parent author | altlash |
| parent permlink | week-1-recap |
| permlink | re-altlash-week-1-recap-20180205t071412556z |
| title | |
| Transaction Info | Block #19597234/Trx 6dea6a0aa01cf81934a24949435cf0f7bd6808dc |
View Raw JSON Data
{
  "block": 19597234,
  "op": [
    "comment",
    {
      "author": "carramrod",
      "body": "im about to be practicing with small trades myself.  I have a hard time not spending whatever BTC i do buy though.  So many promising alt coins i want to buy.",
      "json_metadata": "{\"tags\":[\"invest\"],\"app\":\"steemit/0.1\"}",
      "parent_author": "altlash",
      "parent_permlink": "week-1-recap",
      "permlink": "re-altlash-week-1-recap-20180205t071412556z",
      "title": ""
    }
  ],
  "op_in_trx": 0,
  "timestamp": "2018-02-05T07:14:12",
  "trx_id": "6dea6a0aa01cf81934a24949435cf0f7bd6808dc",
  "trx_in_block": 26,
  "virtual_op": 0
}Manabar
Voting Power100.00%
Downvote Power100.00%
Resource Credits100.00%
Reputation Progress0.00%
{
  "voting_manabar": {
    "current_mana": "8143659806",
    "last_update_time": 1779052497
  },
  "downvote_manabar": {
    "current_mana": 2035914951,
    "last_update_time": 1779052497
  },
  "rc_account": {
    "account": "altlash",
    "max_rc": "10164408779",
    "max_rc_creation_adjustment": {
      "amount": "2020748973",
      "nai": "@@000000037",
      "precision": 6
    },
    "rc_manabar": {
      "current_mana": "10164408779",
      "last_update_time": 1779052497
    }
  }
}
Account Metadata
| POSTING JSON METADATA | |
| profile | {"profile_image":"https://scontent-atl3-1.xx.fbcdn.net/v/t1.0-9/26195971_10214996020563942_6353942225851003486_n.jpg?oh=901815fd7205130d3fd6dae67d70e9d7&oe=5ADE3FF6"} |
| JSON METADATA | |
| profile | {"profile_image":"https://scontent-atl3-1.xx.fbcdn.net/v/t1.0-9/26195971_10214996020563942_6353942225851003486_n.jpg?oh=901815fd7205130d3fd6dae67d70e9d7&oe=5ADE3FF6"} |
{
  "posting_json_metadata": {
    "profile": {
      "profile_image": "https://scontent-atl3-1.xx.fbcdn.net/v/t1.0-9/26195971_10214996020563942_6353942225851003486_n.jpg?oh=901815fd7205130d3fd6dae67d70e9d7&oe=5ADE3FF6"
    }
  },
  "json_metadata": {
    "profile": {
      "profile_image": "https://scontent-atl3-1.xx.fbcdn.net/v/t1.0-9/26195971_10214996020563942_6353942225851003486_n.jpg?oh=901815fd7205130d3fd6dae67d70e9d7&oe=5ADE3FF6"
    }
  }
}
Auth Keys
Owner
Single Signature
Public Keys
STM6cy1i2bA6uxiQM99UWT7vbwz8KcvnaiBYhjgGNgrL4RL83X7Zn1/1
Active
Single Signature
Public Keys
STM5rFmbataM2AEY2pokUmzWKsJQNjm5ZVZQPDkHtpWvW4jttE9NA1/1
Posting
Single Signature
Public Keys
STM5Hh11mCSSfYjT1fgjwswy2WFsBoJKJADurAs6dg2WkWbKP3vTx1/1
Memo
STM5EK6bVEvgxFPmR87kje6eU2gJJBZAcVNtWUK3bomFKKzLnrxEc
{
  "owner": {
    "account_auths": [],
    "key_auths": [
      [
        "STM6cy1i2bA6uxiQM99UWT7vbwz8KcvnaiBYhjgGNgrL4RL83X7Zn",
        1
      ]
    ],
    "weight_threshold": 1
  },
  "active": {
    "account_auths": [],
    "key_auths": [
      [
        "STM5rFmbataM2AEY2pokUmzWKsJQNjm5ZVZQPDkHtpWvW4jttE9NA",
        1
      ]
    ],
    "weight_threshold": 1
  },
  "posting": {
    "account_auths": [],
    "key_auths": [
      [
        "STM5Hh11mCSSfYjT1fgjwswy2WFsBoJKJADurAs6dg2WkWbKP3vTx",
        1
      ]
    ],
    "weight_threshold": 1
  },
  "memo": "STM5EK6bVEvgxFPmR87kje6eU2gJJBZAcVNtWUK3bomFKKzLnrxEc"
}
Witness Votes
0 / 30
No active witness votes.
[]