VOTING POWER100.00%
DOWNVOTE POWER100.00%
RESOURCE CREDITS100.00%
REPUTATION PROGRESS9.24%
Net Worth
0.296USD
STEEM
0.001STEEM
SBD
0.000SBD
Effective Power
6.133SP
├── Own SP
5.101SP
└── Incoming DelegationsDeleg
+1.031SP
Detailed Balance
| STEEM | ||
| balance | 0.001STEEM | STEEM |
| market_balance | 0.000STEEM | STEEM |
| savings_balance | 0.000STEEM | STEEM |
| reward_steem_balance | 0.000STEEM | STEEM |
| STEEM POWER | ||
| Own SP | 5.101SP | SP |
| Delegated Out | 0.000SP | SP |
| Delegation In | 1.031SP | SP |
| Effective Power | 6.133SP | SP |
| Reward SP (pending) | 0.000SP | SP |
| SBD | ||
| sbd_balance | 0.000SBD | SBD |
| sbd_conversions | 0.000SBD | SBD |
| sbd_market_balance | 0.000SBD | SBD |
| savings_sbd_balance | 0.000SBD | SBD |
| reward_sbd_balance | 0.000SBD | SBD |
{
  "balance": "0.001 STEEM",
  "savings_balance": "0.000 STEEM",
  "reward_steem_balance": "0.000 STEEM",
  "vesting_shares": "8297.027008 VESTS",
  "delegated_vesting_shares": "0.000000 VESTS",
  "received_vesting_shares": "1677.459086 VESTS",
  "sbd_balance": "0.000 SBD",
  "savings_sbd_balance": "0.000 SBD",
  "reward_sbd_balance": "0.000 SBD",
  "conversions": []
}
Account Info
| name | fureweb |
| id | 635498 |
| rank | 199,675 |
| reputation | 79277691714 |
| created | 2018-01-21T12:08:27 |
| recovery_account | steem |
| proxy | None |
| post_count | 16 |
| comment_count | 0 |
| lifetime_vote_count | 0 |
| witnesses_voted_for | 0 |
| last_post | 2018-04-03T23:19:33 |
| last_root_post | 2018-02-22T04:23:51 |
| last_vote_time | 2018-04-02T14:59:00 |
| proxied_vsf_votes | 0, 0, 0, 0 |
| can_vote | 1 |
| voting_power | 0 |
| delayed_votes | 0 |
| balance | 0.001 STEEM |
| savings_balance | 0.000 STEEM |
| sbd_balance | 0.000 SBD |
| savings_sbd_balance | 0.000 SBD |
| vesting_shares | 8297.027008 VESTS |
| delegated_vesting_shares | 0.000000 VESTS |
| received_vesting_shares | 1677.459086 VESTS |
| reward_vesting_balance | 0.000000 VESTS |
| vesting_balance | 0.000 STEEM |
| vesting_withdraw_rate | 0.000000 VESTS |
| next_vesting_withdrawal | 1969-12-31T23:59:59 |
| withdrawn | 0 |
| to_withdraw | 0 |
| withdraw_routes | 0 |
| savings_withdraw_requests | 0 |
| last_account_recovery | 1970-01-01T00:00:00 |
| reset_account | null |
| last_owner_update | 1970-01-01T00:00:00 |
| last_account_update | 2018-01-22T07:03:00 |
| mined | No |
| sbd_seconds | 0 |
| sbd_last_interest_payment | 2021-03-27T14:01:15 |
| savings_sbd_last_interest_payment | 1970-01-01T00:00:00 |
{
  "active": {
    "account_auths": [],
    "key_auths": [
      [
        "STM5Qpzye4kiA4HjaP5CnqeYbcdPWGS78EzryBhPkfQPqqjSsCWKp",
        1
      ]
    ],
    "weight_threshold": 1
  },
  "balance": "0.001 STEEM",
  "can_vote": true,
  "comment_count": 0,
  "created": "2018-01-21T12:08:27",
  "curation_rewards": 0,
  "delegated_vesting_shares": "0.000000 VESTS",
  "downvote_manabar": {
    "current_mana": 2493621524,
    "last_update_time": 1743859593
  },
  "guest_bloggers": [],
  "id": 635498,
  "json_metadata": "{\"profile\":{\"profile_image\":\"https://us.v-cdn.net/6030588/uploads/userpics/593/pYJVW1N7GLYZ9.png\",\"name\":\"fureweb\",\"location\":\"Seoul\",\"website\":\"https://fureweb-com.github.io\"}}",
  "last_account_recovery": "1970-01-01T00:00:00",
  "last_account_update": "2018-01-22T07:03:00",
  "last_owner_update": "1970-01-01T00:00:00",
  "last_post": "2018-04-03T23:19:33",
  "last_root_post": "2018-02-22T04:23:51",
  "last_vote_time": "2018-04-02T14:59:00",
  "lifetime_vote_count": 0,
  "market_history": [],
  "memo_key": "STM8iPJ3gKittsH9Ae8uLDzXHzpv2n56dd9iKt8Z1P4TS775rsaAD",
  "mined": false,
  "name": "fureweb",
  "next_vesting_withdrawal": "1969-12-31T23:59:59",
  "other_history": [],
  "owner": {
    "account_auths": [],
    "key_auths": [
      [
        "STM6nQ64PzsSeiqufnvCT1PUfnoFh9JhyCuYw2tPwFfXx5RpuytMB",
        1
      ]
    ],
    "weight_threshold": 1
  },
  "pending_claimed_accounts": 0,
  "post_bandwidth": 0,
  "post_count": 16,
  "post_history": [],
  "posting": {
    "account_auths": [],
    "key_auths": [
      [
        "STM7Hf9eLLqTmJkgcUqPkVh1mY8NDoiMwZobTEZwU6ydEDe5bMGQf",
        1
      ]
    ],
    "weight_threshold": 1
  },
  "posting_json_metadata": "{\"profile\":{\"profile_image\":\"https://us.v-cdn.net/6030588/uploads/userpics/593/pYJVW1N7GLYZ9.png\",\"name\":\"fureweb\",\"location\":\"Seoul\",\"website\":\"https://fureweb-com.github.io\"}}",
  "posting_rewards": 7109,
  "proxied_vsf_votes": [
    0,
    0,
    0,
    0
  ],
  "proxy": "",
  "received_vesting_shares": "1677.459086 VESTS",
  "recovery_account": "steem",
  "reputation": "79277691714",
  "reset_account": "null",
  "reward_sbd_balance": "0.000 SBD",
  "reward_steem_balance": "0.000 STEEM",
  "reward_vesting_balance": "0.000000 VESTS",
  "reward_vesting_steem": "0.000 STEEM",
  "savings_balance": "0.000 STEEM",
  "savings_sbd_balance": "0.000 SBD",
  "savings_sbd_last_interest_payment": "1970-01-01T00:00:00",
  "savings_sbd_seconds": "0",
  "savings_sbd_seconds_last_update": "1970-01-01T00:00:00",
  "savings_withdraw_requests": 0,
  "sbd_balance": "0.000 SBD",
  "sbd_last_interest_payment": "2021-03-27T14:01:15",
  "sbd_seconds": "0",
  "sbd_seconds_last_update": "2021-03-27T14:01:15",
  "tags_usage": [],
  "to_withdraw": 0,
  "transfer_history": [],
  "vesting_balance": "0.000 STEEM",
  "vesting_shares": "8297.027008 VESTS",
  "vesting_withdraw_rate": "0.000000 VESTS",
  "vote_history": [],
  "voting_manabar": {
    "current_mana": "9974486094",
    "last_update_time": 1743859593
  },
  "voting_power": 0,
  "withdraw_routes": 0,
  "withdrawn": 0,
  "witness_votes": [],
  "witnesses_voted_for": 0,
  "rank": 199675
}
Withdraw Routes
| Incoming | Outgoing |
|---|---|
Empty | Empty |
{
  "incoming": [],
  "outgoing": []
}From Date
To Date
2025/04/05 13:26:33
2025/04/05 13:26:33
| delegatee | fureweb |
| delegator | steem |
| vesting shares | 1677.459086 VESTS |
| Transaction Info | Block #94441672/Trx a7b2687a20623d6b8bcc2bf8c608c1335908ff32 |
View Raw JSON Data
{
  "block": 94441672,
  "op": [
    "delegate_vesting_shares",
    {
      "delegatee": "fureweb",
      "delegator": "steem",
      "vesting_shares": "1677.459086 VESTS"
    }
  ],
  "op_in_trx": 0,
  "timestamp": "2025-04-05T13:26:33",
  "trx_id": "a7b2687a20623d6b8bcc2bf8c608c1335908ff32",
  "trx_in_block": 7,
  "virtual_op": 0
}2021/11/28 12:23:09
2021/11/28 12:23:09
| delegatee | fureweb |
| delegator | steem |
| vesting shares | 1845.205532 VESTS |
| Transaction Info | Block #59385101/Trx 9677bfcc2a65fe165fd4224feb1038ead4120bf1 |
View Raw JSON Data
{
  "block": 59385101,
  "op": [
    "delegate_vesting_shares",
    {
      "delegatee": "fureweb",
      "delegator": "steem",
      "vesting_shares": "1845.205532 VESTS"
    }
  ],
  "op_in_trx": 0,
  "timestamp": "2021-11-28T12:23:09",
  "trx_id": "9677bfcc2a65fe165fd4224feb1038ead4120bf1",
  "trx_in_block": 21,
  "virtual_op": 0
}furewebsent 1.239 SBD to @user.dunamu- "1139f9c8-3df6-4063-9262-c3296e7641bb"2021/03/27 14:01:15
furewebsent 1.239 SBD to @user.dunamu- "1139f9c8-3df6-4063-9262-c3296e7641bb"
2021/03/27 14:01:15
| amount | 1.239 SBD |
| from | fureweb |
| memo | 1139f9c8-3df6-4063-9262-c3296e7641bb |
| to | user.dunamu |
| Transaction Info | Block #52368165/Trx 97143d95e11071983e8f21991d324b25ab5587fb |
View Raw JSON Data
{
  "block": 52368165,
  "op": [
    "transfer",
    {
      "amount": "1.239 SBD",
      "from": "fureweb",
      "memo": "1139f9c8-3df6-4063-9262-c3296e7641bb",
      "to": "user.dunamu"
    }
  ],
  "op_in_trx": 0,
  "timestamp": "2021-03-27T14:01:15",
  "trx_id": "97143d95e11071983e8f21991d324b25ab5587fb",
  "trx_in_block": 9,
  "virtual_op": 0
}2020/01/21 13:14:36
2020/01/21 13:14:36
| author | steemitboard |
| body | Congratulations @fureweb! You received a personal award! <table><tr><td>https://steemitimages.com/70x70/http://steemitboard.com/@fureweb/birthday2.png</td><td>Happy Birthday! - You are on the Steem blockchain for 2 years!</td></tr></table> <sub>_You can view [your badges on your Steem Board](https://steemitboard.com/@fureweb) and compare to others on the [Steem Ranking](https://steemitboard.com/ranking/index.php?name=fureweb)_</sub> ###### [Vote for @Steemitboard as a witness](https://v2.steemconnect.com/sign/account-witness-vote?witness=steemitboard&approve=1) to get one more award and increased upvotes! |
| json metadata | {"image":["https://steemitboard.com/img/notify.png"]} |
| parent author | fureweb |
| parent permlink | nginx-ssl |
| permlink | steemitboard-notify-fureweb-20200121t131436000z |
| title | |
| Transaction Info | Block #40123082/Trx 1b319c04fa345ec7496e68372a7a8dab67d652f9 |
View Raw JSON Data
{
  "block": 40123082,
  "op": [
    "comment",
    {
      "author": "steemitboard",
      "body": "Congratulations @fureweb! You received a personal award!\n\n<table><tr><td>https://steemitimages.com/70x70/http://steemitboard.com/@fureweb/birthday2.png</td><td>Happy Birthday! - You are on the Steem blockchain for 2 years!</td></tr></table>\n\n<sub>_You can view [your badges on your Steem Board](https://steemitboard.com/@fureweb) and compare to others on the [Steem Ranking](https://steemitboard.com/ranking/index.php?name=fureweb)_</sub>\n\n\n###### [Vote for @Steemitboard as a witness](https://v2.steemconnect.com/sign/account-witness-vote?witness=steemitboard&approve=1) to get one more award and increased upvotes!",
      "json_metadata": "{\"image\":[\"https://steemitboard.com/img/notify.png\"]}",
      "parent_author": "fureweb",
      "parent_permlink": "nginx-ssl",
      "permlink": "steemitboard-notify-fureweb-20200121t131436000z",
      "title": ""
    }
  ],
  "op_in_trx": 0,
  "timestamp": "2020-01-21T13:14:36",
  "trx_id": "1b319c04fa345ec7496e68372a7a8dab67d652f9",
  "trx_in_block": 13,
  "virtual_op": 0
}2019/01/21 14:14:48
2019/01/21 14:14:48
| author | steemitboard |
| body | Congratulations @fureweb! You received a personal award! <table><tr><td>https://steemitimages.com/70x70/http://steemitboard.com/@fureweb/birthday1.png</td><td>Happy Birthday! - You are on the Steem blockchain for 1 year!</td></tr></table> <sub>_[Click here to view your Board](https://steemitboard.com/@fureweb)_</sub> > Support [SteemitBoard's project](https://steemit.com/@steemitboard)! **[Vote for its witness](https://v2.steemconnect.com/sign/account-witness-vote?witness=steemitboard&approve=1)** and **get one more award**! |
| json metadata | {"image":["https://steemitboard.com/img/notify.png"]} |
| parent author | fureweb |
| parent permlink | nginx-ssl |
| permlink | steemitboard-notify-fureweb-20190121t141447000z |
| title | |
| Transaction Info | Block #29651724/Trx df1237709470016cc279cdf93c8674d23da23ee6 |
View Raw JSON Data
{
  "block": 29651724,
  "op": [
    "comment",
    {
      "author": "steemitboard",
      "body": "Congratulations @fureweb! You received a personal award!\n\n<table><tr><td>https://steemitimages.com/70x70/http://steemitboard.com/@fureweb/birthday1.png</td><td>Happy Birthday! - You are on the Steem blockchain for 1 year!</td></tr></table>\n\n<sub>_[Click here to view your Board](https://steemitboard.com/@fureweb)_</sub>\n\n\n> Support [SteemitBoard's project](https://steemit.com/@steemitboard)! **[Vote for its witness](https://v2.steemconnect.com/sign/account-witness-vote?witness=steemitboard&approve=1)** and **get one more award**!",
      "json_metadata": "{\"image\":[\"https://steemitboard.com/img/notify.png\"]}",
      "parent_author": "fureweb",
      "parent_permlink": "nginx-ssl",
      "permlink": "steemitboard-notify-fureweb-20190121t141447000z",
      "title": ""
    }
  ],
  "op_in_trx": 0,
  "timestamp": "2019-01-21T14:14:48",
  "trx_id": "df1237709470016cc279cdf93c8674d23da23ee6",
  "trx_in_block": 6,
  "virtual_op": 0
}2018/07/04 01:28:12
2018/07/04 01:28:12
| delegatee | fureweb |
| delegator | steem |
| vesting shares | 2029.736576 VESTS |
| Transaction Info | Block #23867385/Trx 8c7932238699a8cf772c8b0eca61de9b3269b016 |
View Raw JSON Data
{
  "block": 23867385,
  "op": [
    "delegate_vesting_shares",
    {
      "delegatee": "fureweb",
      "delegator": "steem",
      "vesting_shares": "2029.736576 VESTS"
    }
  ],
  "op_in_trx": 0,
  "timestamp": "2018-07-04T01:28:12",
  "trx_id": "8c7932238699a8cf772c8b0eca61de9b3269b016",
  "trx_in_block": 15,
  "virtual_op": 0
}parley.appsent 0.001 STEEM to @fureweb- "Have a amazing day! 😊"2018/04/10 21:28:33
parley.appsent 0.001 STEEM to @fureweb- "Have a amazing day! 😊"
2018/04/10 21:28:33
| amount | 0.001 STEEM |
| from | parley.app |
| memo | Have a amazing day! 😊 |
| to | fureweb |
| Transaction Info | Block #21455313/Trx 6580d78070287978df98760882b1d38af4ce13c1 |
View Raw JSON Data
{
  "block": 21455313,
  "op": [
    "transfer",
    {
      "amount": "0.001 STEEM",
      "from": "parley.app",
      "memo": "Have a amazing day! 😊",
      "to": "fureweb"
    }
  ],
  "op_in_trx": 0,
  "timestamp": "2018-04-10T21:28:33",
  "trx_id": "6580d78070287978df98760882b1d38af4ce13c1",
  "trx_in_block": 40,
  "virtual_op": 0
}2018/04/04 09:57:36
2018/04/04 09:57:36
| author | hikamaeng |
| body | 오 너도 이미 잘 쓰고 있었네. 더 늦게 시작하면 안되었을 분위기인가..=.= 지인 중 젤 마지막에 합류한 느낌. |
| json metadata | {"tags":["development"],"app":"steemit/0.1"} |
| parent author | fureweb |
| parent permlink | re-hikamaeng-7s6nmg-20180403t231930892z |
| permlink | re-fureweb-re-hikamaeng-7s6nmg-20180404t095736451z |
| title | |
| Transaction Info | Block #21268710/Trx da3f659706a7d5c9f2b07592e245ed31986779a3 |
View Raw JSON Data
{
  "block": 21268710,
  "op": [
    "comment",
    {
      "author": "hikamaeng",
      "body": "오 너도 이미 잘 쓰고 있었네. 더 늦게 시작하면 안되었을 분위기인가..=.=\n지인 중 젤 마지막에 합류한 느낌.",
      "json_metadata": "{\"tags\":[\"development\"],\"app\":\"steemit/0.1\"}",
      "parent_author": "fureweb",
      "parent_permlink": "re-hikamaeng-7s6nmg-20180403t231930892z",
      "permlink": "re-fureweb-re-hikamaeng-7s6nmg-20180404t095736451z",
      "title": ""
    }
  ],
  "op_in_trx": 0,
  "timestamp": "2018-04-04T09:57:36",
  "trx_id": "da3f659706a7d5c9f2b07592e245ed31986779a3",
  "trx_in_block": 39,
  "virtual_op": 0
}furewebcustom json: follow2018/04/03 23:20:15
furewebcustom json: follow
2018/04/03 23:20:15
| id | follow |
| json | ["reblog",{"account":"fureweb","author":"hikamaeng","permlink":"7s6nmg"}] |
| required auths | [] |
| required posting auths | ["fureweb"] |
| Transaction Info | Block #21255967/Trx 3c1a94ef3e5756f769d09a3bb77a5fbb5bba4bea |
View Raw JSON Data
{
  "block": 21255967,
  "op": [
    "custom_json",
    {
      "id": "follow",
      "json": "[\"reblog\",{\"account\":\"fureweb\",\"author\":\"hikamaeng\",\"permlink\":\"7s6nmg\"}]",
      "required_auths": [],
      "required_posting_auths": [
        "fureweb"
      ]
    }
  ],
  "op_in_trx": 0,
  "timestamp": "2018-04-03T23:20:15",
  "trx_id": "3c1a94ef3e5756f769d09a3bb77a5fbb5bba4bea",
  "trx_in_block": 10,
  "virtual_op": 0
}furewebreplied to @hikamaeng / re-hikamaeng-7s6nmg-20180403t231930892z2018/04/03 23:19:33
furewebreplied to @hikamaeng / re-hikamaeng-7s6nmg-20180403t231930892z
2018/04/03 23:19:33
| author | fureweb |
| body | 항상 좋은 말씀 감사합니다! |
| json metadata | {"tags":["development"],"app":"steemit/0.1"} |
| parent author | hikamaeng |
| parent permlink | 7s6nmg |
| permlink | re-hikamaeng-7s6nmg-20180403t231930892z |
| title | |
| Transaction Info | Block #21255953/Trx b668291aabcbf66f8010aa45a5884a3b69d42a3c |
View Raw JSON Data
{
  "block": 21255953,
  "op": [
    "comment",
    {
      "author": "fureweb",
      "body": "항상 좋은 말씀 감사합니다!",
      "json_metadata": "{\"tags\":[\"development\"],\"app\":\"steemit/0.1\"}",
      "parent_author": "hikamaeng",
      "parent_permlink": "7s6nmg",
      "permlink": "re-hikamaeng-7s6nmg-20180403t231930892z",
      "title": ""
    }
  ],
  "op_in_trx": 0,
  "timestamp": "2018-04-03T23:19:33",
  "trx_id": "b668291aabcbf66f8010aa45a5884a3b69d42a3c",
  "trx_in_block": 14,
  "virtual_op": 0
}furewebdeleted a comment or post2018/04/03 22:59:57
furewebdeleted a comment or post
2018/04/03 22:59:57
| author | fureweb |
| permlink | re-jiwootak-re-hikamaeng-7s6nmg-20180403t225943276z |
| Transaction Info | Block #21255561/Trx 9b2a4b9a5f6d4dbd20cc9835f4e020ea357786ed |
View Raw JSON Data
{
  "block": 21255561,
  "op": [
    "delete_comment",
    {
      "author": "fureweb",
      "permlink": "re-jiwootak-re-hikamaeng-7s6nmg-20180403t225943276z"
    }
  ],
  "op_in_trx": 0,
  "timestamp": "2018-04-03T22:59:57",
  "trx_id": "9b2a4b9a5f6d4dbd20cc9835f4e020ea357786ed",
  "trx_in_block": 24,
  "virtual_op": 0
}2018/04/03 22:59:45
2018/04/03 22:59:45
| author | fureweb |
| body | 좋은 말씀들 항상 감사합니다! |
| json metadata | {"tags":["development"],"app":"steemit/0.1"} |
| parent author | jiwootak |
| parent permlink | re-hikamaeng-7s6nmg-20180403t071907418z |
| permlink | re-jiwootak-re-hikamaeng-7s6nmg-20180403t225943276z |
| title | |
| Transaction Info | Block #21255557/Trx c8ae6eb906cb506a20c866c5367c2246a8bf9f7a |
View Raw JSON Data
{
  "block": 21255557,
  "op": [
    "comment",
    {
      "author": "fureweb",
      "body": "좋은 말씀들 항상 감사합니다!",
      "json_metadata": "{\"tags\":[\"development\"],\"app\":\"steemit/0.1\"}",
      "parent_author": "jiwootak",
      "parent_permlink": "re-hikamaeng-7s6nmg-20180403t071907418z",
      "permlink": "re-jiwootak-re-hikamaeng-7s6nmg-20180403t225943276z",
      "title": ""
    }
  ],
  "op_in_trx": 0,
  "timestamp": "2018-04-03T22:59:45",
  "trx_id": "c8ae6eb906cb506a20c866c5367c2246a8bf9f7a",
  "trx_in_block": 15,
  "virtual_op": 0
}furewebupvoted (100.00%) @hikamaeng / 7s6nmg2018/04/02 14:59:00
furewebupvoted (100.00%) @hikamaeng / 7s6nmg
2018/04/02 14:59:00
| author | hikamaeng |
| permlink | 7s6nmg |
| voter | fureweb |
| weight | 10000 (100.00%) |
| Transaction Info | Block #21217148/Trx ef71cf8a9cd80c8477306ffa18490e90e1572d92 |
View Raw JSON Data
{
  "block": 21217148,
  "op": [
    "vote",
    {
      "author": "hikamaeng",
      "permlink": "7s6nmg",
      "voter": "fureweb",
      "weight": 10000
    }
  ],
  "op_in_trx": 0,
  "timestamp": "2018-04-02T14:59:00",
  "trx_id": "ef71cf8a9cd80c8477306ffa18490e90e1572d92",
  "trx_in_block": 47,
  "virtual_op": 0
}furewebfollowed @hikamaeng2018/04/01 23:29:03
furewebfollowed @hikamaeng
2018/04/01 23:29:03
| id | follow |
| json | ["follow",{"follower":"fureweb","following":"hikamaeng","what":["blog"]}] |
| required auths | [] |
| required posting auths | ["fureweb"] |
| Transaction Info | Block #21198552/Trx b7e450b2359d94d5df96ad18f7c489b0a6f6a06d |
View Raw JSON Data
{
  "block": 21198552,
  "op": [
    "custom_json",
    {
      "id": "follow",
      "json": "[\"follow\",{\"follower\":\"fureweb\",\"following\":\"hikamaeng\",\"what\":[\"blog\"]}]",
      "required_auths": [],
      "required_posting_auths": [
        "fureweb"
      ]
    }
  ],
  "op_in_trx": 0,
  "timestamp": "2018-04-01T23:29:03",
  "trx_id": "b7e450b2359d94d5df96ad18f7c489b0a6f6a06d",
  "trx_in_block": 21,
  "virtual_op": 0
}furewebcustom json: follow2018/04/01 23:28:54
furewebcustom json: follow
2018/04/01 23:28:54
| id | follow |
| json | ["reblog",{"account":"fureweb","author":"hikamaeng","permlink":"re-1"}] |
| required auths | [] |
| required posting auths | ["fureweb"] |
| Transaction Info | Block #21198549/Trx 0d61633d523c8cb9dd288a0fbe6d23f4ea121559 |
View Raw JSON Data
{
  "block": 21198549,
  "op": [
    "custom_json",
    {
      "id": "follow",
      "json": "[\"reblog\",{\"account\":\"fureweb\",\"author\":\"hikamaeng\",\"permlink\":\"re-1\"}]",
      "required_auths": [],
      "required_posting_auths": [
        "fureweb"
      ]
    }
  ],
  "op_in_trx": 0,
  "timestamp": "2018-04-01T23:28:54",
  "trx_id": "0d61633d523c8cb9dd288a0fbe6d23f4ea121559",
  "trx_in_block": 51,
  "virtual_op": 0
}furewebupvoted (100.00%) @hikamaeng / re-12018/04/01 23:28:45
furewebupvoted (100.00%) @hikamaeng / re-1
2018/04/01 23:28:45
| author | hikamaeng |
| permlink | re-1 |
| voter | fureweb |
| weight | 10000 (100.00%) |
| Transaction Info | Block #21198546/Trx 510545e5a4ea82744170a436f05ad0084a11b131 |
View Raw JSON Data
{
  "block": 21198546,
  "op": [
    "vote",
    {
      "author": "hikamaeng",
      "permlink": "re-1",
      "voter": "fureweb",
      "weight": 10000
    }
  ],
  "op_in_trx": 0,
  "timestamp": "2018-04-01T23:28:45",
  "trx_id": "510545e5a4ea82744170a436f05ad0084a11b131",
  "trx_in_block": 32,
  "virtual_op": 0
}2018/03/13 07:57:12
2018/03/13 07:57:12
| author | loum |
| permlink | eos-bp-3 |
| voter | fureweb |
| weight | 10000 (100.00%) |
| Transaction Info | Block #20633775/Trx f6922fcce9018507aaa51675be8750df083290ce |
View Raw JSON Data
{
  "block": 20633775,
  "op": [
    "vote",
    {
      "author": "loum",
      "permlink": "eos-bp-3",
      "voter": "fureweb",
      "weight": 10000
    }
  ],
  "op_in_trx": 0,
  "timestamp": "2018-03-13T07:57:12",
  "trx_id": "f6922fcce9018507aaa51675be8750df083290ce",
  "trx_in_block": 12,
  "virtual_op": 0
}furewebupvoted (100.00%) @creamer7 / 2lhng5-eos2018/03/13 01:34:18
furewebupvoted (100.00%) @creamer7 / 2lhng5-eos
2018/03/13 01:34:18
| author | creamer7 |
| permlink | 2lhng5-eos |
| voter | fureweb |
| weight | 10000 (100.00%) |
| Transaction Info | Block #20626120/Trx e5d1bbee1870de06e380bffccbe0a1f71d61bc0f |
View Raw JSON Data
{
  "block": 20626120,
  "op": [
    "vote",
    {
      "author": "creamer7",
      "permlink": "2lhng5-eos",
      "voter": "fureweb",
      "weight": 10000
    }
  ],
  "op_in_trx": 0,
  "timestamp": "2018-03-13T01:34:18",
  "trx_id": "e5d1bbee1870de06e380bffccbe0a1f71d61bc0f",
  "trx_in_block": 3,
  "virtual_op": 0
}2018/03/12 04:06:18
2018/03/12 04:06:18
| author | creamer7 |
| permlink | 6p42m-eos |
| voter | fureweb |
| weight | 10000 (100.00%) |
| Transaction Info | Block #20600382/Trx 9cb00139670d69f78dc696fed10ef9c5c117e56b |
View Raw JSON Data
{
  "block": 20600382,
  "op": [
    "vote",
    {
      "author": "creamer7",
      "permlink": "6p42m-eos",
      "voter": "fureweb",
      "weight": 10000
    }
  ],
  "op_in_trx": 0,
  "timestamp": "2018-03-12T04:06:18",
  "trx_id": "9cb00139670d69f78dc696fed10ef9c5c117e56b",
  "trx_in_block": 45,
  "virtual_op": 0
}furewebupvoted (100.00%) @musicholic / 746yea2018/03/10 13:18:00
furewebupvoted (100.00%) @musicholic / 746yea
2018/03/10 13:18:00
| author | musicholic |
| permlink | 746yea |
| voter | fureweb |
| weight | 10000 (100.00%) |
| Transaction Info | Block #20553907/Trx e67219865f961fdc169f77aa173db4744d9feab7 |
View Raw JSON Data
{
  "block": 20553907,
  "op": [
    "vote",
    {
      "author": "musicholic",
      "permlink": "746yea",
      "voter": "fureweb",
      "weight": 10000
    }
  ],
  "op_in_trx": 0,
  "timestamp": "2018-03-10T13:18:00",
  "trx_id": "e67219865f961fdc169f77aa173db4744d9feab7",
  "trx_in_block": 16,
  "virtual_op": 0
}2018/03/09 14:47:00
2018/03/09 14:47:00
| author | creamer7 |
| body | 읽어주셔서 감사합니다 ! |
| json metadata | {"tags":["kr"],"app":"steemit/0.1"} |
| parent author | fureweb |
| parent permlink | re-creamer7-eos-q-and-a-20180309t122125877z |
| permlink | re-fureweb-re-creamer7-eos-q-and-a-20180309t144648597z |
| title | |
| Transaction Info | Block #20526957/Trx 7a76ad91b321da792ef4bf6b4b7ca26c5b4dcfbc |
View Raw JSON Data
{
  "block": 20526957,
  "op": [
    "comment",
    {
      "author": "creamer7",
      "body": "읽어주셔서 감사합니다 !",
      "json_metadata": "{\"tags\":[\"kr\"],\"app\":\"steemit/0.1\"}",
      "parent_author": "fureweb",
      "parent_permlink": "re-creamer7-eos-q-and-a-20180309t122125877z",
      "permlink": "re-fureweb-re-creamer7-eos-q-and-a-20180309t144648597z",
      "title": ""
    }
  ],
  "op_in_trx": 0,
  "timestamp": "2018-03-09T14:47:00",
  "trx_id": "7a76ad91b321da792ef4bf6b4b7ca26c5b4dcfbc",
  "trx_in_block": 7,
  "virtual_op": 0
}2018/03/09 12:21:27
2018/03/09 12:21:27
| author | fureweb |
| body | 정보 감사합니다! |
| json metadata | {"tags":["kr"],"app":"steemit/0.1"} |
| parent author | creamer7 |
| parent permlink | eos-q-and-a |
| permlink | re-creamer7-eos-q-and-a-20180309t122125877z |
| title | |
| Transaction Info | Block #20524046/Trx ca85d125d693b8fc57874171670cdbc1a936f731 |
View Raw JSON Data
{
  "block": 20524046,
  "op": [
    "comment",
    {
      "author": "fureweb",
      "body": "정보 감사합니다!",
      "json_metadata": "{\"tags\":[\"kr\"],\"app\":\"steemit/0.1\"}",
      "parent_author": "creamer7",
      "parent_permlink": "eos-q-and-a",
      "permlink": "re-creamer7-eos-q-and-a-20180309t122125877z",
      "title": ""
    }
  ],
  "op_in_trx": 0,
  "timestamp": "2018-03-09T12:21:27",
  "trx_id": "ca85d125d693b8fc57874171670cdbc1a936f731",
  "trx_in_block": 4,
  "virtual_op": 0
}furewebupvoted (100.00%) @creamer7 / eos-q-and-a2018/03/09 12:21:21
furewebupvoted (100.00%) @creamer7 / eos-q-and-a
2018/03/09 12:21:21
| author | creamer7 |
| permlink | eos-q-and-a |
| voter | fureweb |
| weight | 10000 (100.00%) |
| Transaction Info | Block #20524044/Trx eae29f8dc1e4f7f0fd77f9326f8c2efea3fb7af9 |
View Raw JSON Data
{
  "block": 20524044,
  "op": [
    "vote",
    {
      "author": "creamer7",
      "permlink": "eos-q-and-a",
      "voter": "fureweb",
      "weight": 10000
    }
  ],
  "op_in_trx": 0,
  "timestamp": "2018-03-09T12:21:21",
  "trx_id": "eae29f8dc1e4f7f0fd77f9326f8c2efea3fb7af9",
  "trx_in_block": 9,
  "virtual_op": 0
}furewebupvoted (100.00%) @eosys / re-fureweb-re-eosys-4ve66e-20180306t052958156z2018/03/09 05:44:03
furewebupvoted (100.00%) @eosys / re-fureweb-re-eosys-4ve66e-20180306t052958156z
2018/03/09 05:44:03
| author | eosys |
| permlink | re-fureweb-re-eosys-4ve66e-20180306t052958156z |
| voter | fureweb |
| weight | 10000 (100.00%) |
| Transaction Info | Block #20516099/Trx dd10dda836ed4b26c65bd46adccfc328bd3a3d2e |
View Raw JSON Data
{
  "block": 20516099,
  "op": [
    "vote",
    {
      "author": "eosys",
      "permlink": "re-fureweb-re-eosys-4ve66e-20180306t052958156z",
      "voter": "fureweb",
      "weight": 10000
    }
  ],
  "op_in_trx": 0,
  "timestamp": "2018-03-09T05:44:03",
  "trx_id": "dd10dda836ed4b26c65bd46adccfc328bd3a3d2e",
  "trx_in_block": 33,
  "virtual_op": 0
}2018/03/09 05:18:48
2018/03/09 05:18:48
| author | eosys |
| permlink | eosys-eos |
| voter | fureweb |
| weight | 10000 (100.00%) |
| Transaction Info | Block #20515594/Trx ac13535f3efe45fef4190d15f7337c7c1757a918 |
View Raw JSON Data
{
  "block": 20515594,
  "op": [
    "vote",
    {
      "author": "eosys",
      "permlink": "eosys-eos",
      "voter": "fureweb",
      "weight": 10000
    }
  ],
  "op_in_trx": 0,
  "timestamp": "2018-03-09T05:18:48",
  "trx_id": "ac13535f3efe45fef4190d15f7337c7c1757a918",
  "trx_in_block": 22,
  "virtual_op": 0
}2018/03/06 05:30:00
2018/03/06 05:30:00
| author | eosys |
| body | 건강한 EOS 생태계의 확장을 위해 최선을 다하겠습니다.^^ |
| json metadata | {"tags":["kr"],"app":"steemit/0.1"} |
| parent author | fureweb |
| parent permlink | re-eosys-4ve66e-20180305t011950968z |
| permlink | re-fureweb-re-eosys-4ve66e-20180306t052958156z |
| title | |
| Transaction Info | Block #20429561/Trx c66f78caee3f8444ee91f04515c779d18716ed48 |
View Raw JSON Data
{
  "block": 20429561,
  "op": [
    "comment",
    {
      "author": "eosys",
      "body": "건강한 EOS 생태계의 확장을 위해 최선을 다하겠습니다.^^",
      "json_metadata": "{\"tags\":[\"kr\"],\"app\":\"steemit/0.1\"}",
      "parent_author": "fureweb",
      "parent_permlink": "re-eosys-4ve66e-20180305t011950968z",
      "permlink": "re-fureweb-re-eosys-4ve66e-20180306t052958156z",
      "title": ""
    }
  ],
  "op_in_trx": 0,
  "timestamp": "2018-03-06T05:30:00",
  "trx_id": "c66f78caee3f8444ee91f04515c779d18716ed48",
  "trx_in_block": 35,
  "virtual_op": 0
}2018/03/05 09:31:57
2018/03/05 09:31:57
| delegatee | fureweb |
| delegator | steem |
| vesting shares | 22341.503299 VESTS |
| Transaction Info | Block #20405612/Trx d8644121209cda45df20db31e7ab547ec3b1f093 |
View Raw JSON Data
{
  "block": 20405612,
  "op": [
    "delegate_vesting_shares",
    {
      "delegatee": "fureweb",
      "delegator": "steem",
      "vesting_shares": "22341.503299 VESTS"
    }
  ],
  "op_in_trx": 0,
  "timestamp": "2018-03-05T09:31:57",
  "trx_id": "d8644121209cda45df20db31e7ab547ec3b1f093",
  "trx_in_block": 40,
  "virtual_op": 0
}furewebclaimed reward balance: 1.239 SBD, 0.465 SP2018/03/05 07:52:15
furewebclaimed reward balance: 1.239 SBD, 0.465 SP
2018/03/05 07:52:15
| account | fureweb |
| reward sbd | 1.239 SBD |
| reward steem | 0.000 STEEM |
| reward vests | 755.921913 VESTS |
| Transaction Info | Block #20403618/Trx aa20c2a317bec8b9076f1951661dd815e2acc335 |
View Raw JSON Data
{
  "block": 20403618,
  "op": [
    "claim_reward_balance",
    {
      "account": "fureweb",
      "reward_sbd": "1.239 SBD",
      "reward_steem": "0.000 STEEM",
      "reward_vests": "755.921913 VESTS"
    }
  ],
  "op_in_trx": 0,
  "timestamp": "2018-03-05T07:52:15",
  "trx_id": "aa20c2a317bec8b9076f1951661dd815e2acc335",
  "trx_in_block": 0,
  "virtual_op": 0
}furewebcustom json: follow2018/03/05 01:20:51
furewebcustom json: follow
2018/03/05 01:20:51
| id | follow |
| json | ["reblog",{"account":"fureweb","author":"eosys","permlink":"4ve66e"}] |
| required auths | [] |
| required posting auths | ["fureweb"] |
| Transaction Info | Block #20395791/Trx 6c390d4e30c271390c21b4edca5e164c99b09ddc |
View Raw JSON Data
{
  "block": 20395791,
  "op": [
    "custom_json",
    {
      "id": "follow",
      "json": "[\"reblog\",{\"account\":\"fureweb\",\"author\":\"eosys\",\"permlink\":\"4ve66e\"}]",
      "required_auths": [],
      "required_posting_auths": [
        "fureweb"
      ]
    }
  ],
  "op_in_trx": 0,
  "timestamp": "2018-03-05T01:20:51",
  "trx_id": "6c390d4e30c271390c21b4edca5e164c99b09ddc",
  "trx_in_block": 23,
  "virtual_op": 0
}furewebreplied to @eosys / re-eosys-4ve66e-20180305t011950968z2018/03/05 01:19:54
furewebreplied to @eosys / re-eosys-4ve66e-20180305t011950968z
2018/03/05 01:19:54
| author | fureweb |
| body | 큰 그림을 보고 계셨네요..출사표 잘 보았습니다! 건강한 EOS 생태계에 도움주실분이라 믿습니다. 지켜보겠습니다~! |
| json metadata | {"tags":["kr"],"app":"steemit/0.1"} |
| parent author | eosys |
| parent permlink | 4ve66e |
| permlink | re-eosys-4ve66e-20180305t011950968z |
| title | |
| Transaction Info | Block #20395772/Trx 3a3d9d7a8e887c124c73ff2b7d79e390e4cd03aa |
View Raw JSON Data
{
  "block": 20395772,
  "op": [
    "comment",
    {
      "author": "fureweb",
      "body": "큰 그림을 보고 계셨네요..출사표 잘 보았습니다! 건강한 EOS 생태계에 도움주실분이라 믿습니다. 지켜보겠습니다~!",
      "json_metadata": "{\"tags\":[\"kr\"],\"app\":\"steemit/0.1\"}",
      "parent_author": "eosys",
      "parent_permlink": "4ve66e",
      "permlink": "re-eosys-4ve66e-20180305t011950968z",
      "title": ""
    }
  ],
  "op_in_trx": 0,
  "timestamp": "2018-03-05T01:19:54",
  "trx_id": "3a3d9d7a8e887c124c73ff2b7d79e390e4cd03aa",
  "trx_in_block": 5,
  "virtual_op": 0
}2018/03/05 01:18:21
2018/03/05 01:18:21
| author | eosys |
| permlink | 4ve66e |
| voter | fureweb |
| weight | 10000 (100.00%) |
| Transaction Info | Block #20395741/Trx c443928a38728ff1e6cc8cd6f5f653c53cfe4258 |
View Raw JSON Data
{
  "block": 20395741,
  "op": [
    "vote",
    {
      "author": "eosys",
      "permlink": "4ve66e",
      "voter": "fureweb",
      "weight": 10000
    }
  ],
  "op_in_trx": 0,
  "timestamp": "2018-03-05T01:18:21",
  "trx_id": "c443928a38728ff1e6cc8cd6f5f653c53cfe4258",
  "trx_in_block": 49,
  "virtual_op": 0
}2018/03/05 01:15:30
2018/03/05 01:15:30
| id | follow |
| json | ["follow",{"follower":"fureweb","following":"eosys","what":["blog"]}] |
| required auths | [] |
| required posting auths | ["fureweb"] |
| Transaction Info | Block #20395684/Trx 5094e2f3cb49ead4a56044df8d541d5225a31047 |
View Raw JSON Data
{
  "block": 20395684,
  "op": [
    "custom_json",
    {
      "id": "follow",
      "json": "[\"follow\",{\"follower\":\"fureweb\",\"following\":\"eosys\",\"what\":[\"blog\"]}]",
      "required_auths": [],
      "required_posting_auths": [
        "fureweb"
      ]
    }
  ],
  "op_in_trx": 0,
  "timestamp": "2018-03-05T01:15:30",
  "trx_id": "5094e2f3cb49ead4a56044df8d541d5225a31047",
  "trx_in_block": 45,
  "virtual_op": 0
}2018/03/04 14:21:30
2018/03/04 14:21:30
| author | loum |
| permlink | 7ptino |
| voter | fureweb |
| weight | 10000 (100.00%) |
| Transaction Info | Block #20382609/Trx 417e52cd088f94cda62a93535932db71128824cd |
View Raw JSON Data
{
  "block": 20382609,
  "op": [
    "vote",
    {
      "author": "loum",
      "permlink": "7ptino",
      "voter": "fureweb",
      "weight": 10000
    }
  ],
  "op_in_trx": 0,
  "timestamp": "2018-03-04T14:21:30",
  "trx_id": "417e52cd088f94cda62a93535932db71128824cd",
  "trx_in_block": 29,
  "virtual_op": 0
}2018/03/01 04:23:51
2018/03/01 04:23:51
| author | fureweb |
| permlink | nginx-ssl |
| sbd payout | 1.239 SBD |
| steem payout | 0.000 STEEM |
| vesting payout | 755.921913 VESTS |
| Transaction Info | Block #20284302/Virtual Operation #6 |
View Raw JSON Data
{
  "block": 20284302,
  "op": [
    "author_reward",
    {
      "author": "fureweb",
      "permlink": "nginx-ssl",
      "sbd_payout": "1.239 SBD",
      "steem_payout": "0.000 STEEM",
      "vesting_payout": "755.921913 VESTS"
    }
  ],
  "op_in_trx": 0,
  "timestamp": "2018-03-01T04:23:51",
  "trx_id": "0000000000000000000000000000000000000000",
  "trx_in_block": 4294967295,
  "virtual_op": 6
}2018/02/22 14:29:24
2018/02/22 14:29:24
| author | fureweb |
| permlink | nginx-ssl |
| voter | cheerup |
| weight | 800 (8.00%) |
| Transaction Info | Block #20095016/Trx 5066d3145127bf561a8637ce1c2df0ef649a8c38 |
View Raw JSON Data
{
  "block": 20095016,
  "op": [
    "vote",
    {
      "author": "fureweb",
      "permlink": "nginx-ssl",
      "voter": "cheerup",
      "weight": 800
    }
  ],
  "op_in_trx": 0,
  "timestamp": "2018-02-22T14:29:24",
  "trx_id": "5066d3145127bf561a8637ce1c2df0ef649a8c38",
  "trx_in_block": 31,
  "virtual_op": 0
}cheerupreplied to @fureweb / re-fureweb-nginx-ssl-20180222t142911566z2018/02/22 14:29:12
cheerupreplied to @fureweb / re-fureweb-nginx-ssl-20180222t142911566z
2018/02/22 14:29:12
| author | cheerup |
| body | Cheer Up! - from Clean STEEM activity supporter |
| json metadata | {"app":"cheerup/test"} |
| parent author | fureweb |
| parent permlink | nginx-ssl |
| permlink | re-fureweb-nginx-ssl-20180222t142911566z |
| title | |
| Transaction Info | Block #20095012/Trx ea5f998630fed311548968a07e15c2b3388fb415 |
View Raw JSON Data
{
  "block": 20095012,
  "op": [
    "comment",
    {
      "author": "cheerup",
      "body": "Cheer Up!\n- from Clean STEEM activity supporter",
      "json_metadata": "{\"app\":\"cheerup/test\"}",
      "parent_author": "fureweb",
      "parent_permlink": "nginx-ssl",
      "permlink": "re-fureweb-nginx-ssl-20180222t142911566z",
      "title": ""
    }
  ],
  "op_in_trx": 0,
  "timestamp": "2018-02-22T14:29:12",
  "trx_id": "ea5f998630fed311548968a07e15c2b3388fb415",
  "trx_in_block": 34,
  "virtual_op": 0
}2018/02/22 14:26:57
2018/02/22 14:26:57
| author | fureweb |
| body | # 들어가기 전에 --- 1. 아직 아래 link들에 대해 새창 열기 기능이 steemit에서 지원되지 않는 것 같습니다. 혹시라도 아래에 등장하는 링크를 클릭하시려면 우클릭 후 새창에서 열어 확인해 주세요! 2. 또한 syntax highlighting이 제대로 지원되지 않는 것 같아서, 혹시라도 보기 불편하신 점이 있다면 아래의 링크를 통해 원본 게시글을 확인하실 수도 있습니다. [https://fureweb-com.github.io/blog/2017/08/07/applying-free-ssl-to-your-ubuntu-server-using-nginx-and-let'sencrypt-from-scratch.html](https://fureweb-com.github.io/blog/2017/08/07/applying-free-ssl-to-your-ubuntu-server-using-nginx-and-let'sencrypt-from-scratch.html) # 개요 --- 본 튜토리얼은 다음의 순서대로 진행됩니다. - 우분투 VPS 생성 - nginx 설치 및 설정 - 도메인 Host IP 설정 및 확인 - Certbot 설치 및 설정 - 최종 확인 - 마치며 windows 환경에서 아래 예제를 실행하셔야 하는 분들은 [mingw](http://www.mingw.org/), [putty](https://www.chiark.greenend.org.uk/~sgtatham/putty/latest.html), windows 10 bash 등을 통해 bash shell을 사용하실 수 있습니다. 본 포스트의 내용은 로컬머신에서 bash shell을 사용할 수 있음을 전제하여 작성했습니다. 또한 vi를 사용할 수 있음을 전제하였으나, vi 사용이 어려우신 경우 nano에 대한 사용 방법을 검색하신 뒤 예제를 따라하시는 것을 추천드립니다. 그런 경우 아래에 표시한 vi 명령을 nano 명령으로 대신하시기 바랍니다. # 우분투 VPS 생성 --- 자신이 사용할 수 있는 클라우드 서비스 내 VPS를 Ubuntu 16.04 LTS 버전으로 생성합니다. 저는 개인적으로 제가 알고있는 한 가장 간단하고 저렴하게 VPS를 생성할 수 있는 [iwinv.kr 클라우드 서비스](//iwinv.kr)를 이용하여 VPS를 생성하도록 하겠습니다. 아래 예제에서는 Ubuntu 16.04 LTS(32bit) 버전으로 VPS를 생성하여 예제를 진행하게 됩니다. 편의상 root 계정으로 아래 예제를 수행하겠습니다. 방화벽 설정과 관련된 부분은 이 포스팅의 주제를 벗어나므로, 가능하다면 VPS 생성 시 방화벽은 사용하지 않음으로 설정하셔서 예제를 실습하시기를 희망합니다. # nginx 설치 및 설정 --- ssh 클라이언트를 이용하여 방금 막 생성한 VPS로 접속합니다. 접속 후 다음의 명령을 차례대로 실행하여 nginx를 서버에 설치한 뒤, 상태를 확인합니다. ```bash $ ssh root@your-vps-ip # 로그인 완료 후 아래 명령을 실행합니다. $ apt-get update $ apt-get install nginx ``` 설치 후 nginx 실행 상태를 다음과 같이 확인할 수 있습니다. ```bash $ service nginx status ``` 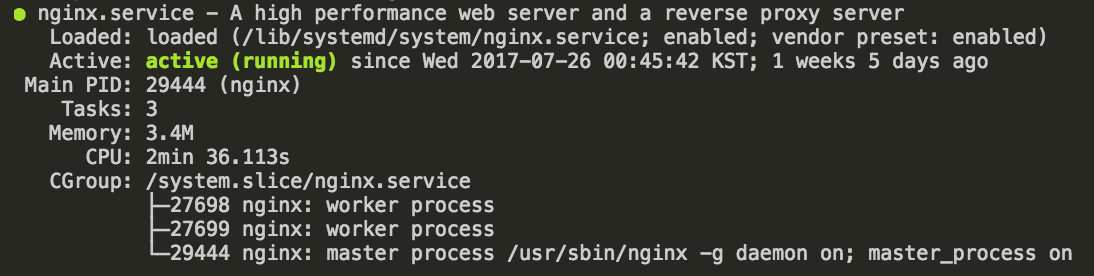 만약 현재 상태가 inactive라면, 다음의 명령을 통해 nginx 프로세스를 실행시킵니다. ```bash $ service nginx start ``` 설치가 완료된 후 브라우저를 통해 서버의 IP를 입력하여 페이지를 요청하면 welcome to nginx 페이지를 확인할 수 있습니다. 만약 welcome 페이지를 볼수 없다면 방화벽 설정 문제일 가능성이 있습니다. 방화벽과 관련된 부분은 클라우드 서비스 업체마다 설정하는 방법이 다를 수 있으니, 사용하시는 업체의 방화벽 설정 사용 설명을 통해 http 요청을 위한 80번 포트 및 https 요청을 위한 443 포트를 열어둘 수 있도록 합니다. 보유하고 있는 도메인을 현재 VPS로 연결시키기 전, 해당 도메인을 통해 본 서버로 http 요청을 해 오는 경우에 대해 처리할 수 있도록 다음과 같이 nginx 설정을 수행합니다. ```bash # 다음의 경로로 이동하여 ssltest.fureweb.com 도메인 요청에 대한 설정파일을 생성합니다. # 아래 경로에 등록된 conf 확장자를 가진 모든 파일이 nginx.conf파일에 의해 include 되며, # nginx가 실행될 때 본 디렉토리 내 파일들이 해석되게 됩니다. $ cd /etc/nginx/conf.d # 원하는 도메인 명으로 설정 파일을 하나 생성합니다. $ vi ssltest.fureweb.com.conf ``` 아래의 내용을 ssltest.fureweb.com.conf 파일에 입력합니다. ```bash server { listen 80; server_name ssltest.fureweb.com; } ``` 필요한 설정 파일을 생성하였다면, 다음의 명령을 통해 설정에 오타 등의 오류는 없는지 확인한 뒤 설정을 적용합니다. ```bash # 설정 파일들에 오류가 없는지 확인한 뒤 $ nginx -t nginx: the configuration file /etc/nginx/nginx.conf syntax is ok nginx: configuration file /etc/nginx/nginx.conf test is successful # 오류가 없다면 설정 파일 내용을 적용합니다. $ nginx -s reload ``` 현재 VPS는 ssltest.fureweb.com에 대한 http 요청을 처리할 수 있는 상태가 되었습니다. 이제 자신이 가지고 있는 도메인 관리업체의 웹사이트에 로그인하여 해당 도메인에 대한 http 요청이 새로 만든 VPS로 전달될 수 있도록 별도의 설정을 진행해 보겠습니다. # 도메인 Host IP 설정 및 확인 --- 본인이 보유하고있는 도메인을 관리하는 업체 사이트에 로그인하여, 자신이 보유한 도메인(또는 서브도메인)에 대한 Host IP를 설정합니다. 예시로, 제가 보유하고 있는 ssltest.fureweb.com 이라는 서브도메인에 대한 http 요청이 방금 만든 VPS 서버로 연결되도록 설정을 추가하겠습니다. 도메인 등록 대행업체마다 설정하는 방법은 다를 수 있으니, 아래 사진을 참고하셔서 비슷한 메뉴에서 설정을 처리해주세요. 일반적으로 DNS 관리 메뉴의 하위 메뉴에서 설정하실 수 있습니다.  만약 이전에 해당 도메인으로의 연결을 한 적이 있다면, 로컬 PC의 DNS캐시를 삭제해야합니다. 없다면 무시하셔도 됩니다. ```bash # OSX 10.10.4 이상인 경우 $ killall -HUP mDNSResponder # Windows 10을 사용하는 경우 - powershell 또는 cmd에서 ipconfig /flushdns # 죄송하지만 이 외에는 검색해 주세요 -_-;; ``` 브라우저가 크롬이라면, 주소표시줄에 다음의 경로를 복사&붙여넣기하여 조회되는 화면에서 `Clear Host Cache` 버튼을 클릭하여 캐시를 삭제하세요. ```url chrome://net-internals/#dns ``` 모든 설정에 문제가 없다면, 이제 웹 브라우저를 통해 내가 가지고 있는 도메인에 대한 연결 요청이 방금 만든 VPS로 전달되게 됩니다. 단, 도메인 관리 업체마다 해당 적용값이 얼마나 빨리 반영되는지는 차이가 있을 수 있으므로, 충분한 시간을 두고 확인을 진행해 주세요. 통상 1~2분 내에는 적용되는 걸로 알고 있으나, 다른 업체는 어떤지 사용해보지 않아서 잘 모르겠네요. ^^; # Certbot 설치 및 설정 --- 먼저 certbot을 설치합니다. ```bash $ add-apt-repository ppa:certbot/certbot ``` <br> 해당 저장소에 담긴 패키지 정보를 확인할 수 있도록 다음과 같이 업데이트를 수행합니다. ```bash $ apt-get update ``` <br> `apt-get`을 이용하여 Certbot을 설치합니다. ```bash $ apt-get install python-certbot-nginx ``` <br> 설치된 certbot을 이용하여 ssltest.fureweb.com 도메인에 대한 SSL 인증서만 발급받도록 합니다. ```bash $ certbot certonly --nginx -d ssltest.fureweb.com # 위 명령을 실행하면 해당 도메인을 관리하는 사람의 이메일 주소를 입력하라고 나옵니다. 입력해 주세요. # 만료일에 대한 정보를 보내줍니다. # 약관에는 동의(A)하셔야 하며, # EFF 재단과의 이메일을 공유할지 여부를 묻는 부분에 대해서는 원하시는대로 진행하시면 됩니다. ``` <br> 아래와 같은 메시지들이 출력됩니다. 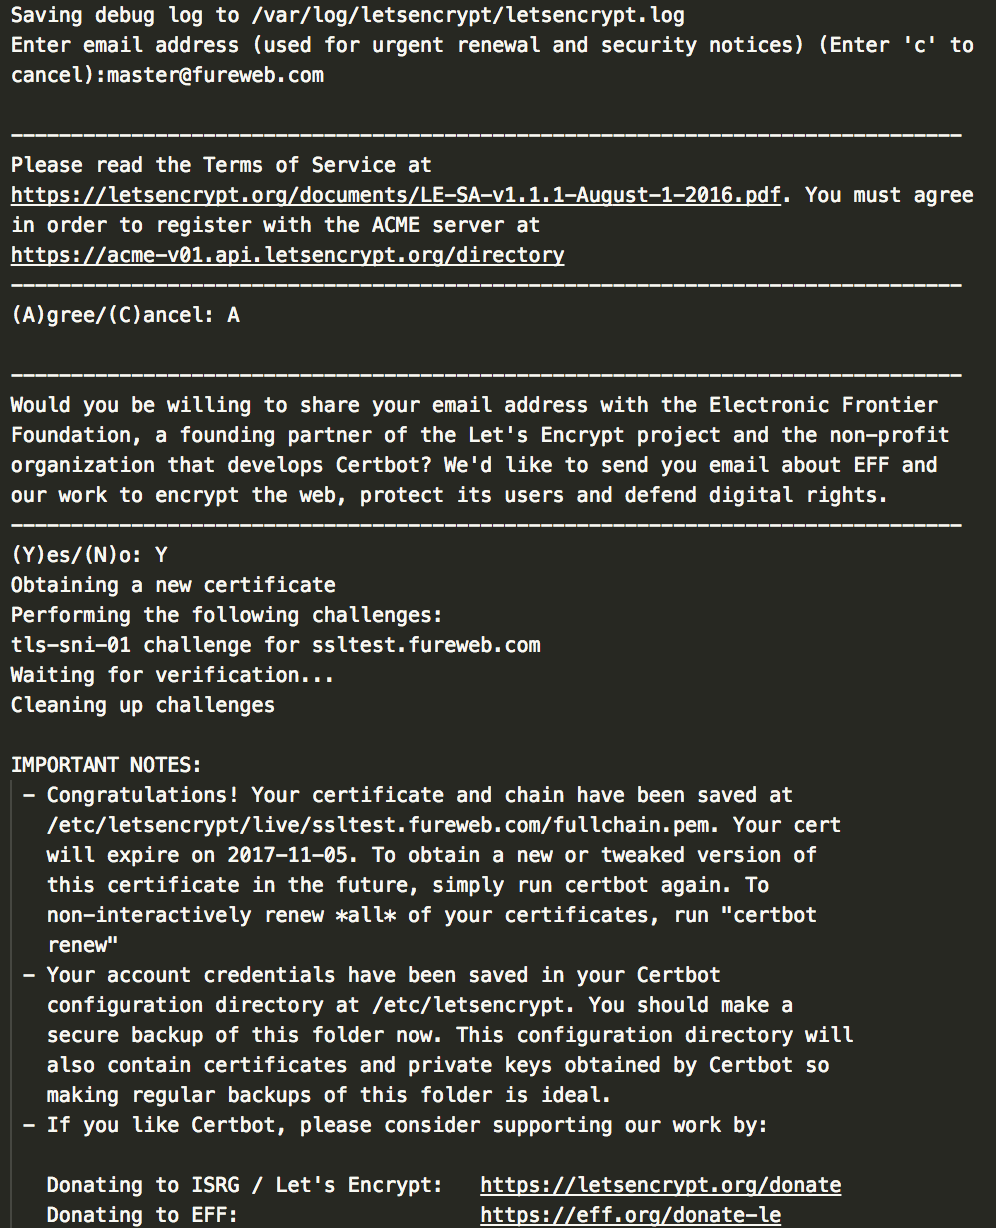 위 명령을 수행하고 나면, 아래 경로에 총 5개의 파일이 생성되어 있음을 확인할 수 있습니다. (실제로는 /etc/letsencrypt/archive/도메인명 디렉토리 내 파일에 대한 심볼릭 링크 입니다.) ```bash $ ls -al /etc/letsencrypt/live/ssltest.fureweb.com total 12 drwxr-xr-x 2 root root 4096 Aug 7 17:03 ./ drwx------ 4 root root 4096 Aug 7 16:56 ../ lrwxrwxrwx 1 root root 43 Aug 7 17:03 cert.pem -> ../../archive/ssltest.fureweb.com/cert1.pem lrwxrwxrwx 1 root root 44 Aug 7 17:03 chain.pem -> ../../archive/ssltest.fureweb.com/chain1.pem lrwxrwxrwx 1 root root 48 Aug 7 17:03 fullchain.pem -> ../../archive/ssltest.fureweb.com/fullchain1.pem lrwxrwxrwx 1 root root 46 Aug 7 17:03 privkey.pem -> ../../archive/ssltest.fureweb.com/privkey1.pem -rw-r--r-- 1 root root 543 Aug 7 17:03 README ``` <br> 이제 ssltest.fureweb.com 이라는 도메인에 대한 ssl 요청을 처리하기위해 필요한 인증서가 준비된 상태가 되었습니다. nginx가 이 인증서를 통해 https 요청을 처리할 수 있도록, 아까 설정했던 conf 파일을 아래와 같이 수정해 보겠습니다. ```bash # 아래 명령어로 기존 설정파일 편집 $ vi /etc/nginx/conf.d/ssltest.fureweb.com.conf # 다음과 같은 형태가 되어야합니다. server { # http://ssltest.fureweb.com 요청에 대해 # https://ssltest.fureweb.com 으로 리다이렉트 처리합니다. listen 80; server_name ssltest.fureweb.com; return 301 https://ssltest.fureweb.com; } server { # https://ssltest.fureweb.com 으로의 요청을 리스닝합니다. listen 443; server_name ssltest.fureweb.com; ssl on; ssl_certificate /etc/letsencrypt/live/ssltest.fureweb.com/fullchain.pem; ssl_certificate_key /etc/letsencrypt/live/ssltest.fureweb.com/privkey.pem; ssl_protocols TLSv1 TLSv1.1 TLSv1.2; ssl_ciphers HIGH:!aNULL:!MD5; # 예제에서는 이 외에 별도 설정을 추가하지 않고, SSL 요청이 정상적으로 처리되는지만 확인합니다. # 일반적으로 아래에는 현재 도메인과 연결된 document_root 등에 대한 설정 기술하거나 # proxy 설정을 통해 동적 처리가 가능한 다른 WAS와 연동하여 응답을 핸들링합니다. } ``` <br> 위 설정을 저장한 뒤, conf 파일에 오타는 없는지 확인하고 문제가 없다면 설정 내용을 적용시킵니다. ```bash # 설정 파일들에 오류가 없는지 확인한 뒤 $ nginx -t nginx: the configuration file /etc/nginx/nginx.conf syntax is ok nginx: configuration file /etc/nginx/nginx.conf test is successful # 오류가 없다면 설정 파일 내용을 적용합니다. $ nginx -s reload ``` <br> # 최종 확인 --- 브라우저의 주소창에 https://ssltest.fureweb.com를 입력하여 연결이 제대로 이뤄지는지 확인합니다. 브라우저 캐시로 인해 https로 리다이렉트 처리가 되지 않은 페이지를 보여줄 수 있으니, 크롬 기준으로 강력 새로고침을 실행시켜주세요. 브라우저 주소표시줄 좌측에 자물쇠가 활성화 된 모습을 확인하실 수 있게 됩니다. ~~주소가 ssltest2.fureweb.com인건 무시해주세요... -_-;~~ 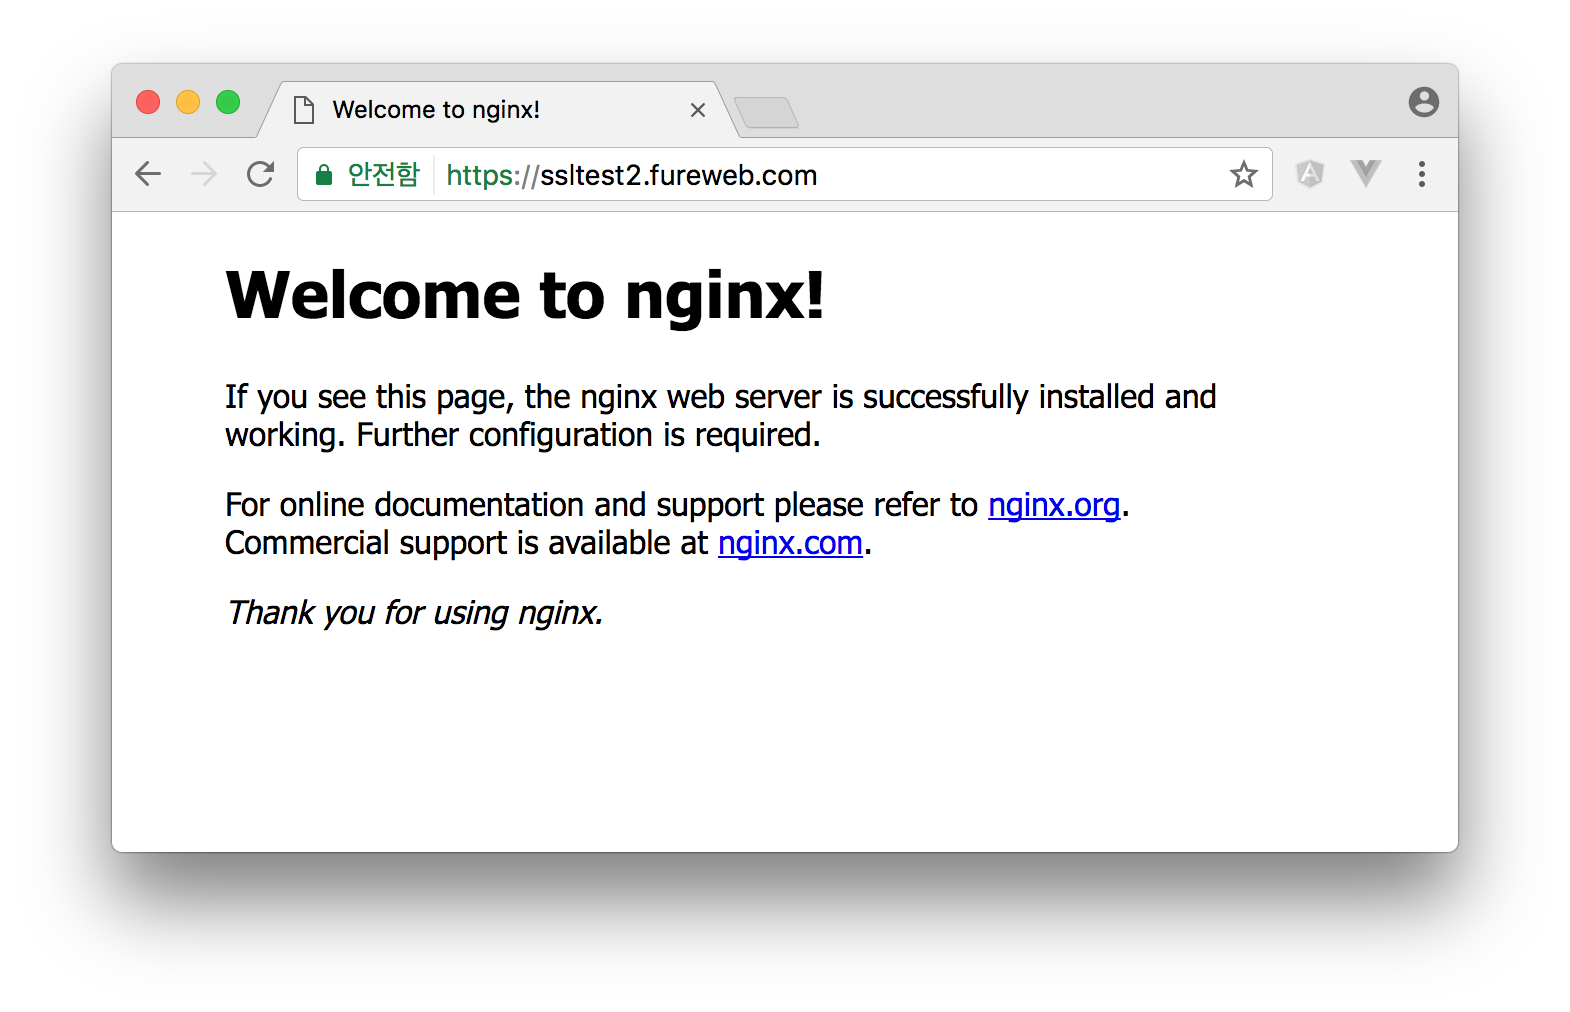 # 마치며 --- 우분투 서버를 생성하는 것 부터 Nginx 설치 및 설정, 그리고 SSL 적용하기까지 모든 과정에 대해 확인해 보았습니다. 혹시라도 본 포스트를 보고 막히는 부분이 있거나 설명이 부족한 부분이 있다면 언제든지 댓글이나 질문 부탁 드리겠습니다. 읽어주셔서 감사합니다! |
| json metadata | {"tags":["kr","kr-dev","ssl","ubuntu","letsencrypt"],"image":["https://steemitimages.com/DQmT5UFQLESiCLNpXWp4EAyr2sTi5dZBphFoLYBzQ8v6CUd/20170807-nginx-status.png","https://fureweb-com.github.io/assets/img/posts/20170807-set-host-ip.png","https://fureweb-com.github.io/assets/img/posts/20170807-certbot-process.png","https://fureweb-com.github.io/assets/img/posts/20170807-ssl-connection.png"],"links":["https://fureweb-com.github.io/blog/2017/08/07/applying-free-ssl-to-your-ubuntu-server-using-nginx-and-let'sencrypt-from-scratch.html","http://www.mingw.org/","https://www.chiark.greenend.org.uk/~sgtatham/putty/latest.html","//iwinv.kr","https://ssltest.fureweb.com"],"app":"steemit/0.1","format":"markdown"} |
| parent author | |
| parent permlink | ssl |
| permlink | nginx-ssl |
| title | 우분투에서 nginx 설치부터 무료 SSL 적용까지 |
| Transaction Info | Block #20094967/Trx 4fd749f5e7d2a7d564581e0d10394ac8aed48115 |
View Raw JSON Data
{
"block": 20094967,
"op": [
"comment",
{
"author": "fureweb",
"body": "# 들어가기 전에\n---\n1. 아직 아래 link들에 대해 새창 열기 기능이 steemit에서 지원되지 않는 것 같습니다. 혹시라도 아래에 등장하는 링크를 클릭하시려면 우클릭 후 새창에서 열어 확인해 주세요! \n2. 또한 syntax highlighting이 제대로 지원되지 않는 것 같아서, 혹시라도 보기 불편하신 점이 있다면 아래의 링크를 통해 원본 게시글을 확인하실 수도 있습니다.\n[https://fureweb-com.github.io/blog/2017/08/07/applying-free-ssl-to-your-ubuntu-server-using-nginx-and-let'sencrypt-from-scratch.html](https://fureweb-com.github.io/blog/2017/08/07/applying-free-ssl-to-your-ubuntu-server-using-nginx-and-let'sencrypt-from-scratch.html)\n\n# 개요\n---\n\n본 튜토리얼은 다음의 순서대로 진행됩니다.\n\n- 우분투 VPS 생성\n- nginx 설치 및 설정\n- 도메인 Host IP 설정 및 확인\n- Certbot 설치 및 설정\n- 최종 확인\n- 마치며\n\nwindows 환경에서 아래 예제를 실행하셔야 하는 분들은 [mingw](http://www.mingw.org/), [putty](https://www.chiark.greenend.org.uk/~sgtatham/putty/latest.html), windows 10 bash 등을 통해 bash shell을 사용하실 수 있습니다. 본 포스트의 내용은 로컬머신에서 bash shell을 사용할 수 있음을 전제하여 작성했습니다. \n\n또한 vi를 사용할 수 있음을 전제하였으나, vi 사용이 어려우신 경우 nano에 대한 사용 방법을 검색하신 뒤 예제를 따라하시는 것을 추천드립니다. 그런 경우 아래에 표시한 vi 명령을 nano 명령으로 대신하시기 바랍니다.\n\n# 우분투 VPS 생성\n---\n\n자신이 사용할 수 있는 클라우드 서비스 내 VPS를 Ubuntu 16.04 LTS 버전으로 생성합니다. 저는 개인적으로 제가 알고있는 한 가장 간단하고 저렴하게 VPS를 생성할 수 있는 [iwinv.kr 클라우드 서비스](//iwinv.kr)를 이용하여 VPS를 생성하도록 하겠습니다.\n\n아래 예제에서는 Ubuntu 16.04 LTS(32bit) 버전으로 VPS를 생성하여 예제를 진행하게 됩니다. 편의상 root 계정으로 아래 예제를 수행하겠습니다.\n\n방화벽 설정과 관련된 부분은 이 포스팅의 주제를 벗어나므로, 가능하다면 VPS 생성 시 방화벽은 사용하지 않음으로 설정하셔서 예제를 실습하시기를 희망합니다.\n\n# nginx 설치 및 설정\n---\n\nssh 클라이언트를 이용하여 방금 막 생성한 VPS로 접속합니다. 접속 후 다음의 명령을 차례대로 실행하여 nginx를 서버에 설치한 뒤, 상태를 확인합니다. \n\n```bash\n$ ssh root@your-vps-ip\n# 로그인 완료 후 아래 명령을 실행합니다.\n$ apt-get update\n$ apt-get install nginx\n```\n\n설치 후 nginx 실행 상태를 다음과 같이 확인할 수 있습니다.\n\n```bash\n$ service nginx status\n```\n \n\n \n만약 현재 상태가 inactive라면, 다음의 명령을 통해 nginx 프로세스를 실행시킵니다.\n```bash\n$ service nginx start\n```\n \n설치가 완료된 후 브라우저를 통해 서버의 IP를 입력하여 페이지를 요청하면 welcome to nginx 페이지를 확인할 수 있습니다. 만약 welcome 페이지를 볼수 없다면 방화벽 설정 문제일 가능성이 있습니다. 방화벽과 관련된 부분은 클라우드 서비스 업체마다 설정하는 방법이 다를 수 있으니, 사용하시는 업체의 방화벽 설정 사용 설명을 통해 http 요청을 위한 80번 포트 및 https 요청을 위한 443 포트를 열어둘 수 있도록 합니다.\n\n보유하고 있는 도메인을 현재 VPS로 연결시키기 전, 해당 도메인을 통해 본 서버로 http 요청을 해 오는 경우에 대해 처리할 수 있도록 다음과 같이 nginx 설정을 수행합니다.\n\n```bash\n# 다음의 경로로 이동하여 ssltest.fureweb.com 도메인 요청에 대한 설정파일을 생성합니다.\n# 아래 경로에 등록된 conf 확장자를 가진 모든 파일이 nginx.conf파일에 의해 include 되며, \n# nginx가 실행될 때 본 디렉토리 내 파일들이 해석되게 됩니다.\n$ cd /etc/nginx/conf.d\n\n# 원하는 도메인 명으로 설정 파일을 하나 생성합니다.\n$ vi ssltest.fureweb.com.conf\n```\n \n아래의 내용을 ssltest.fureweb.com.conf 파일에 입력합니다.\n```bash\nserver {\n listen 80;\n server_name ssltest.fureweb.com;\n}\n```\n\n필요한 설정 파일을 생성하였다면, 다음의 명령을 통해 설정에 오타 등의 오류는 없는지 확인한 뒤 설정을 적용합니다.\n```bash\n# 설정 파일들에 오류가 없는지 확인한 뒤\n$ nginx -t\nnginx: the configuration file /etc/nginx/nginx.conf syntax is ok\nnginx: configuration file /etc/nginx/nginx.conf test is successful\n# 오류가 없다면 설정 파일 내용을 적용합니다.\n$ nginx -s reload\n```\n\n현재 VPS는 ssltest.fureweb.com에 대한 http 요청을 처리할 수 있는 상태가 되었습니다. 이제 자신이 가지고 있는 도메인 관리업체의 웹사이트에 로그인하여 해당 도메인에 대한 http 요청이 새로 만든 VPS로 전달될 수 있도록 별도의 설정을 진행해 보겠습니다.\n\n\n# 도메인 Host IP 설정 및 확인\n---\n\n본인이 보유하고있는 도메인을 관리하는 업체 사이트에 로그인하여, 자신이 보유한 도메인(또는 서브도메인)에 대한 Host IP를 설정합니다. \n\n예시로, 제가 보유하고 있는 ssltest.fureweb.com 이라는 서브도메인에 대한 http 요청이 방금 만든 VPS 서버로 연결되도록 설정을 추가하겠습니다. 도메인 등록 대행업체마다 설정하는 방법은 다를 수 있으니, 아래 사진을 참고하셔서 비슷한 메뉴에서 설정을 처리해주세요. 일반적으로 DNS 관리 메뉴의 하위 메뉴에서 설정하실 수 있습니다.\n\n\n\n만약 이전에 해당 도메인으로의 연결을 한 적이 있다면, 로컬 PC의 DNS캐시를 삭제해야합니다. 없다면 무시하셔도 됩니다.\n```bash\n# OSX 10.10.4 이상인 경우\n$ killall -HUP mDNSResponder\n\n# Windows 10을 사용하는 경우 - powershell 또는 cmd에서\nipconfig /flushdns\n\n# 죄송하지만 이 외에는 검색해 주세요 -_-;;\n```\n\n브라우저가 크롬이라면, 주소표시줄에 다음의 경로를 복사&붙여넣기하여 조회되는 화면에서 `Clear Host Cache` 버튼을 클릭하여 캐시를 삭제하세요. \n```url\nchrome://net-internals/#dns\n```\n\n모든 설정에 문제가 없다면, 이제 웹 브라우저를 통해 내가 가지고 있는 도메인에 대한 연결 요청이 방금 만든 VPS로 전달되게 됩니다. 단, 도메인 관리 업체마다 해당 적용값이 얼마나 빨리 반영되는지는 차이가 있을 수 있으므로, 충분한 시간을 두고 확인을 진행해 주세요. 통상 1~2분 내에는 적용되는 걸로 알고 있으나, 다른 업체는 어떤지 사용해보지 않아서 잘 모르겠네요. ^^;\n\n# Certbot 설치 및 설정\n---\n\n먼저 certbot을 설치합니다.\n```bash\n$ add-apt-repository ppa:certbot/certbot\n```\n<br>\n해당 저장소에 담긴 패키지 정보를 확인할 수 있도록 다음과 같이 업데이트를 수행합니다.\n```bash\n$ apt-get update\n```\n<br>\n`apt-get`을 이용하여 Certbot을 설치합니다.\n```bash\n$ apt-get install python-certbot-nginx\n```\n<br>\n설치된 certbot을 이용하여 ssltest.fureweb.com 도메인에 대한 SSL 인증서만 발급받도록 합니다.\n\n```bash\n$ certbot certonly --nginx -d ssltest.fureweb.com\n# 위 명령을 실행하면 해당 도메인을 관리하는 사람의 이메일 주소를 입력하라고 나옵니다. 입력해 주세요.\n# 만료일에 대한 정보를 보내줍니다.\n# 약관에는 동의(A)하셔야 하며,\n# EFF 재단과의 이메일을 공유할지 여부를 묻는 부분에 대해서는 원하시는대로 진행하시면 됩니다.\n```\n<br>\n아래와 같은 메시지들이 출력됩니다.\n\n\n위 명령을 수행하고 나면, 아래 경로에 총 5개의 파일이 생성되어 있음을 확인할 수 있습니다. (실제로는 /etc/letsencrypt/archive/도메인명 디렉토리 내 파일에 대한 심볼릭 링크 입니다.)\n```bash\n$ ls -al /etc/letsencrypt/live/ssltest.fureweb.com\ntotal 12\ndrwxr-xr-x 2 root root 4096 Aug 7 17:03 ./\ndrwx------ 4 root root 4096 Aug 7 16:56 ../\nlrwxrwxrwx 1 root root 43 Aug 7 17:03 cert.pem -> ../../archive/ssltest.fureweb.com/cert1.pem\nlrwxrwxrwx 1 root root 44 Aug 7 17:03 chain.pem -> ../../archive/ssltest.fureweb.com/chain1.pem\nlrwxrwxrwx 1 root root 48 Aug 7 17:03 fullchain.pem -> ../../archive/ssltest.fureweb.com/fullchain1.pem\nlrwxrwxrwx 1 root root 46 Aug 7 17:03 privkey.pem -> ../../archive/ssltest.fureweb.com/privkey1.pem\n-rw-r--r-- 1 root root 543 Aug 7 17:03 README\n```\n<br>\n이제 ssltest.fureweb.com 이라는 도메인에 대한 ssl 요청을 처리하기위해 필요한 인증서가 준비된 상태가 되었습니다. nginx가 이 인증서를 통해 https 요청을 처리할 수 있도록, 아까 설정했던 conf 파일을 아래와 같이 수정해 보겠습니다. \n\n```bash\n# 아래 명령어로 기존 설정파일 편집\n$ vi /etc/nginx/conf.d/ssltest.fureweb.com.conf\n\n# 다음과 같은 형태가 되어야합니다.\nserver {\n # http://ssltest.fureweb.com 요청에 대해\n # https://ssltest.fureweb.com 으로 리다이렉트 처리합니다. \n listen 80;\n server_name ssltest.fureweb.com;\n return 301 https://ssltest.fureweb.com;\n}\n\nserver {\n # https://ssltest.fureweb.com 으로의 요청을 리스닝합니다.\n listen 443;\n server_name ssltest.fureweb.com;\n\n ssl on;\n ssl_certificate /etc/letsencrypt/live/ssltest.fureweb.com/fullchain.pem;\n ssl_certificate_key /etc/letsencrypt/live/ssltest.fureweb.com/privkey.pem;\n\n ssl_protocols TLSv1 TLSv1.1 TLSv1.2;\n ssl_ciphers HIGH:!aNULL:!MD5;\n\n # 예제에서는 이 외에 별도 설정을 추가하지 않고, SSL 요청이 정상적으로 처리되는지만 확인합니다.\n # 일반적으로 아래에는 현재 도메인과 연결된 document_root 등에 대한 설정 기술하거나\n # proxy 설정을 통해 동적 처리가 가능한 다른 WAS와 연동하여 응답을 핸들링합니다.\n}\n\n```\n<br>\n위 설정을 저장한 뒤, conf 파일에 오타는 없는지 확인하고 문제가 없다면 설정 내용을 적용시킵니다.\n\n```bash\n# 설정 파일들에 오류가 없는지 확인한 뒤\n$ nginx -t\nnginx: the configuration file /etc/nginx/nginx.conf syntax is ok\nnginx: configuration file /etc/nginx/nginx.conf test is successful\n# 오류가 없다면 설정 파일 내용을 적용합니다.\n$ nginx -s reload\n```\n<br>\n\n# 최종 확인\n---\n\n브라우저의 주소창에 https://ssltest.fureweb.com를 입력하여 연결이 제대로 이뤄지는지 확인합니다. 브라우저 캐시로 인해 https로 리다이렉트 처리가 되지 않은 페이지를 보여줄 수 있으니, 크롬 기준으로 강력 새로고침을 실행시켜주세요.\n\n브라우저 주소표시줄 좌측에 자물쇠가 활성화 된 모습을 확인하실 수 있게 됩니다. \n~~주소가 ssltest2.fureweb.com인건 무시해주세요... -_-;~~\n\n\n\n\n# 마치며\n---\n\n우분투 서버를 생성하는 것 부터 Nginx 설치 및 설정, 그리고 SSL 적용하기까지 모든 과정에 대해 확인해 보았습니다. 혹시라도 본 포스트를 보고 막히는 부분이 있거나 설명이 부족한 부분이 있다면 언제든지 댓글이나 질문 부탁 드리겠습니다. \n\n읽어주셔서 감사합니다!",
"json_metadata": "{\"tags\":[\"kr\",\"kr-dev\",\"ssl\",\"ubuntu\",\"letsencrypt\"],\"image\":[\"https://steemitimages.com/DQmT5UFQLESiCLNpXWp4EAyr2sTi5dZBphFoLYBzQ8v6CUd/20170807-nginx-status.png\",\"https://fureweb-com.github.io/assets/img/posts/20170807-set-host-ip.png\",\"https://fureweb-com.github.io/assets/img/posts/20170807-certbot-process.png\",\"https://fureweb-com.github.io/assets/img/posts/20170807-ssl-connection.png\"],\"links\":[\"https://fureweb-com.github.io/blog/2017/08/07/applying-free-ssl-to-your-ubuntu-server-using-nginx-and-let'sencrypt-from-scratch.html\",\"http://www.mingw.org/\",\"https://www.chiark.greenend.org.uk/~sgtatham/putty/latest.html\",\"//iwinv.kr\",\"https://ssltest.fureweb.com\"],\"app\":\"steemit/0.1\",\"format\":\"markdown\"}",
"parent_author": "",
"parent_permlink": "ssl",
"permlink": "nginx-ssl",
"title": "우분투에서 nginx 설치부터 무료 SSL 적용까지"
}
],
"op_in_trx": 0,
"timestamp": "2018-02-22T14:26:57",
"trx_id": "4fd749f5e7d2a7d564581e0d10394ac8aed48115",
"trx_in_block": 31,
"virtual_op": 0
}2018/02/22 14:19:30
2018/02/22 14:19:30
| author | fureweb |
| body | # 들어가기 전에 --- 1. 아직 아래 link들에 대해 새창 열기 기능이 steemit에서 지원되지 않는 것 같습니다. 혹시라도 아래에 등장하는 링크를 클릭하시려면 우클릭 후 새창에서 열어 확인해 주세요! 2. 또한 syntax highlighting이 제대로 지원되지 않는 것 같아서, 혹시라도 보기 불편하신 점이 있다면 아래의 링크를 통해 원본 게시글을 확인하실 수도 있습니다. [https://fureweb-com.github.io/blog/2017/08/07/applying-free-ssl-to-your-ubuntu-server-using-nginx-and-let'sencrypt-from-scratch.html](https://fureweb-com.github.io/blog/2017/08/07/applying-free-ssl-to-your-ubuntu-server-using-nginx-and-let'sencrypt-from-scratch.html) # 개요 --- 본 튜토리얼은 다음의 순서대로 진행됩니다. - 우분투 VPS 생성 - nginx 설치 및 설정 - 도메인 Host IP 설정 및 확인 - Certbot 설치 및 설정 - 최종 확인 - 마치며 windows 환경에서 아래 예제를 실행하셔야 하는 분들은 [mingw](http://www.mingw.org/), [putty](https://www.chiark.greenend.org.uk/~sgtatham/putty/latest.html), windows 10 bash 등을 통해 bash shell을 사용하실 수 있습니다. 본 포스트의 내용은 로컬머신에서 bash shell을 사용할 수 있음을 전제하여 작성했습니다. 또한 vi를 사용할 수 있음을 전제하였으나, vi 사용이 어려우신 경우 nano에 대한 사용 방법을 검색하신 뒤 예제를 따라하시는 것을 추천드립니다. 그런 경우 아래에 표시한 vi 명령을 nano 명령으로 대신하시기 바랍니다. # 우분투 VPS 생성 --- 자신이 사용할 수 있는 클라우드 서비스 내 VPS를 Ubuntu 16.04 LTS 버전으로 생성합니다. 저는 개인적으로 제가 알고있는 한 가장 간단하고 저렴하게 VPS를 생성할 수 있는 [iwinv.kr 클라우드 서비스](//iwinv.kr)를 이용하여 VPS를 생성하도록 하겠습니다. 아래 예제에서는 Ubuntu 16.04 LTS(32bit) 버전으로 VPS를 생성하여 예제를 진행하게 됩니다. 편의상 root 계정으로 아래 예제를 수행하겠습니다. 방화벽 설정과 관련된 부분은 이 포스팅의 주제를 벗어나므로, 가능하다면 VPS 생성 시 방화벽은 사용하지 않음으로 설정하셔서 예제를 실습하시기를 희망합니다. # nginx 설치 및 설정 --- ssh 클라이언트를 이용하여 방금 막 생성한 VPS로 접속합니다. 접속 후 다음의 명령을 차례대로 실행하여 nginx를 서버에 설치한 뒤, 상태를 확인합니다. ```bash $ ssh root@your-vps-ip # 로그인 완료 후 아래 명령을 실행합니다. $ apt-get update $ apt-get install nginx ``` 설치 후 nginx 실행 상태를 다음과 같이 확인할 수 있습니다. ```bash $ service nginx status ```  만약 현재 상태가 inactive라면, 다음의 명령을 통해 nginx 프로세스를 실행시킵니다. ```bash $ service nginx start ``` 설치가 완료된 후 브라우저를 통해 서버의 IP를 입력하여 페이지를 요청하면 welcome to nginx 페이지를 확인할 수 있습니다. 만약 welcome 페이지를 볼수 없다면 방화벽 설정 문제일 가능성이 있습니다. 방화벽과 관련된 부분은 클라우드 서비스 업체마다 설정하는 방법이 다를 수 있으니, 사용하시는 업체의 방화벽 설정 사용 설명을 통해 http 요청을 위한 80번 포트 및 https 요청을 위한 443 포트를 열어둘 수 있도록 합니다. 보유하고 있는 도메인을 현재 VPS로 연결시키기 전, 해당 도메인을 통해 본 서버로 http 요청을 해 오는 경우에 대해 처리할 수 있도록 다음과 같이 nginx 설정을 수행합니다. ```bash # 다음의 경로로 이동하여 ssltest.fureweb.com 도메인 요청에 대한 설정파일을 생성합니다. # 아래 경로에 등록된 conf 확장자를 가진 모든 파일이 nginx.conf파일에 의해 include 되며, # nginx가 실행될 때 본 디렉토리 내 파일들이 해석되게 됩니다. $ cd /etc/nginx/conf.d # 원하는 도메인 명으로 설정 파일을 하나 생성합니다. $ vi ssltest.fureweb.com.conf ``` 아래의 내용을 ssltest.fureweb.com.conf 파일에 입력합니다. ```bash server { listen 80; server_name ssltest.fureweb.com; } ``` 필요한 설정 파일을 생성하였다면, 다음의 명령을 통해 설정에 오타 등의 오류는 없는지 확인한 뒤 설정을 적용합니다. ```bash # 설정 파일들에 오류가 없는지 확인한 뒤 $ nginx -t nginx: the configuration file /etc/nginx/nginx.conf syntax is ok nginx: configuration file /etc/nginx/nginx.conf test is successful # 오류가 없다면 설정 파일 내용을 적용합니다. $ nginx -s reload ``` 현재 VPS는 ssltest.fureweb.com에 대한 http 요청을 처리할 수 있는 상태가 되었습니다. 이제 자신이 가지고 있는 도메인 관리업체의 웹사이트에 로그인하여 해당 도메인에 대한 http 요청이 새로 만든 VPS로 전달될 수 있도록 별도의 설정을 진행해 보겠습니다. # 도메인 Host IP 설정 및 확인 --- 본인이 보유하고있는 도메인을 관리하는 업체 사이트에 로그인하여, 자신이 보유한 도메인(또는 서브도메인)에 대한 Host IP를 설정합니다. 예시로, 제가 보유하고 있는 ssltest.fureweb.com 이라는 서브도메인에 대한 http 요청이 방금 만든 VPS 서버로 연결되도록 설정을 추가하겠습니다. 도메인 등록 대행업체마다 설정하는 방법은 다를 수 있으니, 아래 사진을 참고하셔서 비슷한 메뉴에서 설정을 처리해주세요. 일반적으로 DNS 관리 메뉴의 하위 메뉴에서 설정하실 수 있습니다.  만약 이전에 해당 도메인으로의 연결을 한 적이 있다면, 로컬 PC의 DNS캐시를 삭제해야합니다. 없다면 무시하셔도 됩니다. ```bash # OSX 10.10.4 이상인 경우 $ killall -HUP mDNSResponder # Windows 10을 사용하는 경우 - powershell 또는 cmd에서 ipconfig /flushdns # 죄송하지만 이 외에는 검색해 주세요 -_-;; ``` 브라우저가 크롬이라면, 주소표시줄에 다음의 경로를 복사&붙여넣기하여 조회되는 화면에서 `Clear Host Cache` 버튼을 클릭하여 캐시를 삭제하세요. ```url chrome://net-internals/#dns ``` 모든 설정에 문제가 없다면, 이제 웹 브라우저를 통해 내가 가지고 있는 도메인에 대한 연결 요청이 방금 만든 VPS로 전달되게 됩니다. 단, 도메인 관리 업체마다 해당 적용값이 얼마나 빨리 반영되는지는 차이가 있을 수 있으므로, 충분한 시간을 두고 확인을 진행해 주세요. 통상 1~2분 내에는 적용되는 걸로 알고 있으나, 다른 업체는 어떤지 사용해보지 않아서 잘 모르겠네요. ^^; # Certbot 설치 및 설정 --- 먼저 certbot을 설치합니다. ```bash $ add-apt-repository ppa:certbot/certbot ``` <br> 해당 저장소에 담긴 패키지 정보를 확인할 수 있도록 다음과 같이 업데이트를 수행합니다. ```bash $ apt-get update ``` <br> `apt-get`을 이용하여 Certbot을 설치합니다. ```bash $ apt-get install python-certbot-nginx ``` <br> 설치된 certbot을 이용하여 ssltest.fureweb.com 도메인에 대한 SSL 인증서만 발급받도록 합니다. ```bash $ certbot certonly --nginx -d ssltest.fureweb.com # 위 명령을 실행하면 해당 도메인을 관리하는 사람의 이메일 주소를 입력하라고 나옵니다. 입력해 주세요. # 만료일에 대한 정보를 보내줍니다. # 약관에는 동의(A)하셔야 하며, # EFF 재단과의 이메일을 공유할지 여부를 묻는 부분에 대해서는 원하시는대로 진행하시면 됩니다. ``` <br> 아래와 같은 메시지들이 출력됩니다.  위 명령을 수행하고 나면, 아래 경로에 총 5개의 파일이 생성되어 있음을 확인할 수 있습니다. (실제로는 /etc/letsencrypt/archive/도메인명 디렉토리 내 파일에 대한 심볼릭 링크 입니다.) ```bash $ ls -al /etc/letsencrypt/live/ssltest.fureweb.com total 12 drwxr-xr-x 2 root root 4096 Aug 7 17:03 ./ drwx------ 4 root root 4096 Aug 7 16:56 ../ lrwxrwxrwx 1 root root 43 Aug 7 17:03 cert.pem -> ../../archive/ssltest.fureweb.com/cert1.pem lrwxrwxrwx 1 root root 44 Aug 7 17:03 chain.pem -> ../../archive/ssltest.fureweb.com/chain1.pem lrwxrwxrwx 1 root root 48 Aug 7 17:03 fullchain.pem -> ../../archive/ssltest.fureweb.com/fullchain1.pem lrwxrwxrwx 1 root root 46 Aug 7 17:03 privkey.pem -> ../../archive/ssltest.fureweb.com/privkey1.pem -rw-r--r-- 1 root root 543 Aug 7 17:03 README ``` <br> 이제 ssltest.fureweb.com 이라는 도메인에 대한 ssl 요청을 처리하기위해 필요한 인증서가 준비된 상태가 되었습니다. nginx가 이 인증서를 통해 https 요청을 처리할 수 있도록, 아까 설정했던 conf 파일을 아래와 같이 수정해 보겠습니다. ```bash # 아래 명령어로 기존 설정파일 편집 $ vi /etc/nginx/conf.d/ssltest.fureweb.com.conf # 다음과 같은 형태가 되어야합니다. server { # http://ssltest.fureweb.com 요청에 대해 # https://ssltest.fureweb.com 으로 리다이렉트 처리합니다. listen 80; server_name ssltest.fureweb.com; return 301 https://ssltest.fureweb.com; } server { # https://ssltest.fureweb.com 으로의 요청을 리스닝합니다. listen 443; server_name ssltest.fureweb.com; ssl on; ssl_certificate /etc/letsencrypt/live/ssltest.fureweb.com/fullchain.pem; ssl_certificate_key /etc/letsencrypt/live/ssltest.fureweb.com/privkey.pem; ssl_protocols TLSv1 TLSv1.1 TLSv1.2; ssl_ciphers HIGH:!aNULL:!MD5; # 예제에서는 이 외에 별도 설정을 추가하지 않고, SSL 요청이 정상적으로 처리되는지만 확인합니다. # 일반적으로 아래에는 현재 도메인과 연결된 document_root 등에 대한 설정 기술하거나 # proxy 설정을 통해 동적 처리가 가능한 다른 WAS와 연동하여 응답을 핸들링합니다. } ``` <br> 위 설정을 저장한 뒤, conf 파일에 오타는 없는지 확인하고 문제가 없다면 설정 내용을 적용시킵니다. ```bash # 설정 파일들에 오류가 없는지 확인한 뒤 $ nginx -t nginx: the configuration file /etc/nginx/nginx.conf syntax is ok nginx: configuration file /etc/nginx/nginx.conf test is successful # 오류가 없다면 설정 파일 내용을 적용합니다. $ nginx -s reload ``` <br> # 최종 확인 --- 브라우저의 주소창에 https://ssltest.fureweb.com를 입력하여 연결이 제대로 이뤄지는지 확인합니다. 브라우저 캐시로 인해 https로 리다이렉트 처리가 되지 않은 페이지를 보여줄 수 있으니, 크롬 기준으로 강력 새로고침을 실행시켜주세요. 브라우저 주소표시줄 좌측에 자물쇠가 활성화 된 모습을 확인하실 수 있게 됩니다. ~~주소가 ssltest2.fureweb.com인건 무시해주세요... -_-;~~  # 마치며 --- 우분투 서버를 생성하는 것 부터 Nginx 설치 및 설정, 그리고 SSL 적용하기까지 모든 과정에 대해 확인해 보았습니다. 혹시라도 본 포스트를 보고 막히는 부분이 있거나 설명이 부족한 부분이 있다면 언제든지 댓글이나 질문 부탁 드리겠습니다. 읽어주셔서 감사합니다! |
| json metadata | {"tags":["ssl"],"image":["https://steemitimages.com/DQmT5UFQLESiCLNpXWp4EAyr2sTi5dZBphFoLYBzQ8v6CUd/20170807-nginx-status.png","https://fureweb-com.github.io/assets/img/posts/20170807-set-host-ip.png","https://fureweb-com.github.io/assets/img/posts/20170807-certbot-process.png","https://fureweb-com.github.io/assets/img/posts/20170807-ssl-connection.png"],"links":["https://fureweb-com.github.io/blog/2017/08/07/applying-free-ssl-to-your-ubuntu-server-using-nginx-and-let'sencrypt-from-scratch.html","http://www.mingw.org/","https://www.chiark.greenend.org.uk/~sgtatham/putty/latest.html","//iwinv.kr","https://ssltest.fureweb.com"],"app":"steemit/0.1","format":"markdown"} |
| parent author | |
| parent permlink | ssl |
| permlink | nginx-ssl |
| title | 우분투에서 nginx 설치부터 무료 SSL 적용까지 |
| Transaction Info | Block #20094818/Trx 8d68ff31d9d65c592cd1286e9aceb94ee853d543 |
View Raw JSON Data
{
"block": 20094818,
"op": [
"comment",
{
"author": "fureweb",
"body": "# 들어가기 전에\n---\n1. 아직 아래 link들에 대해 새창 열기 기능이 steemit에서 지원되지 않는 것 같습니다. 혹시라도 아래에 등장하는 링크를 클릭하시려면 우클릭 후 새창에서 열어 확인해 주세요! \n2. 또한 syntax highlighting이 제대로 지원되지 않는 것 같아서, 혹시라도 보기 불편하신 점이 있다면 아래의 링크를 통해 원본 게시글을 확인하실 수도 있습니다.\n[https://fureweb-com.github.io/blog/2017/08/07/applying-free-ssl-to-your-ubuntu-server-using-nginx-and-let'sencrypt-from-scratch.html](https://fureweb-com.github.io/blog/2017/08/07/applying-free-ssl-to-your-ubuntu-server-using-nginx-and-let'sencrypt-from-scratch.html)\n\n# 개요\n---\n\n본 튜토리얼은 다음의 순서대로 진행됩니다.\n\n- 우분투 VPS 생성\n- nginx 설치 및 설정\n- 도메인 Host IP 설정 및 확인\n- Certbot 설치 및 설정\n- 최종 확인\n- 마치며\n\nwindows 환경에서 아래 예제를 실행하셔야 하는 분들은 [mingw](http://www.mingw.org/), [putty](https://www.chiark.greenend.org.uk/~sgtatham/putty/latest.html), windows 10 bash 등을 통해 bash shell을 사용하실 수 있습니다. 본 포스트의 내용은 로컬머신에서 bash shell을 사용할 수 있음을 전제하여 작성했습니다. \n\n또한 vi를 사용할 수 있음을 전제하였으나, vi 사용이 어려우신 경우 nano에 대한 사용 방법을 검색하신 뒤 예제를 따라하시는 것을 추천드립니다. 그런 경우 아래에 표시한 vi 명령을 nano 명령으로 대신하시기 바랍니다.\n\n# 우분투 VPS 생성\n---\n\n자신이 사용할 수 있는 클라우드 서비스 내 VPS를 Ubuntu 16.04 LTS 버전으로 생성합니다. 저는 개인적으로 제가 알고있는 한 가장 간단하고 저렴하게 VPS를 생성할 수 있는 [iwinv.kr 클라우드 서비스](//iwinv.kr)를 이용하여 VPS를 생성하도록 하겠습니다.\n\n아래 예제에서는 Ubuntu 16.04 LTS(32bit) 버전으로 VPS를 생성하여 예제를 진행하게 됩니다. 편의상 root 계정으로 아래 예제를 수행하겠습니다.\n\n방화벽 설정과 관련된 부분은 이 포스팅의 주제를 벗어나므로, 가능하다면 VPS 생성 시 방화벽은 사용하지 않음으로 설정하셔서 예제를 실습하시기를 희망합니다.\n\n# nginx 설치 및 설정\n---\n\nssh 클라이언트를 이용하여 방금 막 생성한 VPS로 접속합니다. 접속 후 다음의 명령을 차례대로 실행하여 nginx를 서버에 설치한 뒤, 상태를 확인합니다. \n\n```bash\n$ ssh root@your-vps-ip\n# 로그인 완료 후 아래 명령을 실행합니다.\n$ apt-get update\n$ apt-get install nginx\n```\n\n설치 후 nginx 실행 상태를 다음과 같이 확인할 수 있습니다.\n\n```bash\n$ service nginx status\n```\n \n\n \n만약 현재 상태가 inactive라면, 다음의 명령을 통해 nginx 프로세스를 실행시킵니다.\n```bash\n$ service nginx start\n```\n \n설치가 완료된 후 브라우저를 통해 서버의 IP를 입력하여 페이지를 요청하면 welcome to nginx 페이지를 확인할 수 있습니다. 만약 welcome 페이지를 볼수 없다면 방화벽 설정 문제일 가능성이 있습니다. 방화벽과 관련된 부분은 클라우드 서비스 업체마다 설정하는 방법이 다를 수 있으니, 사용하시는 업체의 방화벽 설정 사용 설명을 통해 http 요청을 위한 80번 포트 및 https 요청을 위한 443 포트를 열어둘 수 있도록 합니다.\n\n보유하고 있는 도메인을 현재 VPS로 연결시키기 전, 해당 도메인을 통해 본 서버로 http 요청을 해 오는 경우에 대해 처리할 수 있도록 다음과 같이 nginx 설정을 수행합니다.\n\n```bash\n# 다음의 경로로 이동하여 ssltest.fureweb.com 도메인 요청에 대한 설정파일을 생성합니다.\n# 아래 경로에 등록된 conf 확장자를 가진 모든 파일이 nginx.conf파일에 의해 include 되며, \n# nginx가 실행될 때 본 디렉토리 내 파일들이 해석되게 됩니다.\n$ cd /etc/nginx/conf.d\n\n# 원하는 도메인 명으로 설정 파일을 하나 생성합니다.\n$ vi ssltest.fureweb.com.conf\n```\n \n아래의 내용을 ssltest.fureweb.com.conf 파일에 입력합니다.\n```bash\nserver {\n listen 80;\n server_name ssltest.fureweb.com;\n}\n```\n\n필요한 설정 파일을 생성하였다면, 다음의 명령을 통해 설정에 오타 등의 오류는 없는지 확인한 뒤 설정을 적용합니다.\n```bash\n# 설정 파일들에 오류가 없는지 확인한 뒤\n$ nginx -t\nnginx: the configuration file /etc/nginx/nginx.conf syntax is ok\nnginx: configuration file /etc/nginx/nginx.conf test is successful\n# 오류가 없다면 설정 파일 내용을 적용합니다.\n$ nginx -s reload\n```\n\n현재 VPS는 ssltest.fureweb.com에 대한 http 요청을 처리할 수 있는 상태가 되었습니다. 이제 자신이 가지고 있는 도메인 관리업체의 웹사이트에 로그인하여 해당 도메인에 대한 http 요청이 새로 만든 VPS로 전달될 수 있도록 별도의 설정을 진행해 보겠습니다.\n\n\n# 도메인 Host IP 설정 및 확인\n---\n\n본인이 보유하고있는 도메인을 관리하는 업체 사이트에 로그인하여, 자신이 보유한 도메인(또는 서브도메인)에 대한 Host IP를 설정합니다. \n\n예시로, 제가 보유하고 있는 ssltest.fureweb.com 이라는 서브도메인에 대한 http 요청이 방금 만든 VPS 서버로 연결되도록 설정을 추가하겠습니다. 도메인 등록 대행업체마다 설정하는 방법은 다를 수 있으니, 아래 사진을 참고하셔서 비슷한 메뉴에서 설정을 처리해주세요. 일반적으로 DNS 관리 메뉴의 하위 메뉴에서 설정하실 수 있습니다.\n\n\n\n만약 이전에 해당 도메인으로의 연결을 한 적이 있다면, 로컬 PC의 DNS캐시를 삭제해야합니다. 없다면 무시하셔도 됩니다.\n```bash\n# OSX 10.10.4 이상인 경우\n$ killall -HUP mDNSResponder\n\n# Windows 10을 사용하는 경우 - powershell 또는 cmd에서\nipconfig /flushdns\n\n# 죄송하지만 이 외에는 검색해 주세요 -_-;;\n```\n\n브라우저가 크롬이라면, 주소표시줄에 다음의 경로를 복사&붙여넣기하여 조회되는 화면에서 `Clear Host Cache` 버튼을 클릭하여 캐시를 삭제하세요. \n```url\nchrome://net-internals/#dns\n```\n\n모든 설정에 문제가 없다면, 이제 웹 브라우저를 통해 내가 가지고 있는 도메인에 대한 연결 요청이 방금 만든 VPS로 전달되게 됩니다. 단, 도메인 관리 업체마다 해당 적용값이 얼마나 빨리 반영되는지는 차이가 있을 수 있으므로, 충분한 시간을 두고 확인을 진행해 주세요. 통상 1~2분 내에는 적용되는 걸로 알고 있으나, 다른 업체는 어떤지 사용해보지 않아서 잘 모르겠네요. ^^;\n\n# Certbot 설치 및 설정\n---\n\n먼저 certbot을 설치합니다.\n```bash\n$ add-apt-repository ppa:certbot/certbot\n```\n<br>\n해당 저장소에 담긴 패키지 정보를 확인할 수 있도록 다음과 같이 업데이트를 수행합니다.\n```bash\n$ apt-get update\n```\n<br>\n`apt-get`을 이용하여 Certbot을 설치합니다.\n```bash\n$ apt-get install python-certbot-nginx\n```\n<br>\n설치된 certbot을 이용하여 ssltest.fureweb.com 도메인에 대한 SSL 인증서만 발급받도록 합니다.\n\n```bash\n$ certbot certonly --nginx -d ssltest.fureweb.com\n# 위 명령을 실행하면 해당 도메인을 관리하는 사람의 이메일 주소를 입력하라고 나옵니다. 입력해 주세요.\n# 만료일에 대한 정보를 보내줍니다.\n# 약관에는 동의(A)하셔야 하며,\n# EFF 재단과의 이메일을 공유할지 여부를 묻는 부분에 대해서는 원하시는대로 진행하시면 됩니다.\n```\n<br>\n아래와 같은 메시지들이 출력됩니다.\n\n\n위 명령을 수행하고 나면, 아래 경로에 총 5개의 파일이 생성되어 있음을 확인할 수 있습니다. (실제로는 /etc/letsencrypt/archive/도메인명 디렉토리 내 파일에 대한 심볼릭 링크 입니다.)\n```bash\n$ ls -al /etc/letsencrypt/live/ssltest.fureweb.com\ntotal 12\ndrwxr-xr-x 2 root root 4096 Aug 7 17:03 ./\ndrwx------ 4 root root 4096 Aug 7 16:56 ../\nlrwxrwxrwx 1 root root 43 Aug 7 17:03 cert.pem -> ../../archive/ssltest.fureweb.com/cert1.pem\nlrwxrwxrwx 1 root root 44 Aug 7 17:03 chain.pem -> ../../archive/ssltest.fureweb.com/chain1.pem\nlrwxrwxrwx 1 root root 48 Aug 7 17:03 fullchain.pem -> ../../archive/ssltest.fureweb.com/fullchain1.pem\nlrwxrwxrwx 1 root root 46 Aug 7 17:03 privkey.pem -> ../../archive/ssltest.fureweb.com/privkey1.pem\n-rw-r--r-- 1 root root 543 Aug 7 17:03 README\n```\n<br>\n이제 ssltest.fureweb.com 이라는 도메인에 대한 ssl 요청을 처리하기위해 필요한 인증서가 준비된 상태가 되었습니다. nginx가 이 인증서를 통해 https 요청을 처리할 수 있도록, 아까 설정했던 conf 파일을 아래와 같이 수정해 보겠습니다. \n\n```bash\n# 아래 명령어로 기존 설정파일 편집\n$ vi /etc/nginx/conf.d/ssltest.fureweb.com.conf\n\n# 다음과 같은 형태가 되어야합니다.\nserver {\n # http://ssltest.fureweb.com 요청에 대해\n # https://ssltest.fureweb.com 으로 리다이렉트 처리합니다. \n listen 80;\n server_name ssltest.fureweb.com;\n return 301 https://ssltest.fureweb.com;\n}\n\nserver {\n # https://ssltest.fureweb.com 으로의 요청을 리스닝합니다.\n listen 443;\n server_name ssltest.fureweb.com;\n\n ssl on;\n ssl_certificate /etc/letsencrypt/live/ssltest.fureweb.com/fullchain.pem;\n ssl_certificate_key /etc/letsencrypt/live/ssltest.fureweb.com/privkey.pem;\n\n ssl_protocols TLSv1 TLSv1.1 TLSv1.2;\n ssl_ciphers HIGH:!aNULL:!MD5;\n\n # 예제에서는 이 외에 별도 설정을 추가하지 않고, SSL 요청이 정상적으로 처리되는지만 확인합니다.\n # 일반적으로 아래에는 현재 도메인과 연결된 document_root 등에 대한 설정 기술하거나\n # proxy 설정을 통해 동적 처리가 가능한 다른 WAS와 연동하여 응답을 핸들링합니다.\n}\n\n```\n<br>\n위 설정을 저장한 뒤, conf 파일에 오타는 없는지 확인하고 문제가 없다면 설정 내용을 적용시킵니다.\n\n```bash\n# 설정 파일들에 오류가 없는지 확인한 뒤\n$ nginx -t\nnginx: the configuration file /etc/nginx/nginx.conf syntax is ok\nnginx: configuration file /etc/nginx/nginx.conf test is successful\n# 오류가 없다면 설정 파일 내용을 적용합니다.\n$ nginx -s reload\n```\n<br>\n\n# 최종 확인\n---\n\n브라우저의 주소창에 https://ssltest.fureweb.com를 입력하여 연결이 제대로 이뤄지는지 확인합니다. 브라우저 캐시로 인해 https로 리다이렉트 처리가 되지 않은 페이지를 보여줄 수 있으니, 크롬 기준으로 강력 새로고침을 실행시켜주세요.\n\n브라우저 주소표시줄 좌측에 자물쇠가 활성화 된 모습을 확인하실 수 있게 됩니다. \n~~주소가 ssltest2.fureweb.com인건 무시해주세요... -_-;~~\n\n\n\n\n# 마치며\n---\n\n우분투 서버를 생성하는 것 부터 Nginx 설치 및 설정, 그리고 SSL 적용하기까지 모든 과정에 대해 확인해 보았습니다. 혹시라도 본 포스트를 보고 막히는 부분이 있거나 설명이 부족한 부분이 있다면 언제든지 댓글이나 질문 부탁 드리겠습니다. \n\n읽어주셔서 감사합니다!",
"json_metadata": "{\"tags\":[\"ssl\"],\"image\":[\"https://steemitimages.com/DQmT5UFQLESiCLNpXWp4EAyr2sTi5dZBphFoLYBzQ8v6CUd/20170807-nginx-status.png\",\"https://fureweb-com.github.io/assets/img/posts/20170807-set-host-ip.png\",\"https://fureweb-com.github.io/assets/img/posts/20170807-certbot-process.png\",\"https://fureweb-com.github.io/assets/img/posts/20170807-ssl-connection.png\"],\"links\":[\"https://fureweb-com.github.io/blog/2017/08/07/applying-free-ssl-to-your-ubuntu-server-using-nginx-and-let'sencrypt-from-scratch.html\",\"http://www.mingw.org/\",\"https://www.chiark.greenend.org.uk/~sgtatham/putty/latest.html\",\"//iwinv.kr\",\"https://ssltest.fureweb.com\"],\"app\":\"steemit/0.1\",\"format\":\"markdown\"}",
"parent_author": "",
"parent_permlink": "ssl",
"permlink": "nginx-ssl",
"title": "우분투에서 nginx 설치부터 무료 SSL 적용까지"
}
],
"op_in_trx": 0,
"timestamp": "2018-02-22T14:19:30",
"trx_id": "8d68ff31d9d65c592cd1286e9aceb94ee853d543",
"trx_in_block": 36,
"virtual_op": 0
}2018/02/22 14:19:09
2018/02/22 14:19:09
| author | fureweb |
| body | # 들어가기 전에 --- 1. 아직 아래 link들에 대해 새창 열기 기능이 steemit에서 지원되지 않는 것 같습니다. 혹시라도 아래에 등장하는 링크를 클릭하시려면 우클릭 후 새창에서 열어 확인해 주세요! 2. 또한 syntax highlighting이 제대로 지원되지 않는 것 같아서, 혹시라도 보기 불편하신 점이 있다면 아래의 링크를 통해 원본 게시글을 확인하실 수도 있습니다. [https://fureweb-com.github.io/blog/2017/08/07/applying-free-ssl-to-your-ubuntu-server-using-nginx-and-let'sencrypt-from-scratch.html](https://fureweb-com.github.io/blog/2017/08/07/applying-free-ssl-to-your-ubuntu-server-using-nginx-and-let'sencrypt-from-scratch.html) # 개요 --- 본 튜토리얼은 다음의 순서대로 진행됩니다. - 우분투 VPS 생성 - nginx 설치 및 설정 - 도메인 Host IP 설정 및 확인 - Certbot 설치 및 설정 - 최종 확인 - 마치며 windows 환경에서 아래 예제를 실행하셔야 하는 분들은 [mingw](http://www.mingw.org/), [putty](https://www.chiark.greenend.org.uk/~sgtatham/putty/latest.html), windows 10 bash 등을 통해 bash shell을 사용하실 수 있습니다. 본 포스트의 내용은 로컬머신에서 bash shell을 사용할 수 있음을 전제하여 작성했습니다. 또한 vi를 사용할 수 있음을 전제하였으나, vi 사용이 어려우신 경우 nano에 대한 사용 방법을 검색하신 뒤 예제를 따라하시는 것을 추천드립니다. 그런 경우 아래에 표시한 vi 명령을 nano 명령으로 대신하시기 바랍니다. # 우분투 VPS 생성 --- 자신이 사용할 수 있는 클라우드 서비스 내 VPS를 Ubuntu 16.04 LTS 버전으로 생성합니다. 저는 개인적으로 제가 알고있는 한 가장 간단하고 저렴하게 VPS를 생성할 수 있는 [iwinv.kr 클라우드 서비스](//iwinv.kr)를 이용하여 VPS를 생성하도록 하겠습니다. 아래 예제에서는 Ubuntu 16.04 LTS(32bit) 버전으로 VPS를 생성하여 예제를 진행하게 됩니다. 편의상 root 계정으로 아래 예제를 수행하겠습니다. 방화벽 설정과 관련된 부분은 이 포스팅의 주제를 벗어나므로, 가능하다면 VPS 생성 시 방화벽은 사용하지 않음으로 설정하셔서 예제를 실습하시기를 희망합니다. # nginx 설치 및 설정 --- ssh 클라이언트를 이용하여 방금 막 생성한 VPS로 접속합니다. 접속 후 다음의 명령을 차례대로 실행하여 nginx를 서버에 설치한 뒤, 상태를 확인합니다. ```bash $ ssh root@your-vps-ip # 로그인 완료 후 아래 명령을 실행합니다. $ apt-get update $ apt-get install nginx ``` 설치 후 nginx 실행 상태를 다음과 같이 확인할 수 있습니다. ```bash $ service nginx status ```  만약 현재 상태가 inactive라면, 다음의 명령을 통해 nginx 프로세스를 실행시킵니다. ```bash $ service nginx start ``` 설치가 완료된 후 브라우저를 통해 서버의 IP를 입력하여 페이지를 요청하면 welcome to nginx 페이지를 확인할 수 있습니다. 만약 welcome 페이지를 볼수 없다면 방화벽 설정 문제일 가능성이 있습니다. 방화벽과 관련된 부분은 클라우드 서비스 업체마다 설정하는 방법이 다를 수 있으니, 사용하시는 업체의 방화벽 설정 사용 설명을 통해 http 요청을 위한 80번 포트 및 https 요청을 위한 443 포트를 열어둘 수 있도록 합니다. 보유하고 있는 도메인을 현재 VPS로 연결시키기 전, 해당 도메인을 통해 본 서버로 http 요청을 해 오는 경우에 대해 처리할 수 있도록 다음과 같이 nginx 설정을 수행합니다. ```bash # 다음의 경로로 이동하여 ssltest.fureweb.com 도메인 요청에 대한 설정파일을 생성합니다. # 아래 경로에 등록된 conf 확장자를 가진 모든 파일이 nginx.conf파일에 의해 include 되며, # nginx가 실행될 때 본 디렉토리 내 파일들이 해석되게 됩니다. $ cd /etc/nginx/conf.d # 원하는 도메인 명으로 설정 파일을 하나 생성합니다. $ vi ssltest.fureweb.com.conf ``` 아래의 내용을 ssltest.fureweb.com.conf 파일에 입력합니다. ```bash server { listen 80; server_name ssltest.fureweb.com; } ``` 필요한 설정 파일을 생성하였다면, 다음의 명령을 통해 설정에 오타 등의 오류는 없는지 확인한 뒤 설정을 적용합니다. ```bash # 설정 파일들에 오류가 없는지 확인한 뒤 $ nginx -t nginx: the configuration file /etc/nginx/nginx.conf syntax is ok nginx: configuration file /etc/nginx/nginx.conf test is successful # 오류가 없다면 설정 파일 내용을 적용합니다. $ nginx -s reload ``` 현재 VPS는 ssltest.fureweb.com에 대한 http 요청을 처리할 수 있는 상태가 되었습니다. 이제 자신이 가지고 있는 도메인 관리업체의 웹사이트에 로그인하여 해당 도메인에 대한 http 요청이 새로 만든 VPS로 전달될 수 있도록 별도의 설정을 진행해 보겠습니다. # 도메인 Host IP 설정 및 확인 --- 본인이 보유하고있는 도메인을 관리하는 업체 사이트에 로그인하여, 자신이 보유한 도메인(또는 서브도메인)에 대한 Host IP를 설정합니다. 예시로, 제가 보유하고 있는 ssltest.fureweb.com 이라는 서브도메인에 대한 http 요청이 방금 만든 VPS 서버로 연결되도록 설정을 추가하겠습니다. 도메인 등록 대행업체마다 설정하는 방법은 다를 수 있으니, 아래 사진을 참고하셔서 비슷한 메뉴에서 설정을 처리해주세요. 일반적으로 DNS 관리 메뉴의 하위 메뉴에서 설정하실 수 있습니다.  만약 이전에 해당 도메인으로의 연결을 한 적이 있다면, 로컬 PC의 DNS캐시를 삭제해야합니다. 없다면 무시하셔도 됩니다. ```bash # OSX 10.10.4 이상인 경우 $ killall -HUP mDNSResponder # Windows 10을 사용하는 경우 - powershell 또는 cmd에서 ipconfig /flushdns # 죄송하지만 이 외에는 검색해 주세요 -_-;; ``` 브라우저가 크롬이라면, 주소표시줄에 다음의 경로를 복사&붙여넣기하여 조회되는 화면에서 `Clear Host Cache` 버튼을 클릭하여 캐시를 삭제하세요. ```url chrome://net-internals/#dns ``` 모든 설정에 문제가 없다면, 이제 웹 브라우저를 통해 내가 가지고 있는 도메인에 대한 연결 요청이 방금 만든 VPS로 전달되게 됩니다. 단, 도메인 관리 업체마다 해당 적용값이 얼마나 빨리 반영되는지는 차이가 있을 수 있으므로, 충분한 시간을 두고 확인을 진행해 주세요. 통상 1~2분 내에는 적용되는 걸로 알고 있으나, 다른 업체는 어떤지 사용해보지 않아서 잘 모르겠네요. ^^; # Certbot 설치 및 설정 --- 먼저 certbot을 설치합니다. ```bash $ add-apt-repository ppa:certbot/certbot ``` <br> 해당 저장소에 담긴 패키지 정보를 확인할 수 있도록 다음과 같이 업데이트를 수행합니다. ```bash $ apt-get update ``` <br> `apt-get`을 이용하여 Certbot을 설치합니다. ```bash $ apt-get install python-certbot-nginx ``` <br> 설치된 certbot을 이용하여 ssltest.fureweb.com 도메인에 대한 SSL 인증서만 발급받도록 합니다. ```bash $ certbot certonly --nginx -d ssltest.fureweb.com # 위 명령을 실행하면 해당 도메인을 관리하는 사람의 이메일 주소를 입력하라고 나옵니다. 입력해 주세요. # 만료일에 대한 정보를 보내줍니다. # 약관에는 동의(A)하셔야 하며, # EFF 재단과의 이메일을 공유할지 여부를 묻는 부분에 대해서는 원하시는대로 진행하시면 됩니다. ``` <br> 아래와 같은 메시지들이 출력됩니다.  위 명령을 수행하고 나면, 아래 경로에 총 5개의 파일이 생성되어 있음을 확인할 수 있습니다. (실제로는 /etc/letsencrypt/archive/도메인명 디렉토리 내 파일에 대한 심볼릭 링크 입니다.) ```bash $ ls -al /etc/letsencrypt/live/ssltest.fureweb.com total 12 drwxr-xr-x 2 root root 4096 Aug 7 17:03 ./ drwx------ 4 root root 4096 Aug 7 16:56 ../ lrwxrwxrwx 1 root root 43 Aug 7 17:03 cert.pem -> ../../archive/ssltest.fureweb.com/cert1.pem lrwxrwxrwx 1 root root 44 Aug 7 17:03 chain.pem -> ../../archive/ssltest.fureweb.com/chain1.pem lrwxrwxrwx 1 root root 48 Aug 7 17:03 fullchain.pem -> ../../archive/ssltest.fureweb.com/fullchain1.pem lrwxrwxrwx 1 root root 46 Aug 7 17:03 privkey.pem -> ../../archive/ssltest.fureweb.com/privkey1.pem -rw-r--r-- 1 root root 543 Aug 7 17:03 README ``` <br> 이제 ssltest.fureweb.com 이라는 도메인에 대한 ssl 요청을 처리하기위해 필요한 인증서가 준비된 상태가 되었습니다. nginx가 이 인증서를 통해 https 요청을 처리할 수 있도록, 아까 설정했던 conf 파일을 아래와 같이 수정해 보겠습니다. ```bash # 아래 명령어로 기존 설정파일 편집 $ vi /etc/nginx/conf.d/ssltest.fureweb.com.conf # 다음과 같은 형태가 되어야합니다. server { # http://ssltest.fureweb.com 요청에 대해 # https://ssltest.fureweb.com 으로 리다이렉트 처리합니다. listen 80; server_name ssltest.fureweb.com; return 301 https://ssltest.fureweb.com; } server { # https://ssltest.fureweb.com 으로의 요청을 리스닝합니다. listen 443; server_name ssltest.fureweb.com; ssl on; ssl_certificate /etc/letsencrypt/live/ssltest.fureweb.com/fullchain.pem; ssl_certificate_key /etc/letsencrypt/live/ssltest.fureweb.com/privkey.pem; ssl_protocols TLSv1 TLSv1.1 TLSv1.2; ssl_ciphers HIGH:!aNULL:!MD5; # 예제에서는 이 외에 별도 설정을 추가하지 않고, SSL 요청이 정상적으로 처리되는지만 확인합니다. # 일반적으로 아래에는 현재 도메인과 연결된 document_root 등에 대한 설정 기술하거나 # proxy 설정을 통해 동적 처리가 가능한 다른 WAS와 연동하여 응답을 핸들링합니다. } ``` <br> 위 설정을 저장한 뒤, conf 파일에 오타는 없는지 확인하고 문제가 없다면 설정 내용을 적용시킵니다. ```bash # 설정 파일들에 오류가 없는지 확인한 뒤 $ nginx -t nginx: the configuration file /etc/nginx/nginx.conf syntax is ok nginx: configuration file /etc/nginx/nginx.conf test is successful # 오류가 없다면 설정 파일 내용을 적용합니다. $ nginx -s reload ``` <br> # 최종 확인 --- 브라우저의 주소창에 https://ssltest.fureweb.com를 입력하여 연결이 제대로 이뤄지는지 확인합니다. 브라우저 캐시로 인해 https로 리다이렉트 처리가 되지 않은 페이지를 보여줄 수 있으니, 크롬 기준으로 강력 새로고침을 실행시켜주세요. 브라우저 주소표시줄 좌측에 자물쇠가 활성화 된 모습을 확인하실 수 있게 됩니다. ~~주소가 ssltest2.fureweb.com인건 무시해주세요... -_-;~~  # 마치며 --- 우분투 서버를 생성하는 것 부터 Nginx 설치 및 설정, 그리고 SSL 적용하기까지 모든 과정에 대해 확인해 보았습니다. 혹시라도 본 포스트를 보고 막히는 부분이 있거나 설명이 부족한 부분이 있다면 언제든지 댓글이나 질문 부탁 드리겠습니다. 읽어주셔서 감사합니다! |
| json metadata | {"tags":["kr","kr-dev","ubuntu","letsencrypt","ssl"],"image":["https://steemitimages.com/DQmT5UFQLESiCLNpXWp4EAyr2sTi5dZBphFoLYBzQ8v6CUd/20170807-nginx-status.png","https://fureweb-com.github.io/assets/img/posts/20170807-set-host-ip.png","https://fureweb-com.github.io/assets/img/posts/20170807-certbot-process.png","https://fureweb-com.github.io/assets/img/posts/20170807-ssl-connection.png"],"links":["https://fureweb-com.github.io/blog/2017/08/07/applying-free-ssl-to-your-ubuntu-server-using-nginx-and-let'sencrypt-from-scratch.html","http://www.mingw.org/","https://www.chiark.greenend.org.uk/~sgtatham/putty/latest.html","//iwinv.kr","https://ssltest.fureweb.com"],"app":"steemit/0.1","format":"markdown"} |
| parent author | |
| parent permlink | ssl |
| permlink | nginx-ssl |
| title | 우분투에서 nginx 설치부터 무료 SSL 적용까지 |
| Transaction Info | Block #20094811/Trx 1268f2778497ae0873098d49c72b8169819e5316 |
View Raw JSON Data
{
"block": 20094811,
"op": [
"comment",
{
"author": "fureweb",
"body": "# 들어가기 전에\n---\n1. 아직 아래 link들에 대해 새창 열기 기능이 steemit에서 지원되지 않는 것 같습니다. 혹시라도 아래에 등장하는 링크를 클릭하시려면 우클릭 후 새창에서 열어 확인해 주세요! \n2. 또한 syntax highlighting이 제대로 지원되지 않는 것 같아서, 혹시라도 보기 불편하신 점이 있다면 아래의 링크를 통해 원본 게시글을 확인하실 수도 있습니다.\n[https://fureweb-com.github.io/blog/2017/08/07/applying-free-ssl-to-your-ubuntu-server-using-nginx-and-let'sencrypt-from-scratch.html](https://fureweb-com.github.io/blog/2017/08/07/applying-free-ssl-to-your-ubuntu-server-using-nginx-and-let'sencrypt-from-scratch.html)\n\n# 개요\n---\n\n본 튜토리얼은 다음의 순서대로 진행됩니다.\n\n- 우분투 VPS 생성\n- nginx 설치 및 설정\n- 도메인 Host IP 설정 및 확인\n- Certbot 설치 및 설정\n- 최종 확인\n- 마치며\n\nwindows 환경에서 아래 예제를 실행하셔야 하는 분들은 [mingw](http://www.mingw.org/), [putty](https://www.chiark.greenend.org.uk/~sgtatham/putty/latest.html), windows 10 bash 등을 통해 bash shell을 사용하실 수 있습니다. 본 포스트의 내용은 로컬머신에서 bash shell을 사용할 수 있음을 전제하여 작성했습니다. \n\n또한 vi를 사용할 수 있음을 전제하였으나, vi 사용이 어려우신 경우 nano에 대한 사용 방법을 검색하신 뒤 예제를 따라하시는 것을 추천드립니다. 그런 경우 아래에 표시한 vi 명령을 nano 명령으로 대신하시기 바랍니다.\n\n# 우분투 VPS 생성\n---\n\n자신이 사용할 수 있는 클라우드 서비스 내 VPS를 Ubuntu 16.04 LTS 버전으로 생성합니다. 저는 개인적으로 제가 알고있는 한 가장 간단하고 저렴하게 VPS를 생성할 수 있는 [iwinv.kr 클라우드 서비스](//iwinv.kr)를 이용하여 VPS를 생성하도록 하겠습니다.\n\n아래 예제에서는 Ubuntu 16.04 LTS(32bit) 버전으로 VPS를 생성하여 예제를 진행하게 됩니다. 편의상 root 계정으로 아래 예제를 수행하겠습니다.\n\n방화벽 설정과 관련된 부분은 이 포스팅의 주제를 벗어나므로, 가능하다면 VPS 생성 시 방화벽은 사용하지 않음으로 설정하셔서 예제를 실습하시기를 희망합니다.\n\n# nginx 설치 및 설정\n---\n\nssh 클라이언트를 이용하여 방금 막 생성한 VPS로 접속합니다. 접속 후 다음의 명령을 차례대로 실행하여 nginx를 서버에 설치한 뒤, 상태를 확인합니다. \n\n```bash\n$ ssh root@your-vps-ip\n# 로그인 완료 후 아래 명령을 실행합니다.\n$ apt-get update\n$ apt-get install nginx\n```\n\n설치 후 nginx 실행 상태를 다음과 같이 확인할 수 있습니다.\n\n```bash\n$ service nginx status\n```\n \n\n \n만약 현재 상태가 inactive라면, 다음의 명령을 통해 nginx 프로세스를 실행시킵니다.\n```bash\n$ service nginx start\n```\n \n설치가 완료된 후 브라우저를 통해 서버의 IP를 입력하여 페이지를 요청하면 welcome to nginx 페이지를 확인할 수 있습니다. 만약 welcome 페이지를 볼수 없다면 방화벽 설정 문제일 가능성이 있습니다. 방화벽과 관련된 부분은 클라우드 서비스 업체마다 설정하는 방법이 다를 수 있으니, 사용하시는 업체의 방화벽 설정 사용 설명을 통해 http 요청을 위한 80번 포트 및 https 요청을 위한 443 포트를 열어둘 수 있도록 합니다.\n\n보유하고 있는 도메인을 현재 VPS로 연결시키기 전, 해당 도메인을 통해 본 서버로 http 요청을 해 오는 경우에 대해 처리할 수 있도록 다음과 같이 nginx 설정을 수행합니다.\n\n```bash\n# 다음의 경로로 이동하여 ssltest.fureweb.com 도메인 요청에 대한 설정파일을 생성합니다.\n# 아래 경로에 등록된 conf 확장자를 가진 모든 파일이 nginx.conf파일에 의해 include 되며, \n# nginx가 실행될 때 본 디렉토리 내 파일들이 해석되게 됩니다.\n$ cd /etc/nginx/conf.d\n\n# 원하는 도메인 명으로 설정 파일을 하나 생성합니다.\n$ vi ssltest.fureweb.com.conf\n```\n \n아래의 내용을 ssltest.fureweb.com.conf 파일에 입력합니다.\n```bash\nserver {\n listen 80;\n server_name ssltest.fureweb.com;\n}\n```\n\n필요한 설정 파일을 생성하였다면, 다음의 명령을 통해 설정에 오타 등의 오류는 없는지 확인한 뒤 설정을 적용합니다.\n```bash\n# 설정 파일들에 오류가 없는지 확인한 뒤\n$ nginx -t\nnginx: the configuration file /etc/nginx/nginx.conf syntax is ok\nnginx: configuration file /etc/nginx/nginx.conf test is successful\n# 오류가 없다면 설정 파일 내용을 적용합니다.\n$ nginx -s reload\n```\n\n현재 VPS는 ssltest.fureweb.com에 대한 http 요청을 처리할 수 있는 상태가 되었습니다. 이제 자신이 가지고 있는 도메인 관리업체의 웹사이트에 로그인하여 해당 도메인에 대한 http 요청이 새로 만든 VPS로 전달될 수 있도록 별도의 설정을 진행해 보겠습니다.\n\n\n# 도메인 Host IP 설정 및 확인\n---\n\n본인이 보유하고있는 도메인을 관리하는 업체 사이트에 로그인하여, 자신이 보유한 도메인(또는 서브도메인)에 대한 Host IP를 설정합니다. \n\n예시로, 제가 보유하고 있는 ssltest.fureweb.com 이라는 서브도메인에 대한 http 요청이 방금 만든 VPS 서버로 연결되도록 설정을 추가하겠습니다. 도메인 등록 대행업체마다 설정하는 방법은 다를 수 있으니, 아래 사진을 참고하셔서 비슷한 메뉴에서 설정을 처리해주세요. 일반적으로 DNS 관리 메뉴의 하위 메뉴에서 설정하실 수 있습니다.\n\n\n\n만약 이전에 해당 도메인으로의 연결을 한 적이 있다면, 로컬 PC의 DNS캐시를 삭제해야합니다. 없다면 무시하셔도 됩니다.\n```bash\n# OSX 10.10.4 이상인 경우\n$ killall -HUP mDNSResponder\n\n# Windows 10을 사용하는 경우 - powershell 또는 cmd에서\nipconfig /flushdns\n\n# 죄송하지만 이 외에는 검색해 주세요 -_-;;\n```\n\n브라우저가 크롬이라면, 주소표시줄에 다음의 경로를 복사&붙여넣기하여 조회되는 화면에서 `Clear Host Cache` 버튼을 클릭하여 캐시를 삭제하세요. \n```url\nchrome://net-internals/#dns\n```\n\n모든 설정에 문제가 없다면, 이제 웹 브라우저를 통해 내가 가지고 있는 도메인에 대한 연결 요청이 방금 만든 VPS로 전달되게 됩니다. 단, 도메인 관리 업체마다 해당 적용값이 얼마나 빨리 반영되는지는 차이가 있을 수 있으므로, 충분한 시간을 두고 확인을 진행해 주세요. 통상 1~2분 내에는 적용되는 걸로 알고 있으나, 다른 업체는 어떤지 사용해보지 않아서 잘 모르겠네요. ^^;\n\n# Certbot 설치 및 설정\n---\n\n먼저 certbot을 설치합니다.\n```bash\n$ add-apt-repository ppa:certbot/certbot\n```\n<br>\n해당 저장소에 담긴 패키지 정보를 확인할 수 있도록 다음과 같이 업데이트를 수행합니다.\n```bash\n$ apt-get update\n```\n<br>\n`apt-get`을 이용하여 Certbot을 설치합니다.\n```bash\n$ apt-get install python-certbot-nginx\n```\n<br>\n설치된 certbot을 이용하여 ssltest.fureweb.com 도메인에 대한 SSL 인증서만 발급받도록 합니다.\n\n```bash\n$ certbot certonly --nginx -d ssltest.fureweb.com\n# 위 명령을 실행하면 해당 도메인을 관리하는 사람의 이메일 주소를 입력하라고 나옵니다. 입력해 주세요.\n# 만료일에 대한 정보를 보내줍니다.\n# 약관에는 동의(A)하셔야 하며,\n# EFF 재단과의 이메일을 공유할지 여부를 묻는 부분에 대해서는 원하시는대로 진행하시면 됩니다.\n```\n<br>\n아래와 같은 메시지들이 출력됩니다.\n\n\n위 명령을 수행하고 나면, 아래 경로에 총 5개의 파일이 생성되어 있음을 확인할 수 있습니다. (실제로는 /etc/letsencrypt/archive/도메인명 디렉토리 내 파일에 대한 심볼릭 링크 입니다.)\n```bash\n$ ls -al /etc/letsencrypt/live/ssltest.fureweb.com\ntotal 12\ndrwxr-xr-x 2 root root 4096 Aug 7 17:03 ./\ndrwx------ 4 root root 4096 Aug 7 16:56 ../\nlrwxrwxrwx 1 root root 43 Aug 7 17:03 cert.pem -> ../../archive/ssltest.fureweb.com/cert1.pem\nlrwxrwxrwx 1 root root 44 Aug 7 17:03 chain.pem -> ../../archive/ssltest.fureweb.com/chain1.pem\nlrwxrwxrwx 1 root root 48 Aug 7 17:03 fullchain.pem -> ../../archive/ssltest.fureweb.com/fullchain1.pem\nlrwxrwxrwx 1 root root 46 Aug 7 17:03 privkey.pem -> ../../archive/ssltest.fureweb.com/privkey1.pem\n-rw-r--r-- 1 root root 543 Aug 7 17:03 README\n```\n<br>\n이제 ssltest.fureweb.com 이라는 도메인에 대한 ssl 요청을 처리하기위해 필요한 인증서가 준비된 상태가 되었습니다. nginx가 이 인증서를 통해 https 요청을 처리할 수 있도록, 아까 설정했던 conf 파일을 아래와 같이 수정해 보겠습니다. \n\n```bash\n# 아래 명령어로 기존 설정파일 편집\n$ vi /etc/nginx/conf.d/ssltest.fureweb.com.conf\n\n# 다음과 같은 형태가 되어야합니다.\nserver {\n # http://ssltest.fureweb.com 요청에 대해\n # https://ssltest.fureweb.com 으로 리다이렉트 처리합니다. \n listen 80;\n server_name ssltest.fureweb.com;\n return 301 https://ssltest.fureweb.com;\n}\n\nserver {\n # https://ssltest.fureweb.com 으로의 요청을 리스닝합니다.\n listen 443;\n server_name ssltest.fureweb.com;\n\n ssl on;\n ssl_certificate /etc/letsencrypt/live/ssltest.fureweb.com/fullchain.pem;\n ssl_certificate_key /etc/letsencrypt/live/ssltest.fureweb.com/privkey.pem;\n\n ssl_protocols TLSv1 TLSv1.1 TLSv1.2;\n ssl_ciphers HIGH:!aNULL:!MD5;\n\n # 예제에서는 이 외에 별도 설정을 추가하지 않고, SSL 요청이 정상적으로 처리되는지만 확인합니다.\n # 일반적으로 아래에는 현재 도메인과 연결된 document_root 등에 대한 설정 기술하거나\n # proxy 설정을 통해 동적 처리가 가능한 다른 WAS와 연동하여 응답을 핸들링합니다.\n}\n\n```\n<br>\n위 설정을 저장한 뒤, conf 파일에 오타는 없는지 확인하고 문제가 없다면 설정 내용을 적용시킵니다.\n\n```bash\n# 설정 파일들에 오류가 없는지 확인한 뒤\n$ nginx -t\nnginx: the configuration file /etc/nginx/nginx.conf syntax is ok\nnginx: configuration file /etc/nginx/nginx.conf test is successful\n# 오류가 없다면 설정 파일 내용을 적용합니다.\n$ nginx -s reload\n```\n<br>\n\n# 최종 확인\n---\n\n브라우저의 주소창에 https://ssltest.fureweb.com를 입력하여 연결이 제대로 이뤄지는지 확인합니다. 브라우저 캐시로 인해 https로 리다이렉트 처리가 되지 않은 페이지를 보여줄 수 있으니, 크롬 기준으로 강력 새로고침을 실행시켜주세요.\n\n브라우저 주소표시줄 좌측에 자물쇠가 활성화 된 모습을 확인하실 수 있게 됩니다. \n~~주소가 ssltest2.fureweb.com인건 무시해주세요... -_-;~~\n\n\n\n\n# 마치며\n---\n\n우분투 서버를 생성하는 것 부터 Nginx 설치 및 설정, 그리고 SSL 적용하기까지 모든 과정에 대해 확인해 보았습니다. 혹시라도 본 포스트를 보고 막히는 부분이 있거나 설명이 부족한 부분이 있다면 언제든지 댓글이나 질문 부탁 드리겠습니다. \n\n읽어주셔서 감사합니다!",
"json_metadata": "{\"tags\":[\"kr\",\"kr-dev\",\"ubuntu\",\"letsencrypt\",\"ssl\"],\"image\":[\"https://steemitimages.com/DQmT5UFQLESiCLNpXWp4EAyr2sTi5dZBphFoLYBzQ8v6CUd/20170807-nginx-status.png\",\"https://fureweb-com.github.io/assets/img/posts/20170807-set-host-ip.png\",\"https://fureweb-com.github.io/assets/img/posts/20170807-certbot-process.png\",\"https://fureweb-com.github.io/assets/img/posts/20170807-ssl-connection.png\"],\"links\":[\"https://fureweb-com.github.io/blog/2017/08/07/applying-free-ssl-to-your-ubuntu-server-using-nginx-and-let'sencrypt-from-scratch.html\",\"http://www.mingw.org/\",\"https://www.chiark.greenend.org.uk/~sgtatham/putty/latest.html\",\"//iwinv.kr\",\"https://ssltest.fureweb.com\"],\"app\":\"steemit/0.1\",\"format\":\"markdown\"}",
"parent_author": "",
"parent_permlink": "ssl",
"permlink": "nginx-ssl",
"title": "우분투에서 nginx 설치부터 무료 SSL 적용까지"
}
],
"op_in_trx": 0,
"timestamp": "2018-02-22T14:19:09",
"trx_id": "1268f2778497ae0873098d49c72b8169819e5316",
"trx_in_block": 5,
"virtual_op": 0
}2018/02/22 14:16:48
2018/02/22 14:16:48
| author | fureweb |
| body | # 들어가기 전에 --- 1. 아직 아래 link들에 대해 새창 열기 기능이 steemit에서 지원되지 않는 것 같습니다. 혹시라도 아래에 등장하는 링크를 클릭하시려면 우클릭 후 새창에서 열어 확인해 주세요! 2. 또한 syntax highlighting이 제대로 지원되지 않는 것 같아서, 혹시라도 보기 불편하신 점이 있다면 아래의 링크를 통해 원본 게시글을 확인하실 수도 있습니다. [https://fureweb-com.github.io/blog/2017/08/07/applying-free-ssl-to-your-ubuntu-server-using-nginx-and-let'sencrypt-from-scratch.html](https://fureweb-com.github.io/blog/2017/08/07/applying-free-ssl-to-your-ubuntu-server-using-nginx-and-let'sencrypt-from-scratch.html) # 개요 --- 본 튜토리얼은 다음의 순서대로 진행됩니다. - 우분투 VPS 생성 - nginx 설치 및 설정 - 도메인 Host IP 설정 및 확인 - Certbot 설치 및 설정 - 최종 확인 - 마치며 windows 환경에서 아래 예제를 실행하셔야 하는 분들은 [mingw](http://www.mingw.org/), [putty](https://www.chiark.greenend.org.uk/~sgtatham/putty/latest.html), windows 10 bash 등을 통해 bash shell을 사용하실 수 있습니다. 본 포스트의 내용은 로컬머신에서 bash shell을 사용할 수 있음을 전제하여 작성했습니다. 또한 vi를 사용할 수 있음을 전제하였으나, vi 사용이 어려우신 경우 nano에 대한 사용 방법을 검색하신 뒤 예제를 따라하시는 것을 추천드립니다. 그런 경우 아래에 표시한 vi 명령을 nano 명령으로 대신하시기 바랍니다. # 우분투 VPS 생성 --- 자신이 사용할 수 있는 클라우드 서비스 내 VPS를 Ubuntu 16.04 LTS 버전으로 생성합니다. 저는 개인적으로 제가 알고있는 한 가장 간단하고 저렴하게 VPS를 생성할 수 있는 [iwinv.kr 클라우드 서비스](//iwinv.kr)를 이용하여 VPS를 생성하도록 하겠습니다. 아래 예제에서는 Ubuntu 16.04 LTS(32bit) 버전으로 VPS를 생성하여 예제를 진행하게 됩니다. 편의상 root 계정으로 아래 예제를 수행하겠습니다. 방화벽 설정과 관련된 부분은 이 포스팅의 주제를 벗어나므로, 가능하다면 VPS 생성 시 방화벽은 사용하지 않음으로 설정하셔서 예제를 실습하시기를 희망합니다. # nginx 설치 및 설정 --- ssh 클라이언트를 이용하여 방금 막 생성한 VPS로 접속합니다. 접속 후 다음의 명령을 차례대로 실행하여 nginx를 서버에 설치한 뒤, 상태를 확인합니다. ```bash $ ssh root@your-vps-ip # 로그인 완료 후 아래 명령을 실행합니다. $ apt-get update $ apt-get install nginx ``` 설치 후 nginx 실행 상태를 다음과 같이 확인할 수 있습니다. ```bash $ service nginx status ```  만약 현재 상태가 inactive라면, 다음의 명령을 통해 nginx 프로세스를 실행시킵니다. ```bash $ service nginx start ``` 설치가 완료된 후 브라우저를 통해 서버의 IP를 입력하여 페이지를 요청하면 welcome to nginx 페이지를 확인할 수 있습니다. 만약 welcome 페이지를 볼수 없다면 방화벽 설정 문제일 가능성이 있습니다. 방화벽과 관련된 부분은 클라우드 서비스 업체마다 설정하는 방법이 다를 수 있으니, 사용하시는 업체의 방화벽 설정 사용 설명을 통해 http 요청을 위한 80번 포트 및 https 요청을 위한 443 포트를 열어둘 수 있도록 합니다. 보유하고 있는 도메인을 현재 VPS로 연결시키기 전, 해당 도메인을 통해 본 서버로 http 요청을 해 오는 경우에 대해 처리할 수 있도록 다음과 같이 nginx 설정을 수행합니다. ```bash # 다음의 경로로 이동하여 ssltest.fureweb.com 도메인 요청에 대한 설정파일을 생성합니다. # 아래 경로에 등록된 conf 확장자를 가진 모든 파일이 nginx.conf파일에 의해 include 되며, # nginx가 실행될 때 본 디렉토리 내 파일들이 해석되게 됩니다. $ cd /etc/nginx/conf.d # 원하는 도메인 명으로 설정 파일을 하나 생성합니다. $ vi ssltest.fureweb.com.conf ``` 아래의 내용을 ssltest.fureweb.com.conf 파일에 입력합니다. ```bash server { listen 80; server_name ssltest.fureweb.com; } ``` 필요한 설정 파일을 생성하였다면, 다음의 명령을 통해 설정에 오타 등의 오류는 없는지 확인한 뒤 설정을 적용합니다. ```bash # 설정 파일들에 오류가 없는지 확인한 뒤 $ nginx -t nginx: the configuration file /etc/nginx/nginx.conf syntax is ok nginx: configuration file /etc/nginx/nginx.conf test is successful # 오류가 없다면 설정 파일 내용을 적용합니다. $ nginx -s reload ``` 현재 VPS는 ssltest.fureweb.com에 대한 http 요청을 처리할 수 있는 상태가 되었습니다. 이제 자신이 가지고 있는 도메인 관리업체의 웹사이트에 로그인하여 해당 도메인에 대한 http 요청이 새로 만든 VPS로 전달될 수 있도록 별도의 설정을 진행해 보겠습니다. # 도메인 Host IP 설정 및 확인 --- 본인이 보유하고있는 도메인을 관리하는 업체 사이트에 로그인하여, 자신이 보유한 도메인(또는 서브도메인)에 대한 Host IP를 설정합니다. 예시로, 제가 보유하고 있는 ssltest.fureweb.com 이라는 서브도메인에 대한 http 요청이 방금 만든 VPS 서버로 연결되도록 설정을 추가하겠습니다. 도메인 등록 대행업체마다 설정하는 방법은 다를 수 있으니, 아래 사진을 참고하셔서 비슷한 메뉴에서 설정을 처리해주세요. 일반적으로 DNS 관리 메뉴의 하위 메뉴에서 설정하실 수 있습니다.  만약 이전에 해당 도메인으로의 연결을 한 적이 있다면, 로컬 PC의 DNS캐시를 삭제해야합니다. 없다면 무시하셔도 됩니다. ```bash # OSX 10.10.4 이상인 경우 $ killall -HUP mDNSResponder # Windows 10을 사용하는 경우 - powershell 또는 cmd에서 ipconfig /flushdns # 죄송하지만 이 외에는 검색해 주세요 -_-;; ``` 브라우저가 크롬이라면, 주소표시줄에 다음의 경로를 복사&붙여넣기하여 조회되는 화면에서 `Clear Host Cache` 버튼을 클릭하여 캐시를 삭제하세요. ```url chrome://net-internals/#dns ``` 모든 설정에 문제가 없다면, 이제 웹 브라우저를 통해 내가 가지고 있는 도메인에 대한 연결 요청이 방금 만든 VPS로 전달되게 됩니다. 단, 도메인 관리 업체마다 해당 적용값이 얼마나 빨리 반영되는지는 차이가 있을 수 있으므로, 충분한 시간을 두고 확인을 진행해 주세요. 통상 1~2분 내에는 적용되는 걸로 알고 있으나, 다른 업체는 어떤지 사용해보지 않아서 잘 모르겠네요. ^^; # Certbot 설치 및 설정 --- 먼저 certbot을 설치합니다. ```bash $ add-apt-repository ppa:certbot/certbot ``` <br> 해당 저장소에 담긴 패키지 정보를 확인할 수 있도록 다음과 같이 업데이트를 수행합니다. ```bash $ apt-get update ``` <br> `apt-get`을 이용하여 Certbot을 설치합니다. ```bash $ apt-get install python-certbot-nginx ``` <br> 설치된 certbot을 이용하여 ssltest.fureweb.com 도메인에 대한 SSL 인증서만 발급받도록 합니다. ```bash $ certbot certonly --nginx -d ssltest.fureweb.com # 위 명령을 실행하면 해당 도메인을 관리하는 사람의 이메일 주소를 입력하라고 나옵니다. 입력해 주세요. # 만료일에 대한 정보를 보내줍니다. # 약관에는 동의(A)하셔야 하며, # EFF 재단과의 이메일을 공유할지 여부를 묻는 부분에 대해서는 원하시는대로 진행하시면 됩니다. ``` <br> 아래와 같은 메시지들이 출력됩니다.  위 명령을 수행하고 나면, 아래 경로에 총 5개의 파일이 생성되어 있음을 확인할 수 있습니다. (실제로는 /etc/letsencrypt/archive/도메인명 디렉토리 내 파일에 대한 심볼릭 링크 입니다.) ```bash $ ls -al /etc/letsencrypt/live/ssltest.fureweb.com total 12 drwxr-xr-x 2 root root 4096 Aug 7 17:03 ./ drwx------ 4 root root 4096 Aug 7 16:56 ../ lrwxrwxrwx 1 root root 43 Aug 7 17:03 cert.pem -> ../../archive/ssltest.fureweb.com/cert1.pem lrwxrwxrwx 1 root root 44 Aug 7 17:03 chain.pem -> ../../archive/ssltest.fureweb.com/chain1.pem lrwxrwxrwx 1 root root 48 Aug 7 17:03 fullchain.pem -> ../../archive/ssltest.fureweb.com/fullchain1.pem lrwxrwxrwx 1 root root 46 Aug 7 17:03 privkey.pem -> ../../archive/ssltest.fureweb.com/privkey1.pem -rw-r--r-- 1 root root 543 Aug 7 17:03 README ``` <br> 이제 ssltest.fureweb.com 이라는 도메인에 대한 ssl 요청을 처리하기위해 필요한 인증서가 준비된 상태가 되었습니다. nginx가 이 인증서를 통해 https 요청을 처리할 수 있도록, 아까 설정했던 conf 파일을 아래와 같이 수정해 보겠습니다. ```bash # 아래 명령어로 기존 설정파일 편집 $ vi /etc/nginx/conf.d/ssltest.fureweb.com.conf # 다음과 같은 형태가 되어야합니다. server { # http://ssltest.fureweb.com 요청에 대해 # https://ssltest.fureweb.com 으로 리다이렉트 처리합니다. listen 80; server_name ssltest.fureweb.com; return 301 https://ssltest.fureweb.com; } server { # https://ssltest.fureweb.com 으로의 요청을 리스닝합니다. listen 443; server_name ssltest.fureweb.com; ssl on; ssl_certificate /etc/letsencrypt/live/ssltest.fureweb.com/fullchain.pem; ssl_certificate_key /etc/letsencrypt/live/ssltest.fureweb.com/privkey.pem; ssl_protocols TLSv1 TLSv1.1 TLSv1.2; ssl_ciphers HIGH:!aNULL:!MD5; # 예제에서는 이 외에 별도 설정을 추가하지 않고, SSL 요청이 정상적으로 처리되는지만 확인합니다. # 일반적으로 아래에는 현재 도메인과 연결된 document_root 등에 대한 설정 기술하거나 # proxy 설정을 통해 동적 처리가 가능한 다른 WAS와 연동하여 응답을 핸들링합니다. } ``` <br> 위 설정을 저장한 뒤, conf 파일에 오타는 없는지 확인하고 문제가 없다면 설정 내용을 적용시킵니다. ```bash # 설정 파일들에 오류가 없는지 확인한 뒤 $ nginx -t nginx: the configuration file /etc/nginx/nginx.conf syntax is ok nginx: configuration file /etc/nginx/nginx.conf test is successful # 오류가 없다면 설정 파일 내용을 적용합니다. $ nginx -s reload ``` <br> # 최종 확인 --- 브라우저의 주소창에 https://ssltest.fureweb.com를 입력하여 연결이 제대로 이뤄지는지 확인합니다. 브라우저 캐시로 인해 https로 리다이렉트 처리가 되지 않은 페이지를 보여줄 수 있으니, 크롬 기준으로 강력 새로고침을 실행시켜주세요. 브라우저 주소표시줄 좌측에 자물쇠가 활성화 된 모습을 확인하실 수 있게 됩니다. ~~주소가 ssltest2.fureweb.com인건 무시해주세요... -_-;~~  # 마치며 --- 우분투 서버를 생성하는 것 부터 Nginx 설치 및 설정, 그리고 SSL 적용하기까지 모든 과정에 대해 확인해 보았습니다. 혹시라도 본 포스트를 보고 막히는 부분이 있거나 설명이 부족한 부분이 있다면 언제든지 댓글이나 질문 부탁 드리겠습니다. 읽어주셔서 감사합니다! |
| json metadata | {"tags":["kr","kr-dev","ubuntu","letsencrypt","ssl"],"image":["https://steemitimages.com/DQmT5UFQLESiCLNpXWp4EAyr2sTi5dZBphFoLYBzQ8v6CUd/20170807-nginx-status.png","https://fureweb-com.github.io/assets/img/posts/20170807-set-host-ip.png","https://fureweb-com.github.io/assets/img/posts/20170807-certbot-process.png","https://fureweb-com.github.io/assets/img/posts/20170807-ssl-connection.png"],"links":["https://fureweb-com.github.io/blog/2017/08/07/applying-free-ssl-to-your-ubuntu-server-using-nginx-and-let'sencrypt-from-scratch.html","http://www.mingw.org/","https://www.chiark.greenend.org.uk/~sgtatham/putty/latest.html","//iwinv.kr","https://ssltest.fureweb.com"],"app":"steemit/0.1","format":"markdown"} |
| parent author | |
| parent permlink | ssl |
| permlink | nginx-ssl |
| title | 우분투에서 nginx 설치부터 무료 SSL 적용까지 |
| Transaction Info | Block #20094764/Trx d65ba110ce0c808b59a2c90e055a9233c3a2c577 |
View Raw JSON Data
{
"block": 20094764,
"op": [
"comment",
{
"author": "fureweb",
"body": "# 들어가기 전에\n---\n1. 아직 아래 link들에 대해 새창 열기 기능이 steemit에서 지원되지 않는 것 같습니다. 혹시라도 아래에 등장하는 링크를 클릭하시려면 우클릭 후 새창에서 열어 확인해 주세요! \n2. 또한 syntax highlighting이 제대로 지원되지 않는 것 같아서, 혹시라도 보기 불편하신 점이 있다면 아래의 링크를 통해 원본 게시글을 확인하실 수도 있습니다.\n[https://fureweb-com.github.io/blog/2017/08/07/applying-free-ssl-to-your-ubuntu-server-using-nginx-and-let'sencrypt-from-scratch.html](https://fureweb-com.github.io/blog/2017/08/07/applying-free-ssl-to-your-ubuntu-server-using-nginx-and-let'sencrypt-from-scratch.html)\n\n# 개요\n---\n\n본 튜토리얼은 다음의 순서대로 진행됩니다.\n\n- 우분투 VPS 생성\n- nginx 설치 및 설정\n- 도메인 Host IP 설정 및 확인\n- Certbot 설치 및 설정\n- 최종 확인\n- 마치며\n\nwindows 환경에서 아래 예제를 실행하셔야 하는 분들은 [mingw](http://www.mingw.org/), [putty](https://www.chiark.greenend.org.uk/~sgtatham/putty/latest.html), windows 10 bash 등을 통해 bash shell을 사용하실 수 있습니다. 본 포스트의 내용은 로컬머신에서 bash shell을 사용할 수 있음을 전제하여 작성했습니다. \n\n또한 vi를 사용할 수 있음을 전제하였으나, vi 사용이 어려우신 경우 nano에 대한 사용 방법을 검색하신 뒤 예제를 따라하시는 것을 추천드립니다. 그런 경우 아래에 표시한 vi 명령을 nano 명령으로 대신하시기 바랍니다.\n\n# 우분투 VPS 생성\n---\n\n자신이 사용할 수 있는 클라우드 서비스 내 VPS를 Ubuntu 16.04 LTS 버전으로 생성합니다. 저는 개인적으로 제가 알고있는 한 가장 간단하고 저렴하게 VPS를 생성할 수 있는 [iwinv.kr 클라우드 서비스](//iwinv.kr)를 이용하여 VPS를 생성하도록 하겠습니다.\n\n아래 예제에서는 Ubuntu 16.04 LTS(32bit) 버전으로 VPS를 생성하여 예제를 진행하게 됩니다. 편의상 root 계정으로 아래 예제를 수행하겠습니다.\n\n방화벽 설정과 관련된 부분은 이 포스팅의 주제를 벗어나므로, 가능하다면 VPS 생성 시 방화벽은 사용하지 않음으로 설정하셔서 예제를 실습하시기를 희망합니다.\n\n# nginx 설치 및 설정\n---\n\nssh 클라이언트를 이용하여 방금 막 생성한 VPS로 접속합니다. 접속 후 다음의 명령을 차례대로 실행하여 nginx를 서버에 설치한 뒤, 상태를 확인합니다. \n\n```bash\n$ ssh root@your-vps-ip\n# 로그인 완료 후 아래 명령을 실행합니다.\n$ apt-get update\n$ apt-get install nginx\n```\n\n설치 후 nginx 실행 상태를 다음과 같이 확인할 수 있습니다.\n\n```bash\n$ service nginx status\n```\n \n\n \n만약 현재 상태가 inactive라면, 다음의 명령을 통해 nginx 프로세스를 실행시킵니다.\n```bash\n$ service nginx start\n```\n \n설치가 완료된 후 브라우저를 통해 서버의 IP를 입력하여 페이지를 요청하면 welcome to nginx 페이지를 확인할 수 있습니다. 만약 welcome 페이지를 볼수 없다면 방화벽 설정 문제일 가능성이 있습니다. 방화벽과 관련된 부분은 클라우드 서비스 업체마다 설정하는 방법이 다를 수 있으니, 사용하시는 업체의 방화벽 설정 사용 설명을 통해 http 요청을 위한 80번 포트 및 https 요청을 위한 443 포트를 열어둘 수 있도록 합니다.\n\n보유하고 있는 도메인을 현재 VPS로 연결시키기 전, 해당 도메인을 통해 본 서버로 http 요청을 해 오는 경우에 대해 처리할 수 있도록 다음과 같이 nginx 설정을 수행합니다.\n\n```bash\n# 다음의 경로로 이동하여 ssltest.fureweb.com 도메인 요청에 대한 설정파일을 생성합니다.\n# 아래 경로에 등록된 conf 확장자를 가진 모든 파일이 nginx.conf파일에 의해 include 되며, \n# nginx가 실행될 때 본 디렉토리 내 파일들이 해석되게 됩니다.\n$ cd /etc/nginx/conf.d\n\n# 원하는 도메인 명으로 설정 파일을 하나 생성합니다.\n$ vi ssltest.fureweb.com.conf\n```\n \n아래의 내용을 ssltest.fureweb.com.conf 파일에 입력합니다.\n```bash\nserver {\n listen 80;\n server_name ssltest.fureweb.com;\n}\n```\n\n필요한 설정 파일을 생성하였다면, 다음의 명령을 통해 설정에 오타 등의 오류는 없는지 확인한 뒤 설정을 적용합니다.\n```bash\n# 설정 파일들에 오류가 없는지 확인한 뒤\n$ nginx -t\nnginx: the configuration file /etc/nginx/nginx.conf syntax is ok\nnginx: configuration file /etc/nginx/nginx.conf test is successful\n# 오류가 없다면 설정 파일 내용을 적용합니다.\n$ nginx -s reload\n```\n\n현재 VPS는 ssltest.fureweb.com에 대한 http 요청을 처리할 수 있는 상태가 되었습니다. 이제 자신이 가지고 있는 도메인 관리업체의 웹사이트에 로그인하여 해당 도메인에 대한 http 요청이 새로 만든 VPS로 전달될 수 있도록 별도의 설정을 진행해 보겠습니다.\n\n\n# 도메인 Host IP 설정 및 확인\n---\n\n본인이 보유하고있는 도메인을 관리하는 업체 사이트에 로그인하여, 자신이 보유한 도메인(또는 서브도메인)에 대한 Host IP를 설정합니다. \n\n예시로, 제가 보유하고 있는 ssltest.fureweb.com 이라는 서브도메인에 대한 http 요청이 방금 만든 VPS 서버로 연결되도록 설정을 추가하겠습니다. 도메인 등록 대행업체마다 설정하는 방법은 다를 수 있으니, 아래 사진을 참고하셔서 비슷한 메뉴에서 설정을 처리해주세요. 일반적으로 DNS 관리 메뉴의 하위 메뉴에서 설정하실 수 있습니다.\n\n\n\n만약 이전에 해당 도메인으로의 연결을 한 적이 있다면, 로컬 PC의 DNS캐시를 삭제해야합니다. 없다면 무시하셔도 됩니다.\n```bash\n# OSX 10.10.4 이상인 경우\n$ killall -HUP mDNSResponder\n\n# Windows 10을 사용하는 경우 - powershell 또는 cmd에서\nipconfig /flushdns\n\n# 죄송하지만 이 외에는 검색해 주세요 -_-;;\n```\n\n브라우저가 크롬이라면, 주소표시줄에 다음의 경로를 복사&붙여넣기하여 조회되는 화면에서 `Clear Host Cache` 버튼을 클릭하여 캐시를 삭제하세요. \n```url\nchrome://net-internals/#dns\n```\n\n모든 설정에 문제가 없다면, 이제 웹 브라우저를 통해 내가 가지고 있는 도메인에 대한 연결 요청이 방금 만든 VPS로 전달되게 됩니다. 단, 도메인 관리 업체마다 해당 적용값이 얼마나 빨리 반영되는지는 차이가 있을 수 있으므로, 충분한 시간을 두고 확인을 진행해 주세요. 통상 1~2분 내에는 적용되는 걸로 알고 있으나, 다른 업체는 어떤지 사용해보지 않아서 잘 모르겠네요. ^^;\n\n# Certbot 설치 및 설정\n---\n\n먼저 certbot을 설치합니다.\n```bash\n$ add-apt-repository ppa:certbot/certbot\n```\n<br>\n해당 저장소에 담긴 패키지 정보를 확인할 수 있도록 다음과 같이 업데이트를 수행합니다.\n```bash\n$ apt-get update\n```\n<br>\n`apt-get`을 이용하여 Certbot을 설치합니다.\n```bash\n$ apt-get install python-certbot-nginx\n```\n<br>\n설치된 certbot을 이용하여 ssltest.fureweb.com 도메인에 대한 SSL 인증서만 발급받도록 합니다.\n\n```bash\n$ certbot certonly --nginx -d ssltest.fureweb.com\n# 위 명령을 실행하면 해당 도메인을 관리하는 사람의 이메일 주소를 입력하라고 나옵니다. 입력해 주세요.\n# 만료일에 대한 정보를 보내줍니다.\n# 약관에는 동의(A)하셔야 하며,\n# EFF 재단과의 이메일을 공유할지 여부를 묻는 부분에 대해서는 원하시는대로 진행하시면 됩니다.\n```\n<br>\n아래와 같은 메시지들이 출력됩니다.\n\n\n위 명령을 수행하고 나면, 아래 경로에 총 5개의 파일이 생성되어 있음을 확인할 수 있습니다. (실제로는 /etc/letsencrypt/archive/도메인명 디렉토리 내 파일에 대한 심볼릭 링크 입니다.)\n```bash\n$ ls -al /etc/letsencrypt/live/ssltest.fureweb.com\ntotal 12\ndrwxr-xr-x 2 root root 4096 Aug 7 17:03 ./\ndrwx------ 4 root root 4096 Aug 7 16:56 ../\nlrwxrwxrwx 1 root root 43 Aug 7 17:03 cert.pem -> ../../archive/ssltest.fureweb.com/cert1.pem\nlrwxrwxrwx 1 root root 44 Aug 7 17:03 chain.pem -> ../../archive/ssltest.fureweb.com/chain1.pem\nlrwxrwxrwx 1 root root 48 Aug 7 17:03 fullchain.pem -> ../../archive/ssltest.fureweb.com/fullchain1.pem\nlrwxrwxrwx 1 root root 46 Aug 7 17:03 privkey.pem -> ../../archive/ssltest.fureweb.com/privkey1.pem\n-rw-r--r-- 1 root root 543 Aug 7 17:03 README\n```\n<br>\n이제 ssltest.fureweb.com 이라는 도메인에 대한 ssl 요청을 처리하기위해 필요한 인증서가 준비된 상태가 되었습니다. nginx가 이 인증서를 통해 https 요청을 처리할 수 있도록, 아까 설정했던 conf 파일을 아래와 같이 수정해 보겠습니다. \n\n```bash\n# 아래 명령어로 기존 설정파일 편집\n$ vi /etc/nginx/conf.d/ssltest.fureweb.com.conf\n\n# 다음과 같은 형태가 되어야합니다.\nserver {\n # http://ssltest.fureweb.com 요청에 대해\n # https://ssltest.fureweb.com 으로 리다이렉트 처리합니다. \n listen 80;\n server_name ssltest.fureweb.com;\n return 301 https://ssltest.fureweb.com;\n}\n\nserver {\n # https://ssltest.fureweb.com 으로의 요청을 리스닝합니다.\n listen 443;\n server_name ssltest.fureweb.com;\n\n ssl on;\n ssl_certificate /etc/letsencrypt/live/ssltest.fureweb.com/fullchain.pem;\n ssl_certificate_key /etc/letsencrypt/live/ssltest.fureweb.com/privkey.pem;\n\n ssl_protocols TLSv1 TLSv1.1 TLSv1.2;\n ssl_ciphers HIGH:!aNULL:!MD5;\n\n # 예제에서는 이 외에 별도 설정을 추가하지 않고, SSL 요청이 정상적으로 처리되는지만 확인합니다.\n # 일반적으로 아래에는 현재 도메인과 연결된 document_root 등에 대한 설정 기술하거나\n # proxy 설정을 통해 동적 처리가 가능한 다른 WAS와 연동하여 응답을 핸들링합니다.\n}\n\n```\n<br>\n위 설정을 저장한 뒤, conf 파일에 오타는 없는지 확인하고 문제가 없다면 설정 내용을 적용시킵니다.\n\n```bash\n# 설정 파일들에 오류가 없는지 확인한 뒤\n$ nginx -t\nnginx: the configuration file /etc/nginx/nginx.conf syntax is ok\nnginx: configuration file /etc/nginx/nginx.conf test is successful\n# 오류가 없다면 설정 파일 내용을 적용합니다.\n$ nginx -s reload\n```\n<br>\n\n# 최종 확인\n---\n\n브라우저의 주소창에 https://ssltest.fureweb.com를 입력하여 연결이 제대로 이뤄지는지 확인합니다. 브라우저 캐시로 인해 https로 리다이렉트 처리가 되지 않은 페이지를 보여줄 수 있으니, 크롬 기준으로 강력 새로고침을 실행시켜주세요.\n\n브라우저 주소표시줄 좌측에 자물쇠가 활성화 된 모습을 확인하실 수 있게 됩니다. \n~~주소가 ssltest2.fureweb.com인건 무시해주세요... -_-;~~\n\n\n\n\n# 마치며\n---\n\n우분투 서버를 생성하는 것 부터 Nginx 설치 및 설정, 그리고 SSL 적용하기까지 모든 과정에 대해 확인해 보았습니다. 혹시라도 본 포스트를 보고 막히는 부분이 있거나 설명이 부족한 부분이 있다면 언제든지 댓글이나 질문 부탁 드리겠습니다. \n\n읽어주셔서 감사합니다!",
"json_metadata": "{\"tags\":[\"kr\",\"kr-dev\",\"ubuntu\",\"letsencrypt\",\"ssl\"],\"image\":[\"https://steemitimages.com/DQmT5UFQLESiCLNpXWp4EAyr2sTi5dZBphFoLYBzQ8v6CUd/20170807-nginx-status.png\",\"https://fureweb-com.github.io/assets/img/posts/20170807-set-host-ip.png\",\"https://fureweb-com.github.io/assets/img/posts/20170807-certbot-process.png\",\"https://fureweb-com.github.io/assets/img/posts/20170807-ssl-connection.png\"],\"links\":[\"https://fureweb-com.github.io/blog/2017/08/07/applying-free-ssl-to-your-ubuntu-server-using-nginx-and-let'sencrypt-from-scratch.html\",\"http://www.mingw.org/\",\"https://www.chiark.greenend.org.uk/~sgtatham/putty/latest.html\",\"//iwinv.kr\",\"https://ssltest.fureweb.com\"],\"app\":\"steemit/0.1\",\"format\":\"markdown\"}",
"parent_author": "",
"parent_permlink": "ssl",
"permlink": "nginx-ssl",
"title": "우분투에서 nginx 설치부터 무료 SSL 적용까지"
}
],
"op_in_trx": 0,
"timestamp": "2018-02-22T14:16:48",
"trx_id": "d65ba110ce0c808b59a2c90e055a9233c3a2c577",
"trx_in_block": 42,
"virtual_op": 0
}furewebupvoted (100.00%) @steemitboard / steemitboard-notify-fureweb-20180222t105341000z2018/02/22 13:19:51
furewebupvoted (100.00%) @steemitboard / steemitboard-notify-fureweb-20180222t105341000z
2018/02/22 13:19:51
| author | steemitboard |
| permlink | steemitboard-notify-fureweb-20180222t105341000z |
| voter | fureweb |
| weight | 10000 (100.00%) |
| Transaction Info | Block #20093625/Trx 2b9124d5bace679dccc32ea1571d29ec1908a6a1 |
View Raw JSON Data
{
  "block": 20093625,
  "op": [
    "vote",
    {
      "author": "steemitboard",
      "permlink": "steemitboard-notify-fureweb-20180222t105341000z",
      "voter": "fureweb",
      "weight": 10000
    }
  ],
  "op_in_trx": 0,
  "timestamp": "2018-02-22T13:19:51",
  "trx_id": "2b9124d5bace679dccc32ea1571d29ec1908a6a1",
  "trx_in_block": 28,
  "virtual_op": 0
}steemitboardupvoted (1.00%) @fureweb / nginx-ssl2018/02/22 10:53:42
steemitboardupvoted (1.00%) @fureweb / nginx-ssl
2018/02/22 10:53:42
| author | fureweb |
| permlink | nginx-ssl |
| voter | steemitboard |
| weight | 100 (1.00%) |
| Transaction Info | Block #20090702/Trx 97a0e9490f9c1de3c5e78b3fcfc6e153769029e0 |
View Raw JSON Data
{
  "block": 20090702,
  "op": [
    "vote",
    {
      "author": "fureweb",
      "permlink": "nginx-ssl",
      "voter": "steemitboard",
      "weight": 100
    }
  ],
  "op_in_trx": 0,
  "timestamp": "2018-02-22T10:53:42",
  "trx_id": "97a0e9490f9c1de3c5e78b3fcfc6e153769029e0",
  "trx_in_block": 10,
  "virtual_op": 0
}2018/02/22 10:53:39
2018/02/22 10:53:39
| author | steemitboard |
| body | Congratulations @fureweb! You have completed some achievement on Steemit and have been rewarded with new badge(s) : [](http://steemitboard.com/@fureweb) Award for the number of comments Click on any badge to view your own Board of Honor on SteemitBoard. To support your work, I also upvoted your post! For more information about SteemitBoard, click [here](https://steemit.com/@steemitboard) If you no longer want to receive notifications, reply to this comment with the word `STOP` > Upvote this notification to help all Steemit users. Learn why [here](https://steemit.com/steemitboard/@steemitboard/http-i-cubeupload-com-7ciqeo-png)! |
| json metadata | {"image":["https://steemitboard.com/img/notifications.png"]} |
| parent author | fureweb |
| parent permlink | nginx-ssl |
| permlink | steemitboard-notify-fureweb-20180222t105341000z |
| title | |
| Transaction Info | Block #20090701/Trx a829495d8b3cf464cce847f0113b52a7cea7156b |
View Raw JSON Data
{
"block": 20090701,
"op": [
"comment",
{
"author": "steemitboard",
"body": "Congratulations @fureweb! You have completed some achievement on Steemit and have been rewarded with new badge(s) :\n\n[](http://steemitboard.com/@fureweb) Award for the number of comments\n\nClick on any badge to view your own Board of Honor on SteemitBoard.\n\nTo support your work, I also upvoted your post!\nFor more information about SteemitBoard, click [here](https://steemit.com/@steemitboard)\n\nIf you no longer want to receive notifications, reply to this comment with the word `STOP`\n\n> Upvote this notification to help all Steemit users. Learn why [here](https://steemit.com/steemitboard/@steemitboard/http-i-cubeupload-com-7ciqeo-png)!",
"json_metadata": "{\"image\":[\"https://steemitboard.com/img/notifications.png\"]}",
"parent_author": "fureweb",
"parent_permlink": "nginx-ssl",
"permlink": "steemitboard-notify-fureweb-20180222t105341000z",
"title": ""
}
],
"op_in_trx": 0,
"timestamp": "2018-02-22T10:53:39",
"trx_id": "a829495d8b3cf464cce847f0113b52a7cea7156b",
"trx_in_block": 35,
"virtual_op": 0
}2018/02/22 07:44:48
2018/02/22 07:44:48
| author | fureweb |
| permlink | nginx-ssl |
| voter | kdj |
| weight | 5000 (50.00%) |
| Transaction Info | Block #20086925/Trx 85bac26d4aa761e95482613e7e606faa9b9b284c |
View Raw JSON Data
{
  "block": 20086925,
  "op": [
    "vote",
    {
      "author": "fureweb",
      "permlink": "nginx-ssl",
      "voter": "kdj",
      "weight": 5000
    }
  ],
  "op_in_trx": 0,
  "timestamp": "2018-02-22T07:44:48",
  "trx_id": "85bac26d4aa761e95482613e7e606faa9b9b284c",
  "trx_in_block": 21,
  "virtual_op": 0
}2018/02/22 06:17:24
2018/02/22 06:17:24
| author | fureweb |
| body | # 들어가기 전에 --- 1. 아직 아래 link들에 대해 새창 열기 기능이 steemit에서 지원되지 않는 것 같습니다. 혹시라도 아래에 등장하는 링크를 클릭하시려면 우클릭 후 새창에서 열어 확인해 주세요! 2. 또한 syntax highlighting이 제대로 지원되지 않는 것 같아서, 혹시라도 보기 불편하신 점이 있다면 아래의 링크를 통해 원본 게시글을 확인하실 수도 있습니다. [https://fureweb-com.github.io/blog/2017/08/07/applying-free-ssl-to-your-ubuntu-server-using-nginx-and-let'sencrypt-from-scratch.html](https://fureweb-com.github.io/blog/2017/08/07/applying-free-ssl-to-your-ubuntu-server-using-nginx-and-let'sencrypt-from-scratch.html) # 개요 --- 본 튜토리얼은 다음의 순서대로 진행됩니다. - 우분투 VPS 생성 - nginx 설치 및 설정 - 도메인 Host IP 설정 및 확인 - Certbot 설치 및 설정 - 최종 확인 - 마치며 windows 환경에서 아래 예제를 실행하셔야 하는 분들은 [mingw](http://www.mingw.org/), [putty](https://www.chiark.greenend.org.uk/~sgtatham/putty/latest.html), windows 10 bash 등을 통해 bash shell을 사용하실 수 있습니다. 본 포스트의 내용은 로컬머신에서 bash shell을 사용할 수 있음을 전제하여 작성했습니다. 또한 vi를 사용할 수 있음을 전제하였으나, vi 사용이 어려우신 경우 nano에 대한 사용 방법을 검색하신 뒤 예제를 따라하시는 것을 추천드립니다. 그런 경우 아래에 표시한 vi 명령을 nano 명령으로 대신하시기 바랍니다. # 우분투 VPS 생성 --- 자신이 사용할 수 있는 클라우드 서비스 내 VPS를 Ubuntu 16.04 LTS 버전으로 생성합니다. 저는 개인적으로 제가 알고있는 한 가장 간단하고 저렴하게 VPS를 생성할 수 있는 [iwinv.kr 클라우드 서비스](//iwinv.kr)를 이용하여 VPS를 생성하도록 하겠습니다. 아래 예제에서는 Ubuntu 16.04 LTS(32bit) 버전으로 VPS를 생성하여 예제를 진행하게 됩니다. 편의상 root 계정으로 아래 예제를 수행하겠습니다. 방화벽 설정과 관련된 부분은 이 포스팅의 주제를 벗어나므로, 가능하다면 VPS 생성 시 방화벽은 사용하지 않음으로 설정하셔서 예제를 실습하시기를 희망합니다. # nginx 설치 및 설정 --- ssh 클라이언트를 이용하여 방금 막 생성한 VPS로 접속합니다. 접속 후 다음의 명령을 차례대로 실행하여 nginx를 서버에 설치한 뒤, 상태를 확인합니다. ```bash $ ssh root@your-vps-ip # 로그인 완료 후 아래 명령을 실행합니다. $ apt-get update $ apt-get install nginx ``` 설치 후 nginx 실행 상태를 다음과 같이 확인할 수 있습니다. ```bash $ service nginx status ```  만약 현재 상태가 inactive라면, 다음의 명령을 통해 nginx 프로세스를 실행시킵니다. ```bash $ service nginx start ``` 설치가 완료된 후 브라우저를 통해 서버의 IP를 입력하여 페이지를 요청하면 welcome to nginx 페이지를 확인할 수 있습니다. 만약 welcome 페이지를 볼수 없다면 방화벽 설정 문제일 가능성이 있습니다. 방화벽과 관련된 부분은 클라우드 서비스 업체마다 설정하는 방법이 다를 수 있으니, 사용하시는 업체의 방화벽 설정 사용 설명을 통해 http 요청을 위한 80번 포트 및 https 요청을 위한 443 포트를 열어둘 수 있도록 합니다. 보유하고 있는 도메인을 현재 VPS로 연결시키기 전, 해당 도메인을 통해 본 서버로 http 요청을 해 오는 경우에 대해 처리할 수 있도록 다음과 같이 nginx 설정을 수행합니다. ```bash # 다음의 경로로 이동하여 ssltest.fureweb.com 도메인 요청에 대한 설정파일을 생성합니다. # 아래 경로에 등록된 conf 확장자를 가진 모든 파일이 nginx.conf파일에 의해 include 되며, # nginx가 실행될 때 본 디렉토리 내 파일들이 해석되게 됩니다. $ cd /etc/nginx/conf.d # 원하는 도메인 명으로 설정 파일을 하나 생성합니다. $ vi ssltest.fureweb.com.conf ``` 아래의 내용을 ssltest.fureweb.com.conf 파일에 입력합니다. ```bash server { listen 80; server_name ssltest.fureweb.com; } ``` 필요한 설정 파일을 생성하였다면, 다음의 명령을 통해 설정에 오타 등의 오류는 없는지 확인한 뒤 설정을 적용합니다. ```bash # 설정 파일들에 오류가 없는지 확인한 뒤 $ nginx -t nginx: the configuration file /etc/nginx/nginx.conf syntax is ok nginx: configuration file /etc/nginx/nginx.conf test is successful # 오류가 없다면 설정 파일 내용을 적용합니다. $ nginx -s reload ``` 현재 VPS는 ssltest.fureweb.com에 대한 http 요청을 처리할 수 있는 상태가 되었습니다. 이제 자신이 가지고 있는 도메인 관리업체의 웹사이트에 로그인하여 해당 도메인에 대한 http 요청이 새로 만든 VPS로 전달될 수 있도록 별도의 설정을 진행해 보겠습니다. # 도메인 Host IP 설정 및 확인 --- 본인이 보유하고있는 도메인을 관리하는 업체 사이트에 로그인하여, 자신이 보유한 도메인(또는 서브도메인)에 대한 Host IP를 설정합니다. 예시로, 제가 보유하고 있는 ssltest.fureweb.com 이라는 서브도메인에 대한 http 요청이 방금 만든 VPS 서버로 연결되도록 설정을 추가하겠습니다. 도메인 등록 대행업체마다 설정하는 방법은 다를 수 있으니, 아래 사진을 참고하셔서 비슷한 메뉴에서 설정을 처리해주세요. 일반적으로 DNS 관리 메뉴의 하위 메뉴에서 설정하실 수 있습니다.  만약 이전에 해당 도메인으로의 연결을 한 적이 있다면, 로컬 PC의 DNS캐시를 삭제해야합니다. 없다면 무시하셔도 됩니다. ```bash # OSX 10.10.4 이상인 경우 $ killall -HUP mDNSResponder # Windows 10을 사용하는 경우 - powershell 또는 cmd에서 ipconfig /flushdns # 죄송하지만 이 외에는 검색해 주세요 -_-;; ``` 브라우저가 크롬이라면, 주소표시줄에 다음의 경로를 복사&붙여넣기하여 조회되는 화면에서 `Clear Host Cache` 버튼을 클릭하여 캐시를 삭제하세요. ```url chrome://net-internals/#dns ``` 모든 설정에 문제가 없다면, 이제 웹 브라우저를 통해 내가 가지고 있는 도메인에 대한 연결 요청이 방금 만든 VPS로 전달되게 됩니다. 단, 도메인 관리 업체마다 해당 적용값이 얼마나 빨리 반영되는지는 차이가 있을 수 있으므로, 충분한 시간을 두고 확인을 진행해 주세요. 통상 1~2분 내에는 적용되는 걸로 알고 있으나, 다른 업체는 어떤지 사용해보지 않아서 잘 모르겠네요. ^^; # Certbot 설치 및 설정 --- 먼저 certbot을 설치합니다. ```bash $ add-apt-repository ppa:certbot/certbot ``` <br> 해당 저장소에 담긴 패키지 정보를 확인할 수 있도록 다음과 같이 업데이트를 수행합니다. ```bash $ apt-get update ``` <br> `apt-get`을 이용하여 Certbot을 설치합니다. ```bash $ apt-get install python-certbot-nginx ``` <br> 설치된 certbot을 이용하여 ssltest.fureweb.com 도메인에 대한 SSL 인증서만 발급받도록 합니다. ```bash $ certbot certonly --nginx -d ssltest.fureweb.com # 위 명령을 실행하면 해당 도메인을 관리하는 사람의 이메일 주소를 입력하라고 나옵니다. 입력해 주세요. # 만료일에 대한 정보를 보내줍니다. # 약관에는 동의(A)하셔야 하며, # EFF 재단과의 이메일을 공유할지 여부를 묻는 부분에 대해서는 원하시는대로 진행하시면 됩니다. ``` <br> 아래와 같은 메시지들이 출력됩니다.  위 명령을 수행하고 나면, 아래 경로에 총 5개의 파일이 생성되어 있음을 확인할 수 있습니다. (실제로는 /etc/letsencrypt/archive/도메인명 디렉토리 내 파일에 대한 심볼릭 링크 입니다.) ```bash $ ls -al /etc/letsencrypt/live/ssltest.fureweb.com total 12 drwxr-xr-x 2 root root 4096 Aug 7 17:03 ./ drwx------ 4 root root 4096 Aug 7 16:56 ../ lrwxrwxrwx 1 root root 43 Aug 7 17:03 cert.pem -> ../../archive/ssltest.fureweb.com/cert1.pem lrwxrwxrwx 1 root root 44 Aug 7 17:03 chain.pem -> ../../archive/ssltest.fureweb.com/chain1.pem lrwxrwxrwx 1 root root 48 Aug 7 17:03 fullchain.pem -> ../../archive/ssltest.fureweb.com/fullchain1.pem lrwxrwxrwx 1 root root 46 Aug 7 17:03 privkey.pem -> ../../archive/ssltest.fureweb.com/privkey1.pem -rw-r--r-- 1 root root 543 Aug 7 17:03 README ``` <br> 이제 ssltest.fureweb.com 이라는 도메인에 대한 ssl 요청을 처리하기위해 필요한 인증서가 준비된 상태가 되었습니다. nginx가 이 인증서를 통해 https 요청을 처리할 수 있도록, 아까 설정했던 conf 파일을 아래와 같이 수정해 보겠습니다. ```bash # 아래 명령어로 기존 설정파일 편집 $ vi /etc/nginx/conf.d/ssltest.fureweb.com.conf # 다음과 같은 형태가 되어야합니다. server { # http://ssltest.fureweb.com 요청에 대해 # https://ssltest.fureweb.com 으로 리다이렉트 처리합니다. listen 80; server_name ssltest.fureweb.com; return 301 https://ssltest.fureweb.com; } server { # https://ssltest.fureweb.com 으로의 요청을 리스닝합니다. listen 443; server_name ssltest.fureweb.com; ssl on; ssl_certificate /etc/letsencrypt/live/ssltest.fureweb.com/fullchain.pem; ssl_certificate_key /etc/letsencrypt/live/ssltest.fureweb.com/privkey.pem; ssl_protocols TLSv1 TLSv1.1 TLSv1.2; ssl_ciphers HIGH:!aNULL:!MD5; # 예제에서는 이 외에 별도 설정을 추가하지 않고, SSL 요청이 정상적으로 처리되는지만 확인합니다. # 일반적으로 아래에는 현재 도메인과 연결된 document_root 등에 대한 설정 기술하거나 # proxy 설정을 통해 동적 처리가 가능한 다른 WAS와 연동하여 응답을 핸들링합니다. } ``` <br> 위 설정을 저장한 뒤, conf 파일에 오타는 없는지 확인하고 문제가 없다면 설정 내용을 적용시킵니다. ```bash # 설정 파일들에 오류가 없는지 확인한 뒤 $ nginx -t nginx: the configuration file /etc/nginx/nginx.conf syntax is ok nginx: configuration file /etc/nginx/nginx.conf test is successful # 오류가 없다면 설정 파일 내용을 적용합니다. $ nginx -s reload ``` <br> # 최종 확인 --- 브라우저의 주소창에 https://ssltest.fureweb.com를 입력하여 연결이 제대로 이뤄지는지 확인합니다. 브라우저 캐시로 인해 https로 리다이렉트 처리가 되지 않은 페이지를 보여줄 수 있으니, 크롬 기준으로 강력 새로고침을 실행시켜주세요. 브라우저 주소표시줄 좌측에 자물쇠가 활성화 된 모습을 확인하실 수 있게 됩니다. ~~주소가 ssltest2.fureweb.com인건 무시해주세요... -_-;~~  # 마치며 --- 우분투 서버를 생성하는 것 부터 Nginx 설치 및 설정, 그리고 SSL 적용하기까지 모든 과정에 대해 확인해 보았습니다. 혹시라도 본 포스트를 보고 막히는 부분이 있거나 설명이 부족한 부분이 있다면 언제든지 댓글이나 질문 부탁 드리겠습니다. 읽어주셔서 감사합니다! |
| json metadata | {"tags":["kr","kr-dev","ubuntu","letsencrypt","ssl"],"image":["https://steemitimages.com/DQmT5UFQLESiCLNpXWp4EAyr2sTi5dZBphFoLYBzQ8v6CUd/20170807-nginx-status.png","https://fureweb-com.github.io/assets/img/posts/20170807-set-host-ip.png","https://fureweb-com.github.io/assets/img/posts/20170807-certbot-process.png","https://fureweb-com.github.io/assets/img/posts/20170807-ssl-connection.png"],"links":["https://fureweb-com.github.io/blog/2017/08/07/applying-free-ssl-to-your-ubuntu-server-using-nginx-and-let'sencrypt-from-scratch.html","http://www.mingw.org/","https://www.chiark.greenend.org.uk/~sgtatham/putty/latest.html","//iwinv.kr","https://ssltest.fureweb.com"],"app":"steemit/0.1","format":"markdown"} |
| parent author | |
| parent permlink | ssl |
| permlink | nginx-ssl |
| title | 우분투에서 nginx 설치부터 무료 SSL 적용까지 |
| Transaction Info | Block #20085177/Trx 2e533af4747e63b69fc69f2cbb1fdf689d7d75fe |
View Raw JSON Data
{
"block": 20085177,
"op": [
"comment",
{
"author": "fureweb",
"body": "# 들어가기 전에\n---\n1. 아직 아래 link들에 대해 새창 열기 기능이 steemit에서 지원되지 않는 것 같습니다. 혹시라도 아래에 등장하는 링크를 클릭하시려면 우클릭 후 새창에서 열어 확인해 주세요! \n2. 또한 syntax highlighting이 제대로 지원되지 않는 것 같아서, 혹시라도 보기 불편하신 점이 있다면 아래의 링크를 통해 원본 게시글을 확인하실 수도 있습니다.\n[https://fureweb-com.github.io/blog/2017/08/07/applying-free-ssl-to-your-ubuntu-server-using-nginx-and-let'sencrypt-from-scratch.html](https://fureweb-com.github.io/blog/2017/08/07/applying-free-ssl-to-your-ubuntu-server-using-nginx-and-let'sencrypt-from-scratch.html)\n\n# 개요\n---\n\n본 튜토리얼은 다음의 순서대로 진행됩니다.\n\n- 우분투 VPS 생성\n- nginx 설치 및 설정\n- 도메인 Host IP 설정 및 확인\n- Certbot 설치 및 설정\n- 최종 확인\n- 마치며\n\nwindows 환경에서 아래 예제를 실행하셔야 하는 분들은 [mingw](http://www.mingw.org/), [putty](https://www.chiark.greenend.org.uk/~sgtatham/putty/latest.html), windows 10 bash 등을 통해 bash shell을 사용하실 수 있습니다. 본 포스트의 내용은 로컬머신에서 bash shell을 사용할 수 있음을 전제하여 작성했습니다. \n\n또한 vi를 사용할 수 있음을 전제하였으나, vi 사용이 어려우신 경우 nano에 대한 사용 방법을 검색하신 뒤 예제를 따라하시는 것을 추천드립니다. 그런 경우 아래에 표시한 vi 명령을 nano 명령으로 대신하시기 바랍니다.\n\n# 우분투 VPS 생성\n---\n\n자신이 사용할 수 있는 클라우드 서비스 내 VPS를 Ubuntu 16.04 LTS 버전으로 생성합니다. 저는 개인적으로 제가 알고있는 한 가장 간단하고 저렴하게 VPS를 생성할 수 있는 [iwinv.kr 클라우드 서비스](//iwinv.kr)를 이용하여 VPS를 생성하도록 하겠습니다.\n\n아래 예제에서는 Ubuntu 16.04 LTS(32bit) 버전으로 VPS를 생성하여 예제를 진행하게 됩니다. 편의상 root 계정으로 아래 예제를 수행하겠습니다.\n\n방화벽 설정과 관련된 부분은 이 포스팅의 주제를 벗어나므로, 가능하다면 VPS 생성 시 방화벽은 사용하지 않음으로 설정하셔서 예제를 실습하시기를 희망합니다.\n\n# nginx 설치 및 설정\n---\n\nssh 클라이언트를 이용하여 방금 막 생성한 VPS로 접속합니다. 접속 후 다음의 명령을 차례대로 실행하여 nginx를 서버에 설치한 뒤, 상태를 확인합니다. \n\n```bash\n$ ssh root@your-vps-ip\n# 로그인 완료 후 아래 명령을 실행합니다.\n$ apt-get update\n$ apt-get install nginx\n```\n\n설치 후 nginx 실행 상태를 다음과 같이 확인할 수 있습니다.\n\n```bash\n$ service nginx status\n```\n \n\n \n만약 현재 상태가 inactive라면, 다음의 명령을 통해 nginx 프로세스를 실행시킵니다.\n```bash\n$ service nginx start\n```\n \n설치가 완료된 후 브라우저를 통해 서버의 IP를 입력하여 페이지를 요청하면 welcome to nginx 페이지를 확인할 수 있습니다. 만약 welcome 페이지를 볼수 없다면 방화벽 설정 문제일 가능성이 있습니다. 방화벽과 관련된 부분은 클라우드 서비스 업체마다 설정하는 방법이 다를 수 있으니, 사용하시는 업체의 방화벽 설정 사용 설명을 통해 http 요청을 위한 80번 포트 및 https 요청을 위한 443 포트를 열어둘 수 있도록 합니다.\n\n보유하고 있는 도메인을 현재 VPS로 연결시키기 전, 해당 도메인을 통해 본 서버로 http 요청을 해 오는 경우에 대해 처리할 수 있도록 다음과 같이 nginx 설정을 수행합니다.\n\n```bash\n# 다음의 경로로 이동하여 ssltest.fureweb.com 도메인 요청에 대한 설정파일을 생성합니다.\n# 아래 경로에 등록된 conf 확장자를 가진 모든 파일이 nginx.conf파일에 의해 include 되며, \n# nginx가 실행될 때 본 디렉토리 내 파일들이 해석되게 됩니다.\n$ cd /etc/nginx/conf.d\n\n# 원하는 도메인 명으로 설정 파일을 하나 생성합니다.\n$ vi ssltest.fureweb.com.conf\n```\n \n아래의 내용을 ssltest.fureweb.com.conf 파일에 입력합니다.\n```bash\nserver {\n listen 80;\n server_name ssltest.fureweb.com;\n}\n```\n\n필요한 설정 파일을 생성하였다면, 다음의 명령을 통해 설정에 오타 등의 오류는 없는지 확인한 뒤 설정을 적용합니다.\n```bash\n# 설정 파일들에 오류가 없는지 확인한 뒤\n$ nginx -t\nnginx: the configuration file /etc/nginx/nginx.conf syntax is ok\nnginx: configuration file /etc/nginx/nginx.conf test is successful\n# 오류가 없다면 설정 파일 내용을 적용합니다.\n$ nginx -s reload\n```\n\n현재 VPS는 ssltest.fureweb.com에 대한 http 요청을 처리할 수 있는 상태가 되었습니다. 이제 자신이 가지고 있는 도메인 관리업체의 웹사이트에 로그인하여 해당 도메인에 대한 http 요청이 새로 만든 VPS로 전달될 수 있도록 별도의 설정을 진행해 보겠습니다.\n\n\n# 도메인 Host IP 설정 및 확인\n---\n\n본인이 보유하고있는 도메인을 관리하는 업체 사이트에 로그인하여, 자신이 보유한 도메인(또는 서브도메인)에 대한 Host IP를 설정합니다. \n\n예시로, 제가 보유하고 있는 ssltest.fureweb.com 이라는 서브도메인에 대한 http 요청이 방금 만든 VPS 서버로 연결되도록 설정을 추가하겠습니다. 도메인 등록 대행업체마다 설정하는 방법은 다를 수 있으니, 아래 사진을 참고하셔서 비슷한 메뉴에서 설정을 처리해주세요. 일반적으로 DNS 관리 메뉴의 하위 메뉴에서 설정하실 수 있습니다.\n\n\n\n만약 이전에 해당 도메인으로의 연결을 한 적이 있다면, 로컬 PC의 DNS캐시를 삭제해야합니다. 없다면 무시하셔도 됩니다.\n```bash\n# OSX 10.10.4 이상인 경우\n$ killall -HUP mDNSResponder\n\n# Windows 10을 사용하는 경우 - powershell 또는 cmd에서\nipconfig /flushdns\n\n# 죄송하지만 이 외에는 검색해 주세요 -_-;;\n```\n\n브라우저가 크롬이라면, 주소표시줄에 다음의 경로를 복사&붙여넣기하여 조회되는 화면에서 `Clear Host Cache` 버튼을 클릭하여 캐시를 삭제하세요. \n```url\nchrome://net-internals/#dns\n```\n\n모든 설정에 문제가 없다면, 이제 웹 브라우저를 통해 내가 가지고 있는 도메인에 대한 연결 요청이 방금 만든 VPS로 전달되게 됩니다. 단, 도메인 관리 업체마다 해당 적용값이 얼마나 빨리 반영되는지는 차이가 있을 수 있으므로, 충분한 시간을 두고 확인을 진행해 주세요. 통상 1~2분 내에는 적용되는 걸로 알고 있으나, 다른 업체는 어떤지 사용해보지 않아서 잘 모르겠네요. ^^;\n\n# Certbot 설치 및 설정\n---\n\n먼저 certbot을 설치합니다.\n```bash\n$ add-apt-repository ppa:certbot/certbot\n```\n<br>\n해당 저장소에 담긴 패키지 정보를 확인할 수 있도록 다음과 같이 업데이트를 수행합니다.\n```bash\n$ apt-get update\n```\n<br>\n`apt-get`을 이용하여 Certbot을 설치합니다.\n```bash\n$ apt-get install python-certbot-nginx\n```\n<br>\n설치된 certbot을 이용하여 ssltest.fureweb.com 도메인에 대한 SSL 인증서만 발급받도록 합니다.\n\n```bash\n$ certbot certonly --nginx -d ssltest.fureweb.com\n# 위 명령을 실행하면 해당 도메인을 관리하는 사람의 이메일 주소를 입력하라고 나옵니다. 입력해 주세요.\n# 만료일에 대한 정보를 보내줍니다.\n# 약관에는 동의(A)하셔야 하며,\n# EFF 재단과의 이메일을 공유할지 여부를 묻는 부분에 대해서는 원하시는대로 진행하시면 됩니다.\n```\n<br>\n아래와 같은 메시지들이 출력됩니다.\n\n\n위 명령을 수행하고 나면, 아래 경로에 총 5개의 파일이 생성되어 있음을 확인할 수 있습니다. (실제로는 /etc/letsencrypt/archive/도메인명 디렉토리 내 파일에 대한 심볼릭 링크 입니다.)\n```bash\n$ ls -al /etc/letsencrypt/live/ssltest.fureweb.com\ntotal 12\ndrwxr-xr-x 2 root root 4096 Aug 7 17:03 ./\ndrwx------ 4 root root 4096 Aug 7 16:56 ../\nlrwxrwxrwx 1 root root 43 Aug 7 17:03 cert.pem -> ../../archive/ssltest.fureweb.com/cert1.pem\nlrwxrwxrwx 1 root root 44 Aug 7 17:03 chain.pem -> ../../archive/ssltest.fureweb.com/chain1.pem\nlrwxrwxrwx 1 root root 48 Aug 7 17:03 fullchain.pem -> ../../archive/ssltest.fureweb.com/fullchain1.pem\nlrwxrwxrwx 1 root root 46 Aug 7 17:03 privkey.pem -> ../../archive/ssltest.fureweb.com/privkey1.pem\n-rw-r--r-- 1 root root 543 Aug 7 17:03 README\n```\n<br>\n이제 ssltest.fureweb.com 이라는 도메인에 대한 ssl 요청을 처리하기위해 필요한 인증서가 준비된 상태가 되었습니다. nginx가 이 인증서를 통해 https 요청을 처리할 수 있도록, 아까 설정했던 conf 파일을 아래와 같이 수정해 보겠습니다. \n\n```bash\n# 아래 명령어로 기존 설정파일 편집\n$ vi /etc/nginx/conf.d/ssltest.fureweb.com.conf\n\n# 다음과 같은 형태가 되어야합니다.\nserver {\n # http://ssltest.fureweb.com 요청에 대해\n # https://ssltest.fureweb.com 으로 리다이렉트 처리합니다. \n listen 80;\n server_name ssltest.fureweb.com;\n return 301 https://ssltest.fureweb.com;\n}\n\nserver {\n # https://ssltest.fureweb.com 으로의 요청을 리스닝합니다.\n listen 443;\n server_name ssltest.fureweb.com;\n\n ssl on;\n ssl_certificate /etc/letsencrypt/live/ssltest.fureweb.com/fullchain.pem;\n ssl_certificate_key /etc/letsencrypt/live/ssltest.fureweb.com/privkey.pem;\n\n ssl_protocols TLSv1 TLSv1.1 TLSv1.2;\n ssl_ciphers HIGH:!aNULL:!MD5;\n\n # 예제에서는 이 외에 별도 설정을 추가하지 않고, SSL 요청이 정상적으로 처리되는지만 확인합니다.\n # 일반적으로 아래에는 현재 도메인과 연결된 document_root 등에 대한 설정 기술하거나\n # proxy 설정을 통해 동적 처리가 가능한 다른 WAS와 연동하여 응답을 핸들링합니다.\n}\n\n```\n<br>\n위 설정을 저장한 뒤, conf 파일에 오타는 없는지 확인하고 문제가 없다면 설정 내용을 적용시킵니다.\n\n```bash\n# 설정 파일들에 오류가 없는지 확인한 뒤\n$ nginx -t\nnginx: the configuration file /etc/nginx/nginx.conf syntax is ok\nnginx: configuration file /etc/nginx/nginx.conf test is successful\n# 오류가 없다면 설정 파일 내용을 적용합니다.\n$ nginx -s reload\n```\n<br>\n\n# 최종 확인\n---\n\n브라우저의 주소창에 https://ssltest.fureweb.com를 입력하여 연결이 제대로 이뤄지는지 확인합니다. 브라우저 캐시로 인해 https로 리다이렉트 처리가 되지 않은 페이지를 보여줄 수 있으니, 크롬 기준으로 강력 새로고침을 실행시켜주세요.\n\n브라우저 주소표시줄 좌측에 자물쇠가 활성화 된 모습을 확인하실 수 있게 됩니다. \n~~주소가 ssltest2.fureweb.com인건 무시해주세요... -_-;~~\n\n\n\n\n# 마치며\n---\n\n우분투 서버를 생성하는 것 부터 Nginx 설치 및 설정, 그리고 SSL 적용하기까지 모든 과정에 대해 확인해 보았습니다. 혹시라도 본 포스트를 보고 막히는 부분이 있거나 설명이 부족한 부분이 있다면 언제든지 댓글이나 질문 부탁 드리겠습니다. \n\n읽어주셔서 감사합니다!",
"json_metadata": "{\"tags\":[\"kr\",\"kr-dev\",\"ubuntu\",\"letsencrypt\",\"ssl\"],\"image\":[\"https://steemitimages.com/DQmT5UFQLESiCLNpXWp4EAyr2sTi5dZBphFoLYBzQ8v6CUd/20170807-nginx-status.png\",\"https://fureweb-com.github.io/assets/img/posts/20170807-set-host-ip.png\",\"https://fureweb-com.github.io/assets/img/posts/20170807-certbot-process.png\",\"https://fureweb-com.github.io/assets/img/posts/20170807-ssl-connection.png\"],\"links\":[\"https://fureweb-com.github.io/blog/2017/08/07/applying-free-ssl-to-your-ubuntu-server-using-nginx-and-let'sencrypt-from-scratch.html\",\"http://www.mingw.org/\",\"https://www.chiark.greenend.org.uk/~sgtatham/putty/latest.html\",\"//iwinv.kr\",\"https://ssltest.fureweb.com\"],\"app\":\"steemit/0.1\",\"format\":\"markdown\"}",
"parent_author": "",
"parent_permlink": "ssl",
"permlink": "nginx-ssl",
"title": "우분투에서 nginx 설치부터 무료 SSL 적용까지"
}
],
"op_in_trx": 0,
"timestamp": "2018-02-22T06:17:24",
"trx_id": "2e533af4747e63b69fc69f2cbb1fdf689d7d75fe",
"trx_in_block": 41,
"virtual_op": 0
}furewebupvoted (100.00%) @nhj12311 / re-fureweb-nginx-ssl-20180222t055917201z2018/02/22 06:12:21
furewebupvoted (100.00%) @nhj12311 / re-fureweb-nginx-ssl-20180222t055917201z
2018/02/22 06:12:21
| author | nhj12311 |
| permlink | re-fureweb-nginx-ssl-20180222t055917201z |
| voter | fureweb |
| weight | 10000 (100.00%) |
| Transaction Info | Block #20085076/Trx ebabfa9b1f2c8eb51dfa71183f1e9f1d3590a32c |
View Raw JSON Data
{
  "block": 20085076,
  "op": [
    "vote",
    {
      "author": "nhj12311",
      "permlink": "re-fureweb-nginx-ssl-20180222t055917201z",
      "voter": "fureweb",
      "weight": 10000
    }
  ],
  "op_in_trx": 0,
  "timestamp": "2018-02-22T06:12:21",
  "trx_id": "ebabfa9b1f2c8eb51dfa71183f1e9f1d3590a32c",
  "trx_in_block": 61,
  "virtual_op": 0
}2018/02/22 06:11:27
2018/02/22 06:11:27
| author | fureweb |
| body | # 들어가기 전에 --- 1. 아직 아래 link들에 대해 새창 열기 기능이 steemit에서 지원되지 않는 것 같습니다. 혹시라도 아래에 등장하는 링크를 클릭하시려면 우클릭 후 새창에서 열어 확인해 주세요! 2. 또한 syntax highlighting이 제대로 지원되지 않는 것 같아서, 혹시라도 보기 불편하신 점이 있다면 아래의 링크를 통해 원본 게시글을 확인하실 수도 있습니다. [https://fureweb-com.github.io/blog/2017/08/07/applying-free-ssl-to-your-ubuntu-server-using-nginx-and-let'sencrypt-from-scratch.html](https://fureweb-com.github.io/blog/2017/08/07/applying-free-ssl-to-your-ubuntu-server-using-nginx-and-let'sencrypt-from-scratch.html) # 개요 --- 본 튜토리얼은 다음의 순서대로 진행됩니다. - 우분투 VPS 생성 - nginx 설치 및 설정 - 도메인 Host IP 설정 및 확인 - Certbot 설치 및 설정 - 최종 확인 - 마치며 windows 환경에서 아래 예제를 실행하셔야 하는 분들은 [mingw](http://www.mingw.org/), [putty](https://www.chiark.greenend.org.uk/~sgtatham/putty/latest.html), windows 10 bash 등을 통해 bash shell을 사용하실 수 있습니다. 본 포스트의 내용은 로컬머신에서 bash shell을 사용할 수 있음을 전제하여 작성했습니다. 또한 vi를 사용할 수 있음을 전제하였으나, vi 사용이 어려우신 경우 nano에 대한 사용 방법을 검색하신 뒤 예제를 따라하시는 것을 추천드립니다. 그런 경우 아래에 표시한 vi 명령을 nano 명령으로 대신하시기 바랍니다. # 우분투 VPS 생성 --- 자신이 사용할 수 있는 클라우드 서비스 내 VPS를 Ubuntu 16.04 LTS 버전으로 생성합니다. 저는 개인적으로 제가 알고있는 한 가장 간단하고 저렴하게 VPS를 생성할 수 있는 [iwinv.kr 클라우드 서비스](//iwinv.kr)를 이용하여 VPS를 생성하도록 하겠습니다. 아래 예제에서는 Ubuntu 16.04 LTS(32bit) 버전으로 VPS를 생성하여 예제를 진행하게 됩니다. 편의상 root 계정으로 아래 예제를 수행하겠습니다. 방화벽 설정과 관련된 부분은 이 포스팅의 주제를 벗어나므로, 가능하다면 VPS 생성 시 방화벽은 사용하지 않음으로 설정하셔서 예제를 실습하시기를 희망합니다. # nginx 설치 및 설정 --- ssh 클라이언트를 이용하여 방금 막 생성한 VPS로 접속합니다. 접속 후 다음의 명령을 차례대로 실행하여 nginx를 서버에 설치한 뒤, 상태를 확인합니다. ```bash $ ssh root@your-vps-ip # 로그인 완료 후 아래 명령을 실행합니다. $ apt-get update $ apt-get install nginx ``` 설치 후 nginx 실행 상태를 다음과 같이 확인할 수 있습니다. ```bash $ service nginx status ```  만약 현재 상태가 inactive라면, 다음의 명령을 통해 nginx 프로세스를 실행시킵니다. ```bash $ service nginx start ``` 설치가 완료된 후 브라우저를 통해 서버의 IP를 입력하여 페이지를 요청하면 welcome to nginx 페이지를 확인할 수 있습니다. 만약 welcome 페이지를 볼수 없다면 방화벽 설정 문제일 가능성이 있습니다. 방화벽과 관련된 부분은 클라우드 서비스 업체마다 설정하는 방법이 다를 수 있으니, 사용하시는 업체의 방화벽 설정 사용 설명을 통해 http 요청을 위한 80번 포트 및 https 요청을 위한 443 포트를 열어둘 수 있도록 합니다. 보유하고 있는 도메인을 현재 VPS로 연결시키기 전, 해당 도메인을 통해 본 서버로 http 요청을 해 오는 경우에 대해 처리할 수 있도록 다음과 같이 nginx 설정을 수행합니다. ```bash # 다음의 경로로 이동하여 ssltest.fureweb.com 도메인 요청에 대한 설정파일을 생성합니다. # 아래 경로에 등록된 conf 확장자를 가진 모든 파일이 nginx.conf파일에 의해 include 되며, # nginx가 실행될 때 본 디렉토리 내 파일들이 해석되게 됩니다. $ cd /etc/nginx/conf.d # 원하는 도메인 명으로 설정 파일을 하나 생성합니다. $ vi ssltest.fureweb.com.conf ``` 아래의 내용을 ssltest.fureweb.com.conf 파일에 입력합니다. ```bash server { listen 80; server_name ssltest.fureweb.com; } ``` 필요한 설정 파일을 생성하였다면, 다음의 명령을 통해 설정에 오타 등의 오류는 없는지 확인한 뒤 설정을 적용합니다. ```bash # 설정 파일들에 오류가 없는지 확인한 뒤 $ nginx -t nginx: the configuration file /etc/nginx/nginx.conf syntax is ok nginx: configuration file /etc/nginx/nginx.conf test is successful # 오류가 없다면 설정 파일 내용을 적용합니다. $ nginx -s reload ``` 현재 VPS는 ssltest.fureweb.com에 대한 http 요청을 처리할 수 있는 상태가 되었습니다. 이제 자신이 가지고 있는 도메인 관리업체의 웹사이트에 로그인하여 해당 도메인에 대한 http 요청이 새로 만든 VPS로 전달될 수 있도록 별도의 설정을 진행해 보겠습니다. # 도메인 Host IP 설정 및 확인 --- 본인이 보유하고있는 도메인을 관리하는 업체 사이트에 로그인하여, 자신이 보유한 도메인(또는 서브도메인)에 대한 Host IP를 설정합니다. 예시로, 제가 보유하고 있는 ssltest.fureweb.com 이라는 서브도메인에 대한 http 요청이 방금 만든 VPS 서버로 연결되도록 설정을 추가하겠습니다. 도메인 등록 대행업체마다 설정하는 방법은 다를 수 있으니, 아래 사진을 참고하셔서 비슷한 메뉴에서 설정을 처리해주세요. 일반적으로 DNS 관리 메뉴의 하위 메뉴에서 설정하실 수 있습니다.  만약 이전에 해당 도메인으로의 연결을 한 적이 있다면, 로컬 PC의 DNS캐시를 삭제해야합니다. 없다면 무시하셔도 됩니다. ```bash # OSX 10.10.4 이상인 경우 $ killall -HUP mDNSResponder # Windows 10을 사용하는 경우 - powershell 또는 cmd에서 ipconfig /flushdns # 죄송하지만 이 외에는 검색해 주세요 -_-;; ``` 브라우저가 크롬이라면, 주소표시줄에 다음의 경로를 복사&붙여넣기하여 조회되는 화면에서 `Clear Host Cache` 버튼을 클릭하여 캐시를 삭제하세요. ```url chrome://net-internals/#dns ``` 모든 설정에 문제가 없다면, 이제 웹 브라우저를 통해 내가 가지고 있는 도메인에 대한 연결 요청이 방금 만든 VPS로 전달되게 됩니다. 단, 도메인 관리 업체마다 해당 적용값이 얼마나 빨리 반영되는지는 차이가 있을 수 있으므로, 충분한 시간을 두고 확인을 진행해 주세요. 통상 1~2분 내에는 적용되는 걸로 알고 있으나, 다른 업체는 어떤지 사용해보지 않아서 잘 모르겠네요. ^^; # Certbot 설치 및 설정 --- 먼저 certbot을 설치합니다. ```bash $ add-apt-repository ppa:certbot/certbot ``` <br> 해당 저장소에 담긴 패키지 정보를 확인할 수 있도록 다음과 같이 업데이트를 수행합니다. ```bash $ apt-get update ``` <br> `apt-get`을 이용하여 Certbot을 설치합니다. ```bash $ apt-get install python-certbot-nginx ``` <br> 설치된 certbot을 이용하여 ssltest.fureweb.com 도메인에 대한 SSL 인증서만 발급받도록 합니다. ```bash $ certbot certonly --nginx -d ssltest.fureweb.com # 위 명령을 실행하면 해당 도메인을 관리하는 사람의 이메일 주소를 입력하라고 나옵니다. 입력해 주세요. # 만료일에 대한 정보를 보내줍니다. # 약관에는 동의(A)하셔야 하며, # EFF 재단과의 이메일을 공유할지 여부를 묻는 부분에 대해서는 원하시는대로 진행하시면 됩니다. ``` <br> 아래와 같은 메시지들이 출력됩니다.  위 명령을 수행하고 나면, 아래 경로에 총 5개의 파일이 생성되어 있음을 확인할 수 있습니다. (실제로는 /etc/letsencrypt/archive/도메인명 디렉토리 내 파일에 대한 심볼릭 링크 입니다.) ```bash $ ls -al /etc/letsencrypt/live/ssltest.fureweb.com total 12 drwxr-xr-x 2 root root 4096 Aug 7 17:03 ./ drwx------ 4 root root 4096 Aug 7 16:56 ../ lrwxrwxrwx 1 root root 43 Aug 7 17:03 cert.pem -> ../../archive/ssltest.fureweb.com/cert1.pem lrwxrwxrwx 1 root root 44 Aug 7 17:03 chain.pem -> ../../archive/ssltest.fureweb.com/chain1.pem lrwxrwxrwx 1 root root 48 Aug 7 17:03 fullchain.pem -> ../../archive/ssltest.fureweb.com/fullchain1.pem lrwxrwxrwx 1 root root 46 Aug 7 17:03 privkey.pem -> ../../archive/ssltest.fureweb.com/privkey1.pem -rw-r--r-- 1 root root 543 Aug 7 17:03 README ``` <br> 이제 ssltest.fureweb.com 이라는 도메인에 대한 ssl 요청을 처리하기위해 필요한 인증서가 준비된 상태가 되었습니다. nginx가 이 인증서를 통해 https 요청을 처리할 수 있도록, 아까 설정했던 conf 파일을 아래와 같이 수정해 보겠습니다. ```bash # 아래 명령어로 기존 설정파일 편집 $ vi /etc/nginx/conf.d/ssltest.fureweb.com.conf # 다음과 같은 형태가 되어야합니다. server { # http://ssltest.fureweb.com 요청에 대해 # https://ssltest.fureweb.com 으로 리다이렉트 처리합니다. listen 80; server_name ssltest.fureweb.com; return 301 https://ssltest.fureweb.com; } server { # https://ssltest.fureweb.com 으로의 요청을 리스닝합니다. listen 443; server_name ssltest.fureweb.com; ssl on; ssl_certificate /etc/letsencrypt/live/ssltest.fureweb.com/fullchain.pem; ssl_certificate_key /etc/letsencrypt/live/ssltest.fureweb.com/privkey.pem; ssl_protocols TLSv1 TLSv1.1 TLSv1.2; ssl_ciphers HIGH:!aNULL:!MD5; # 예제에서는 이 외에 별도 설정을 추가하지 않고, SSL 요청이 정상적으로 처리되는지만 확인합니다. # 일반적으로 아래에는 현재 도메인과 연결된 document_root 등에 대한 설정 기술하거나 # proxy 설정을 통해 동적 처리가 가능한 다른 WAS와 연동하여 응답을 핸들링합니다. } ``` <br> 위 설정을 저장한 뒤, conf 파일에 오타는 없는지 확인하고 문제가 없다면 설정 내용을 적용시킵니다. ```bash # 설정 파일들에 오류가 없는지 확인한 뒤 $ nginx -t nginx: the configuration file /etc/nginx/nginx.conf syntax is ok nginx: configuration file /etc/nginx/nginx.conf test is successful # 오류가 없다면 설정 파일 내용을 적용합니다. $ nginx -s reload ``` <br> # 최종 확인 --- 브라우저의 주소창에 https://ssltest.fureweb.com를 입력하여 연결이 제대로 이뤄지는지 확인합니다. 브라우저 캐시로 인해 https로 리다이렉트 처리가 되지 않은 페이지를 보여줄 수 있으니, 크롬 기준으로 강력 새로고침을 실행시켜주세요. 브라우저 주소표시줄 좌측에 자물쇠가 활성화 된 모습을 확인하실 수 있게 됩니다. ~~주소가 ssltest2.fureweb.com인건 무시해주세요... -_-;~~  # 마치며 --- 우분투 서버를 생성하는 것 부터 Nginx 설치 및 설정, 그리고 SSL 적용하기까지 모든 과정에 대해 확인해 보았습니다. 혹시라도 본 포스트를 보고 막히는 부분이 있거나 설명이 부족한 부분이 있다면 언제든지 댓글이나 질문 부탁 드리겠습니다. 읽어주셔서 감사합니다! |
| json metadata | {"tags":["nginx","ubuntu","letsencrypt","vps","ssl"],"image":["https://steemitimages.com/DQmT5UFQLESiCLNpXWp4EAyr2sTi5dZBphFoLYBzQ8v6CUd/20170807-nginx-status.png","https://fureweb-com.github.io/assets/img/posts/20170807-set-host-ip.png","https://fureweb-com.github.io/assets/img/posts/20170807-certbot-process.png","https://fureweb-com.github.io/assets/img/posts/20170807-ssl-connection.png"],"links":["https://fureweb-com.github.io/blog/2017/08/07/applying-free-ssl-to-your-ubuntu-server-using-nginx-and-let'sencrypt-from-scratch.html","http://www.mingw.org/","https://www.chiark.greenend.org.uk/~sgtatham/putty/latest.html","//iwinv.kr","https://ssltest.fureweb.com"],"app":"steemit/0.1","format":"markdown"} |
| parent author | |
| parent permlink | ssl |
| permlink | nginx-ssl |
| title | 우분투에서 nginx 설치부터 무료 SSL 적용까지 |
| Transaction Info | Block #20085058/Trx 04d0e2ab14e330bd85db871334f3547670e5b98c |
View Raw JSON Data
{
"block": 20085058,
"op": [
"comment",
{
"author": "fureweb",
"body": "# 들어가기 전에\n---\n1. 아직 아래 link들에 대해 새창 열기 기능이 steemit에서 지원되지 않는 것 같습니다. 혹시라도 아래에 등장하는 링크를 클릭하시려면 우클릭 후 새창에서 열어 확인해 주세요! \n2. 또한 syntax highlighting이 제대로 지원되지 않는 것 같아서, 혹시라도 보기 불편하신 점이 있다면 아래의 링크를 통해 원본 게시글을 확인하실 수도 있습니다.\n[https://fureweb-com.github.io/blog/2017/08/07/applying-free-ssl-to-your-ubuntu-server-using-nginx-and-let'sencrypt-from-scratch.html](https://fureweb-com.github.io/blog/2017/08/07/applying-free-ssl-to-your-ubuntu-server-using-nginx-and-let'sencrypt-from-scratch.html)\n\n# 개요\n---\n\n본 튜토리얼은 다음의 순서대로 진행됩니다.\n\n- 우분투 VPS 생성\n- nginx 설치 및 설정\n- 도메인 Host IP 설정 및 확인\n- Certbot 설치 및 설정\n- 최종 확인\n- 마치며\n\nwindows 환경에서 아래 예제를 실행하셔야 하는 분들은 [mingw](http://www.mingw.org/), [putty](https://www.chiark.greenend.org.uk/~sgtatham/putty/latest.html), windows 10 bash 등을 통해 bash shell을 사용하실 수 있습니다. 본 포스트의 내용은 로컬머신에서 bash shell을 사용할 수 있음을 전제하여 작성했습니다. \n\n또한 vi를 사용할 수 있음을 전제하였으나, vi 사용이 어려우신 경우 nano에 대한 사용 방법을 검색하신 뒤 예제를 따라하시는 것을 추천드립니다. 그런 경우 아래에 표시한 vi 명령을 nano 명령으로 대신하시기 바랍니다.\n\n# 우분투 VPS 생성\n---\n\n자신이 사용할 수 있는 클라우드 서비스 내 VPS를 Ubuntu 16.04 LTS 버전으로 생성합니다. 저는 개인적으로 제가 알고있는 한 가장 간단하고 저렴하게 VPS를 생성할 수 있는 [iwinv.kr 클라우드 서비스](//iwinv.kr)를 이용하여 VPS를 생성하도록 하겠습니다.\n\n아래 예제에서는 Ubuntu 16.04 LTS(32bit) 버전으로 VPS를 생성하여 예제를 진행하게 됩니다. 편의상 root 계정으로 아래 예제를 수행하겠습니다.\n\n방화벽 설정과 관련된 부분은 이 포스팅의 주제를 벗어나므로, 가능하다면 VPS 생성 시 방화벽은 사용하지 않음으로 설정하셔서 예제를 실습하시기를 희망합니다.\n\n# nginx 설치 및 설정\n---\n\nssh 클라이언트를 이용하여 방금 막 생성한 VPS로 접속합니다. 접속 후 다음의 명령을 차례대로 실행하여 nginx를 서버에 설치한 뒤, 상태를 확인합니다. \n\n```bash\n$ ssh root@your-vps-ip\n# 로그인 완료 후 아래 명령을 실행합니다.\n$ apt-get update\n$ apt-get install nginx\n```\n\n설치 후 nginx 실행 상태를 다음과 같이 확인할 수 있습니다.\n\n```bash\n$ service nginx status\n```\n \n\n \n만약 현재 상태가 inactive라면, 다음의 명령을 통해 nginx 프로세스를 실행시킵니다.\n```bash\n$ service nginx start\n```\n \n설치가 완료된 후 브라우저를 통해 서버의 IP를 입력하여 페이지를 요청하면 welcome to nginx 페이지를 확인할 수 있습니다. 만약 welcome 페이지를 볼수 없다면 방화벽 설정 문제일 가능성이 있습니다. 방화벽과 관련된 부분은 클라우드 서비스 업체마다 설정하는 방법이 다를 수 있으니, 사용하시는 업체의 방화벽 설정 사용 설명을 통해 http 요청을 위한 80번 포트 및 https 요청을 위한 443 포트를 열어둘 수 있도록 합니다.\n\n보유하고 있는 도메인을 현재 VPS로 연결시키기 전, 해당 도메인을 통해 본 서버로 http 요청을 해 오는 경우에 대해 처리할 수 있도록 다음과 같이 nginx 설정을 수행합니다.\n\n```bash\n# 다음의 경로로 이동하여 ssltest.fureweb.com 도메인 요청에 대한 설정파일을 생성합니다.\n# 아래 경로에 등록된 conf 확장자를 가진 모든 파일이 nginx.conf파일에 의해 include 되며, \n# nginx가 실행될 때 본 디렉토리 내 파일들이 해석되게 됩니다.\n$ cd /etc/nginx/conf.d\n\n# 원하는 도메인 명으로 설정 파일을 하나 생성합니다.\n$ vi ssltest.fureweb.com.conf\n```\n \n아래의 내용을 ssltest.fureweb.com.conf 파일에 입력합니다.\n```bash\nserver {\n listen 80;\n server_name ssltest.fureweb.com;\n}\n```\n\n필요한 설정 파일을 생성하였다면, 다음의 명령을 통해 설정에 오타 등의 오류는 없는지 확인한 뒤 설정을 적용합니다.\n```bash\n# 설정 파일들에 오류가 없는지 확인한 뒤\n$ nginx -t\nnginx: the configuration file /etc/nginx/nginx.conf syntax is ok\nnginx: configuration file /etc/nginx/nginx.conf test is successful\n# 오류가 없다면 설정 파일 내용을 적용합니다.\n$ nginx -s reload\n```\n\n현재 VPS는 ssltest.fureweb.com에 대한 http 요청을 처리할 수 있는 상태가 되었습니다. 이제 자신이 가지고 있는 도메인 관리업체의 웹사이트에 로그인하여 해당 도메인에 대한 http 요청이 새로 만든 VPS로 전달될 수 있도록 별도의 설정을 진행해 보겠습니다.\n\n\n# 도메인 Host IP 설정 및 확인\n---\n\n본인이 보유하고있는 도메인을 관리하는 업체 사이트에 로그인하여, 자신이 보유한 도메인(또는 서브도메인)에 대한 Host IP를 설정합니다. \n\n예시로, 제가 보유하고 있는 ssltest.fureweb.com 이라는 서브도메인에 대한 http 요청이 방금 만든 VPS 서버로 연결되도록 설정을 추가하겠습니다. 도메인 등록 대행업체마다 설정하는 방법은 다를 수 있으니, 아래 사진을 참고하셔서 비슷한 메뉴에서 설정을 처리해주세요. 일반적으로 DNS 관리 메뉴의 하위 메뉴에서 설정하실 수 있습니다.\n\n\n\n만약 이전에 해당 도메인으로의 연결을 한 적이 있다면, 로컬 PC의 DNS캐시를 삭제해야합니다. 없다면 무시하셔도 됩니다.\n```bash\n# OSX 10.10.4 이상인 경우\n$ killall -HUP mDNSResponder\n\n# Windows 10을 사용하는 경우 - powershell 또는 cmd에서\nipconfig /flushdns\n\n# 죄송하지만 이 외에는 검색해 주세요 -_-;;\n```\n\n브라우저가 크롬이라면, 주소표시줄에 다음의 경로를 복사&붙여넣기하여 조회되는 화면에서 `Clear Host Cache` 버튼을 클릭하여 캐시를 삭제하세요. \n```url\nchrome://net-internals/#dns\n```\n\n모든 설정에 문제가 없다면, 이제 웹 브라우저를 통해 내가 가지고 있는 도메인에 대한 연결 요청이 방금 만든 VPS로 전달되게 됩니다. 단, 도메인 관리 업체마다 해당 적용값이 얼마나 빨리 반영되는지는 차이가 있을 수 있으므로, 충분한 시간을 두고 확인을 진행해 주세요. 통상 1~2분 내에는 적용되는 걸로 알고 있으나, 다른 업체는 어떤지 사용해보지 않아서 잘 모르겠네요. ^^;\n\n# Certbot 설치 및 설정\n---\n\n먼저 certbot을 설치합니다.\n```bash\n$ add-apt-repository ppa:certbot/certbot\n```\n<br>\n해당 저장소에 담긴 패키지 정보를 확인할 수 있도록 다음과 같이 업데이트를 수행합니다.\n```bash\n$ apt-get update\n```\n<br>\n`apt-get`을 이용하여 Certbot을 설치합니다.\n```bash\n$ apt-get install python-certbot-nginx\n```\n<br>\n설치된 certbot을 이용하여 ssltest.fureweb.com 도메인에 대한 SSL 인증서만 발급받도록 합니다.\n\n```bash\n$ certbot certonly --nginx -d ssltest.fureweb.com\n# 위 명령을 실행하면 해당 도메인을 관리하는 사람의 이메일 주소를 입력하라고 나옵니다. 입력해 주세요.\n# 만료일에 대한 정보를 보내줍니다.\n# 약관에는 동의(A)하셔야 하며,\n# EFF 재단과의 이메일을 공유할지 여부를 묻는 부분에 대해서는 원하시는대로 진행하시면 됩니다.\n```\n<br>\n아래와 같은 메시지들이 출력됩니다.\n\n\n위 명령을 수행하고 나면, 아래 경로에 총 5개의 파일이 생성되어 있음을 확인할 수 있습니다. (실제로는 /etc/letsencrypt/archive/도메인명 디렉토리 내 파일에 대한 심볼릭 링크 입니다.)\n```bash\n$ ls -al /etc/letsencrypt/live/ssltest.fureweb.com\ntotal 12\ndrwxr-xr-x 2 root root 4096 Aug 7 17:03 ./\ndrwx------ 4 root root 4096 Aug 7 16:56 ../\nlrwxrwxrwx 1 root root 43 Aug 7 17:03 cert.pem -> ../../archive/ssltest.fureweb.com/cert1.pem\nlrwxrwxrwx 1 root root 44 Aug 7 17:03 chain.pem -> ../../archive/ssltest.fureweb.com/chain1.pem\nlrwxrwxrwx 1 root root 48 Aug 7 17:03 fullchain.pem -> ../../archive/ssltest.fureweb.com/fullchain1.pem\nlrwxrwxrwx 1 root root 46 Aug 7 17:03 privkey.pem -> ../../archive/ssltest.fureweb.com/privkey1.pem\n-rw-r--r-- 1 root root 543 Aug 7 17:03 README\n```\n<br>\n이제 ssltest.fureweb.com 이라는 도메인에 대한 ssl 요청을 처리하기위해 필요한 인증서가 준비된 상태가 되었습니다. nginx가 이 인증서를 통해 https 요청을 처리할 수 있도록, 아까 설정했던 conf 파일을 아래와 같이 수정해 보겠습니다. \n\n```bash\n# 아래 명령어로 기존 설정파일 편집\n$ vi /etc/nginx/conf.d/ssltest.fureweb.com.conf\n\n# 다음과 같은 형태가 되어야합니다.\nserver {\n # http://ssltest.fureweb.com 요청에 대해\n # https://ssltest.fureweb.com 으로 리다이렉트 처리합니다. \n listen 80;\n server_name ssltest.fureweb.com;\n return 301 https://ssltest.fureweb.com;\n}\n\nserver {\n # https://ssltest.fureweb.com 으로의 요청을 리스닝합니다.\n listen 443;\n server_name ssltest.fureweb.com;\n\n ssl on;\n ssl_certificate /etc/letsencrypt/live/ssltest.fureweb.com/fullchain.pem;\n ssl_certificate_key /etc/letsencrypt/live/ssltest.fureweb.com/privkey.pem;\n\n ssl_protocols TLSv1 TLSv1.1 TLSv1.2;\n ssl_ciphers HIGH:!aNULL:!MD5;\n\n # 예제에서는 이 외에 별도 설정을 추가하지 않고, SSL 요청이 정상적으로 처리되는지만 확인합니다.\n # 일반적으로 아래에는 현재 도메인과 연결된 document_root 등에 대한 설정 기술하거나\n # proxy 설정을 통해 동적 처리가 가능한 다른 WAS와 연동하여 응답을 핸들링합니다.\n}\n\n```\n<br>\n위 설정을 저장한 뒤, conf 파일에 오타는 없는지 확인하고 문제가 없다면 설정 내용을 적용시킵니다.\n\n```bash\n# 설정 파일들에 오류가 없는지 확인한 뒤\n$ nginx -t\nnginx: the configuration file /etc/nginx/nginx.conf syntax is ok\nnginx: configuration file /etc/nginx/nginx.conf test is successful\n# 오류가 없다면 설정 파일 내용을 적용합니다.\n$ nginx -s reload\n```\n<br>\n\n# 최종 확인\n---\n\n브라우저의 주소창에 https://ssltest.fureweb.com를 입력하여 연결이 제대로 이뤄지는지 확인합니다. 브라우저 캐시로 인해 https로 리다이렉트 처리가 되지 않은 페이지를 보여줄 수 있으니, 크롬 기준으로 강력 새로고침을 실행시켜주세요.\n\n브라우저 주소표시줄 좌측에 자물쇠가 활성화 된 모습을 확인하실 수 있게 됩니다. \n~~주소가 ssltest2.fureweb.com인건 무시해주세요... -_-;~~\n\n\n\n\n# 마치며\n---\n\n우분투 서버를 생성하는 것 부터 Nginx 설치 및 설정, 그리고 SSL 적용하기까지 모든 과정에 대해 확인해 보았습니다. 혹시라도 본 포스트를 보고 막히는 부분이 있거나 설명이 부족한 부분이 있다면 언제든지 댓글이나 질문 부탁 드리겠습니다. \n\n읽어주셔서 감사합니다!",
"json_metadata": "{\"tags\":[\"nginx\",\"ubuntu\",\"letsencrypt\",\"vps\",\"ssl\"],\"image\":[\"https://steemitimages.com/DQmT5UFQLESiCLNpXWp4EAyr2sTi5dZBphFoLYBzQ8v6CUd/20170807-nginx-status.png\",\"https://fureweb-com.github.io/assets/img/posts/20170807-set-host-ip.png\",\"https://fureweb-com.github.io/assets/img/posts/20170807-certbot-process.png\",\"https://fureweb-com.github.io/assets/img/posts/20170807-ssl-connection.png\"],\"links\":[\"https://fureweb-com.github.io/blog/2017/08/07/applying-free-ssl-to-your-ubuntu-server-using-nginx-and-let'sencrypt-from-scratch.html\",\"http://www.mingw.org/\",\"https://www.chiark.greenend.org.uk/~sgtatham/putty/latest.html\",\"//iwinv.kr\",\"https://ssltest.fureweb.com\"],\"app\":\"steemit/0.1\",\"format\":\"markdown\"}",
"parent_author": "",
"parent_permlink": "ssl",
"permlink": "nginx-ssl",
"title": "우분투에서 nginx 설치부터 무료 SSL 적용까지"
}
],
"op_in_trx": 0,
"timestamp": "2018-02-22T06:11:27",
"trx_id": "04d0e2ab14e330bd85db871334f3547670e5b98c",
"trx_in_block": 20,
"virtual_op": 0
}2018/02/22 06:10:54
2018/02/22 06:10:54
| author | fureweb |
| body | 아 네 감사합니다! |
| json metadata | {"tags":["ssl"],"app":"steemit/0.1"} |
| parent author | nhj12311 |
| parent permlink | re-fureweb-nginx-ssl-20180222t055917201z |
| permlink | re-nhj12311-re-fureweb-nginx-ssl-20180222t061051958z |
| title | |
| Transaction Info | Block #20085047/Trx 5acd4e6422d03f5204c19e11409d3212d27a2ca9 |
View Raw JSON Data
{
  "block": 20085047,
  "op": [
    "comment",
    {
      "author": "fureweb",
      "body": "아 네 감사합니다!",
      "json_metadata": "{\"tags\":[\"ssl\"],\"app\":\"steemit/0.1\"}",
      "parent_author": "nhj12311",
      "parent_permlink": "re-fureweb-nginx-ssl-20180222t055917201z",
      "permlink": "re-nhj12311-re-fureweb-nginx-ssl-20180222t061051958z",
      "title": ""
    }
  ],
  "op_in_trx": 0,
  "timestamp": "2018-02-22T06:10:54",
  "trx_id": "5acd4e6422d03f5204c19e11409d3212d27a2ca9",
  "trx_in_block": 25,
  "virtual_op": 0
}nhj12311replied to @fureweb / re-fureweb-nginx-ssl-20180222t055917201z2018/02/22 05:59:21
nhj12311replied to @fureweb / re-fureweb-nginx-ssl-20180222t055917201z
2018/02/22 05:59:21
| author | nhj12311 |
| body | kr과 #kr-dev 태그를 추천합니다. |
| json metadata | {"tags":["ssl","kr-dev"],"app":"steemit/0.1"} |
| parent author | fureweb |
| parent permlink | nginx-ssl |
| permlink | re-fureweb-nginx-ssl-20180222t055917201z |
| title | |
| Transaction Info | Block #20084816/Trx 4295b3f90fa51c70ac4b83861164b9e319758963 |
View Raw JSON Data
{
  "block": 20084816,
  "op": [
    "comment",
    {
      "author": "nhj12311",
      "body": "kr과 #kr-dev 태그를 추천합니다.",
      "json_metadata": "{\"tags\":[\"ssl\",\"kr-dev\"],\"app\":\"steemit/0.1\"}",
      "parent_author": "fureweb",
      "parent_permlink": "nginx-ssl",
      "permlink": "re-fureweb-nginx-ssl-20180222t055917201z",
      "title": ""
    }
  ],
  "op_in_trx": 0,
  "timestamp": "2018-02-22T05:59:21",
  "trx_id": "4295b3f90fa51c70ac4b83861164b9e319758963",
  "trx_in_block": 12,
  "virtual_op": 0
}2018/02/22 05:58:18
2018/02/22 05:58:18
| author | fureweb |
| permlink | nginx-ssl |
| voter | nhj12311 |
| weight | 2500 (25.00%) |
| Transaction Info | Block #20084795/Trx 044c998a5658b1821e4dded31928943ee82ac2fe |
View Raw JSON Data
{
  "block": 20084795,
  "op": [
    "vote",
    {
      "author": "fureweb",
      "permlink": "nginx-ssl",
      "voter": "nhj12311",
      "weight": 2500
    }
  ],
  "op_in_trx": 0,
  "timestamp": "2018-02-22T05:58:18",
  "trx_id": "044c998a5658b1821e4dded31928943ee82ac2fe",
  "trx_in_block": 33,
  "virtual_op": 0
}2018/02/22 05:02:09
2018/02/22 05:02:09
| author | fureweb |
| permlink | nginx-ssl |
| voter | calebjohn |
| weight | 10000 (100.00%) |
| Transaction Info | Block #20083672/Trx 2ffd1bfec8a0cf682a3e521d731580a5c6cfee46 |
View Raw JSON Data
{
  "block": 20083672,
  "op": [
    "vote",
    {
      "author": "fureweb",
      "permlink": "nginx-ssl",
      "voter": "calebjohn",
      "weight": 10000
    }
  ],
  "op_in_trx": 0,
  "timestamp": "2018-02-22T05:02:09",
  "trx_id": "2ffd1bfec8a0cf682a3e521d731580a5c6cfee46",
  "trx_in_block": 10,
  "virtual_op": 0
}2018/02/22 04:56:51
2018/02/22 04:56:51
| author | fureweb |
| permlink | nginx-ssl |
| voter | hr1 |
| weight | 2 (0.02%) |
| Transaction Info | Block #20083566/Trx cb4346a5fb24660a8950d7b4d99d7064c4300002 |
View Raw JSON Data
{
  "block": 20083566,
  "op": [
    "vote",
    {
      "author": "fureweb",
      "permlink": "nginx-ssl",
      "voter": "hr1",
      "weight": 2
    }
  ],
  "op_in_trx": 0,
  "timestamp": "2018-02-22T04:56:51",
  "trx_id": "cb4346a5fb24660a8950d7b4d99d7064c4300002",
  "trx_in_block": 34,
  "virtual_op": 0
}2018/02/22 04:23:51
2018/02/22 04:23:51
| author | fureweb |
| permlink | nginx-ssl |
| voter | fureweb |
| weight | 10000 (100.00%) |
| Transaction Info | Block #20082906/Trx f019c4342342d4505dd97bc5f0067324bae69857 |
View Raw JSON Data
{
  "block": 20082906,
  "op": [
    "vote",
    {
      "author": "fureweb",
      "permlink": "nginx-ssl",
      "voter": "fureweb",
      "weight": 10000
    }
  ],
  "op_in_trx": 0,
  "timestamp": "2018-02-22T04:23:51",
  "trx_id": "f019c4342342d4505dd97bc5f0067324bae69857",
  "trx_in_block": 6,
  "virtual_op": 0
}2018/02/22 04:23:51
2018/02/22 04:23:51
| author | fureweb |
| body | # 들어가기 전에 --- 1. 아직 아래 link들에 대해 새창 열기 기능이 steemit에서 지원되지 않는 것 같습니다. 혹시라도 아래에 등장하는 링크를 클릭하시려면 우클릭 후 새창에서 열어 확인해 주세요! 2. 또한 syntax highlighting이 제대로 지원되지 않는 것 같아서, 혹시라도 보기 불편하신 점이 있다면 아래의 링크를 통해 원본 게시글을 확인하실 수도 있습니다. [https://fureweb-com.github.io/blog/2017/08/07/applying-free-ssl-to-your-ubuntu-server-using-nginx-and-let'sencrypt-from-scratch.html](https://fureweb-com.github.io/blog/2017/08/07/applying-free-ssl-to-your-ubuntu-server-using-nginx-and-let'sencrypt-from-scratch.html) # 개요 --- 본 튜토리얼은 다음의 순서대로 진행됩니다. - 우분투 VPS 생성 - nginx 설치 및 설정 - 도메인 Host IP 설정 및 확인 - Certbot 설치 및 설정 - 최종 확인 - 마치며 windows 환경에서 아래 예제를 실행하셔야 하는 분들은 [mingw](http://www.mingw.org/), [putty](https://www.chiark.greenend.org.uk/~sgtatham/putty/latest.html), windows 10 bash 등을 통해 bash shell을 사용하실 수 있습니다. 본 포스트의 내용은 로컬머신에서 bash shell을 사용할 수 있음을 전제하여 작성했습니다. 또한 vi를 사용할 수 있음을 전제하였으나, vi 사용이 어려우신 경우 nano에 대한 사용 방법을 검색하신 뒤 예제를 따라하시는 것을 추천드립니다. 그런 경우 아래에 표시한 vi 명령을 nano 명령으로 대신하시기 바랍니다. # 우분투 VPS 생성 --- 자신이 사용할 수 있는 클라우드 서비스 내 VPS를 Ubuntu 16.04 LTS 버전으로 생성합니다. 저는 개인적으로 제가 알고있는 한 가장 간단하고 저렴하게 VPS를 생성할 수 있는 [iwinv.kr 클라우드 서비스](//iwinv.kr)를 이용하여 VPS를 생성하도록 하겠습니다. 아래 예제에서는 Ubuntu 16.04 LTS(32bit) 버전으로 VPS를 생성하여 예제를 진행하게 됩니다. 편의상 root 계정으로 아래 예제를 수행하겠습니다. 방화벽 설정과 관련된 부분은 이 포스팅의 주제를 벗어나므로, 가능하다면 VPS 생성 시 방화벽은 사용하지 않음으로 설정하셔서 예제를 실습하시기를 희망합니다. # nginx 설치 및 설정 --- ssh 클라이언트를 이용하여 방금 막 생성한 VPS로 접속합니다. 접속 후 다음의 명령을 차례대로 실행하여 nginx를 서버에 설치한 뒤, 상태를 확인합니다. ```bash $ ssh root@your-vps-ip # 로그인 완료 후 아래 명령을 실행합니다. $ apt-get update $ apt-get install nginx ``` 설치 후 nginx 실행 상태를 다음과 같이 확인할 수 있습니다. ```bash $ service nginx status ```  만약 현재 상태가 inactive라면, 다음의 명령을 통해 nginx 프로세스를 실행시킵니다. ```bash $ service nginx start ``` 설치가 완료된 후 브라우저를 통해 서버의 IP를 입력하여 페이지를 요청하면 welcome to nginx 페이지를 확인할 수 있습니다. 만약 welcome 페이지를 볼수 없다면 방화벽 설정 문제일 가능성이 있습니다. 방화벽과 관련된 부분은 클라우드 서비스 업체마다 설정하는 방법이 다를 수 있으니, 사용하시는 업체의 방화벽 설정 사용 설명을 통해 http 요청을 위한 80번 포트 및 https 요청을 위한 443 포트를 열어둘 수 있도록 합니다. 보유하고 있는 도메인을 현재 VPS로 연결시키기 전, 해당 도메인을 통해 본 서버로 http 요청을 해 오는 경우에 대해 처리할 수 있도록 다음과 같이 nginx 설정을 수행합니다. ```bash # 다음의 경로로 이동하여 ssltest.fureweb.com 도메인 요청에 대한 설정파일을 생성합니다. # 아래 경로에 등록된 conf 확장자를 가진 모든 파일이 nginx.conf파일에 의해 include 되며, # nginx가 실행될 때 본 디렉토리 내 파일들이 해석되게 됩니다. $ cd /etc/nginx/conf.d # 원하는 도메인 명으로 설정 파일을 하나 생성합니다. $ vi ssltest.fureweb.com.conf ``` 아래의 내용을 ssltest.fureweb.com.conf 파일에 입력합니다. ```bash server { listen 80; server_name ssltest.fureweb.com; } ``` 필요한 설정 파일을 생성하였다면, 다음의 명령을 통해 설정에 오타 등의 오류는 없는지 확인한 뒤 설정을 적용합니다. ```bash # 설정 파일들에 오류가 없는지 확인한 뒤 $ nginx -t nginx: the configuration file /etc/nginx/nginx.conf syntax is ok nginx: configuration file /etc/nginx/nginx.conf test is successful # 오류가 없다면 설정 파일 내용을 적용합니다. $ nginx -s reload ``` 현재 VPS는 ssltest.fureweb.com에 대한 http 요청을 처리할 수 있는 상태가 되었습니다. 이제 자신이 가지고 있는 도메인 관리업체의 웹사이트에 로그인하여 해당 도메인에 대한 http 요청이 새로 만든 VPS로 전달될 수 있도록 별도의 설정을 진행해 보겠습니다. # 도메인 Host IP 설정 및 확인 --- 본인이 보유하고있는 도메인을 관리하는 업체 사이트에 로그인하여, 자신이 보유한 도메인(또는 서브도메인)에 대한 Host IP를 설정합니다. 예시로, 제가 보유하고 있는 ssltest.fureweb.com 이라는 서브도메인에 대한 http 요청이 방금 만든 VPS 서버로 연결되도록 설정을 추가하겠습니다. 도메인 등록 대행업체마다 설정하는 방법은 다를 수 있으니, 아래 사진을 참고하셔서 비슷한 메뉴에서 설정을 처리해주세요. 일반적으로 DNS 관리 메뉴의 하위 메뉴에서 설정하실 수 있습니다.  만약 이전에 해당 도메인으로의 연결을 한 적이 있다면, 로컬 PC의 DNS캐시를 삭제해야합니다. 없다면 무시하셔도 됩니다. ```bash # OSX 10.10.4 이상인 경우 $ killall -HUP mDNSResponder # Windows 10을 사용하는 경우 - powershell 또는 cmd에서 ipconfig /flushdns # 죄송하지만 이 외에는 검색해 주세요 -_-;; ``` 브라우저가 크롬이라면, 주소표시줄에 다음의 경로를 복사&붙여넣기하여 조회되는 화면에서 `Clear Host Cache` 버튼을 클릭하여 캐시를 삭제하세요. ```url chrome://net-internals/#dns ``` 모든 설정에 문제가 없다면, 이제 웹 브라우저를 통해 내가 가지고 있는 도메인에 대한 연결 요청이 방금 만든 VPS로 전달되게 됩니다. 단, 도메인 관리 업체마다 해당 적용값이 얼마나 빨리 반영되는지는 차이가 있을 수 있으므로, 충분한 시간을 두고 확인을 진행해 주세요. 통상 1~2분 내에는 적용되는 걸로 알고 있으나, 다른 업체는 어떤지 사용해보지 않아서 잘 모르겠네요. ^^; # Certbot 설치 및 설정 --- 먼저 certbot을 설치합니다. ```bash $ add-apt-repository ppa:certbot/certbot ``` <br> 해당 저장소에 담긴 패키지 정보를 확인할 수 있도록 다음과 같이 업데이트를 수행합니다. ```bash $ apt-get update ``` <br> `apt-get`을 이용하여 Certbot을 설치합니다. ```bash $ apt-get install python-certbot-nginx ``` <br> 설치된 certbot을 이용하여 ssltest.fureweb.com 도메인에 대한 SSL 인증서만 발급받도록 합니다. ```bash $ certbot certonly --nginx -d ssltest.fureweb.com # 위 명령을 실행하면 해당 도메인을 관리하는 사람의 이메일 주소를 입력하라고 나옵니다. 입력해 주세요. # 만료일에 대한 정보를 보내줍니다. # 약관에는 동의(A)하셔야 하며, # EFF 재단과의 이메일을 공유할지 여부를 묻는 부분에 대해서는 원하시는대로 진행하시면 됩니다. ``` <br> 아래와 같은 메시지들이 출력됩니다.  위 명령을 수행하고 나면, 아래 경로에 총 5개의 파일이 생성되어 있음을 확인할 수 있습니다. (실제로는 /etc/letsencrypt/archive/도메인명 디렉토리 내 파일에 대한 심볼릭 링크 입니다.) ```bash $ ls -al /etc/letsencrypt/live/ssltest.fureweb.com total 12 drwxr-xr-x 2 root root 4096 Aug 7 17:03 ./ drwx------ 4 root root 4096 Aug 7 16:56 ../ lrwxrwxrwx 1 root root 43 Aug 7 17:03 cert.pem -> ../../archive/ssltest.fureweb.com/cert1.pem lrwxrwxrwx 1 root root 44 Aug 7 17:03 chain.pem -> ../../archive/ssltest.fureweb.com/chain1.pem lrwxrwxrwx 1 root root 48 Aug 7 17:03 fullchain.pem -> ../../archive/ssltest.fureweb.com/fullchain1.pem lrwxrwxrwx 1 root root 46 Aug 7 17:03 privkey.pem -> ../../archive/ssltest.fureweb.com/privkey1.pem -rw-r--r-- 1 root root 543 Aug 7 17:03 README ``` <br> 이제 ssltest.fureweb.com 이라는 도메인에 대한 ssl 요청을 처리하기위해 필요한 인증서가 준비된 상태가 되었습니다. nginx가 이 인증서를 통해 https 요청을 처리할 수 있도록, 아까 설정했던 conf 파일을 아래와 같이 수정해 보겠습니다. ```bash # 아래 명령어로 기존 설정파일 편집 $ vi /etc/nginx/conf.d/ssltest.fureweb.com.conf # 다음과 같은 형태가 되어야합니다. server { # http://ssltest.fureweb.com 요청에 대해 # https://ssltest.fureweb.com 으로 리다이렉트 처리합니다. listen 80; server_name ssltest.fureweb.com; return 301 https://ssltest.fureweb.com; } server { # https://ssltest.fureweb.com 으로의 요청을 리스닝합니다. listen 443; server_name ssltest.fureweb.com; ssl on; ssl_certificate /etc/letsencrypt/live/ssltest.fureweb.com/fullchain.pem; ssl_certificate_key /etc/letsencrypt/live/ssltest.fureweb.com/privkey.pem; ssl_protocols TLSv1 TLSv1.1 TLSv1.2; ssl_ciphers HIGH:!aNULL:!MD5; # 예제에서는 이 외에 별도 설정을 추가하지 않고, SSL 요청이 정상적으로 처리되는지만 확인합니다. # 일반적으로 아래에는 현재 도메인과 연결된 document_root 등에 대한 설정 기술하거나 # proxy 설정을 통해 동적 처리가 가능한 다른 WAS와 연동하여 응답을 핸들링합니다. } ``` <br> 위 설정을 저장한 뒤, conf 파일에 오타는 없는지 확인하고 문제가 없다면 설정 내용을 적용시킵니다. ```bash # 설정 파일들에 오류가 없는지 확인한 뒤 $ nginx -t nginx: the configuration file /etc/nginx/nginx.conf syntax is ok nginx: configuration file /etc/nginx/nginx.conf test is successful # 오류가 없다면 설정 파일 내용을 적용합니다. $ nginx -s reload ``` <br> # 최종 확인 --- 브라우저의 주소창에 https://ssltest.fureweb.com를 입력하여 연결이 제대로 이뤄지는지 확인합니다. 브라우저 캐시로 인해 https로 리다이렉트 처리가 되지 않은 페이지를 보여줄 수 있으니, 크롬 기준으로 강력 새로고침을 실행시켜주세요. 브라우저 주소표시줄 좌측에 자물쇠가 활성화 된 모습을 확인하실 수 있게 됩니다. ~~주소가 ssltest2.fureweb.com인건 무시해주세요... -_-;~~  # 마치며 --- 우분투 서버를 생성하는 것 부터 Nginx 설치 및 설정, 그리고 SSL 적용하기까지 모든 과정에 대해 확인해 보았습니다. 혹시라도 본 포스트를 보고 막히는 부분이 있거나 설명이 부족한 부분이 있다면 언제든지 댓글이나 질문 부탁 드리겠습니다. 읽어주셔서 감사합니다! |
| json metadata | {"tags":["ssl","nginx","ubuntu","letsencrypt","vps"],"image":["https://steemitimages.com/DQmT5UFQLESiCLNpXWp4EAyr2sTi5dZBphFoLYBzQ8v6CUd/20170807-nginx-status.png","https://fureweb-com.github.io/assets/img/posts/20170807-set-host-ip.png","https://fureweb-com.github.io/assets/img/posts/20170807-certbot-process.png","https://fureweb-com.github.io/assets/img/posts/20170807-ssl-connection.png"],"links":["https://fureweb-com.github.io/blog/2017/08/07/applying-free-ssl-to-your-ubuntu-server-using-nginx-and-let'sencrypt-from-scratch.html","http://www.mingw.org/","https://www.chiark.greenend.org.uk/~sgtatham/putty/latest.html","//iwinv.kr","https://ssltest.fureweb.com"],"app":"steemit/0.1","format":"markdown"} |
| parent author | |
| parent permlink | ssl |
| permlink | nginx-ssl |
| title | 우분투에서 nginx 설치부터 무료 SSL 적용까지 |
| Transaction Info | Block #20082906/Trx f019c4342342d4505dd97bc5f0067324bae69857 |
View Raw JSON Data
{
"block": 20082906,
"op": [
"comment",
{
"author": "fureweb",
"body": "# 들어가기 전에\n---\n1. 아직 아래 link들에 대해 새창 열기 기능이 steemit에서 지원되지 않는 것 같습니다. 혹시라도 아래에 등장하는 링크를 클릭하시려면 우클릭 후 새창에서 열어 확인해 주세요! \n2. 또한 syntax highlighting이 제대로 지원되지 않는 것 같아서, 혹시라도 보기 불편하신 점이 있다면 아래의 링크를 통해 원본 게시글을 확인하실 수도 있습니다.\n[https://fureweb-com.github.io/blog/2017/08/07/applying-free-ssl-to-your-ubuntu-server-using-nginx-and-let'sencrypt-from-scratch.html](https://fureweb-com.github.io/blog/2017/08/07/applying-free-ssl-to-your-ubuntu-server-using-nginx-and-let'sencrypt-from-scratch.html)\n\n# 개요\n---\n\n본 튜토리얼은 다음의 순서대로 진행됩니다.\n\n- 우분투 VPS 생성\n- nginx 설치 및 설정\n- 도메인 Host IP 설정 및 확인\n- Certbot 설치 및 설정\n- 최종 확인\n- 마치며\n\nwindows 환경에서 아래 예제를 실행하셔야 하는 분들은 [mingw](http://www.mingw.org/), [putty](https://www.chiark.greenend.org.uk/~sgtatham/putty/latest.html), windows 10 bash 등을 통해 bash shell을 사용하실 수 있습니다. 본 포스트의 내용은 로컬머신에서 bash shell을 사용할 수 있음을 전제하여 작성했습니다. \n\n또한 vi를 사용할 수 있음을 전제하였으나, vi 사용이 어려우신 경우 nano에 대한 사용 방법을 검색하신 뒤 예제를 따라하시는 것을 추천드립니다. 그런 경우 아래에 표시한 vi 명령을 nano 명령으로 대신하시기 바랍니다.\n\n# 우분투 VPS 생성\n---\n\n자신이 사용할 수 있는 클라우드 서비스 내 VPS를 Ubuntu 16.04 LTS 버전으로 생성합니다. 저는 개인적으로 제가 알고있는 한 가장 간단하고 저렴하게 VPS를 생성할 수 있는 [iwinv.kr 클라우드 서비스](//iwinv.kr)를 이용하여 VPS를 생성하도록 하겠습니다.\n\n아래 예제에서는 Ubuntu 16.04 LTS(32bit) 버전으로 VPS를 생성하여 예제를 진행하게 됩니다. 편의상 root 계정으로 아래 예제를 수행하겠습니다.\n\n방화벽 설정과 관련된 부분은 이 포스팅의 주제를 벗어나므로, 가능하다면 VPS 생성 시 방화벽은 사용하지 않음으로 설정하셔서 예제를 실습하시기를 희망합니다.\n\n# nginx 설치 및 설정\n---\n\nssh 클라이언트를 이용하여 방금 막 생성한 VPS로 접속합니다. 접속 후 다음의 명령을 차례대로 실행하여 nginx를 서버에 설치한 뒤, 상태를 확인합니다. \n\n```bash\n$ ssh root@your-vps-ip\n# 로그인 완료 후 아래 명령을 실행합니다.\n$ apt-get update\n$ apt-get install nginx\n```\n\n설치 후 nginx 실행 상태를 다음과 같이 확인할 수 있습니다.\n\n```bash\n$ service nginx status\n```\n \n\n \n만약 현재 상태가 inactive라면, 다음의 명령을 통해 nginx 프로세스를 실행시킵니다.\n```bash\n$ service nginx start\n```\n \n설치가 완료된 후 브라우저를 통해 서버의 IP를 입력하여 페이지를 요청하면 welcome to nginx 페이지를 확인할 수 있습니다. 만약 welcome 페이지를 볼수 없다면 방화벽 설정 문제일 가능성이 있습니다. 방화벽과 관련된 부분은 클라우드 서비스 업체마다 설정하는 방법이 다를 수 있으니, 사용하시는 업체의 방화벽 설정 사용 설명을 통해 http 요청을 위한 80번 포트 및 https 요청을 위한 443 포트를 열어둘 수 있도록 합니다.\n\n보유하고 있는 도메인을 현재 VPS로 연결시키기 전, 해당 도메인을 통해 본 서버로 http 요청을 해 오는 경우에 대해 처리할 수 있도록 다음과 같이 nginx 설정을 수행합니다.\n\n```bash\n# 다음의 경로로 이동하여 ssltest.fureweb.com 도메인 요청에 대한 설정파일을 생성합니다.\n# 아래 경로에 등록된 conf 확장자를 가진 모든 파일이 nginx.conf파일에 의해 include 되며, \n# nginx가 실행될 때 본 디렉토리 내 파일들이 해석되게 됩니다.\n$ cd /etc/nginx/conf.d\n\n# 원하는 도메인 명으로 설정 파일을 하나 생성합니다.\n$ vi ssltest.fureweb.com.conf\n```\n \n아래의 내용을 ssltest.fureweb.com.conf 파일에 입력합니다.\n```bash\nserver {\n listen 80;\n server_name ssltest.fureweb.com;\n}\n```\n\n필요한 설정 파일을 생성하였다면, 다음의 명령을 통해 설정에 오타 등의 오류는 없는지 확인한 뒤 설정을 적용합니다.\n```bash\n# 설정 파일들에 오류가 없는지 확인한 뒤\n$ nginx -t\nnginx: the configuration file /etc/nginx/nginx.conf syntax is ok\nnginx: configuration file /etc/nginx/nginx.conf test is successful\n# 오류가 없다면 설정 파일 내용을 적용합니다.\n$ nginx -s reload\n```\n\n현재 VPS는 ssltest.fureweb.com에 대한 http 요청을 처리할 수 있는 상태가 되었습니다. 이제 자신이 가지고 있는 도메인 관리업체의 웹사이트에 로그인하여 해당 도메인에 대한 http 요청이 새로 만든 VPS로 전달될 수 있도록 별도의 설정을 진행해 보겠습니다.\n\n\n# 도메인 Host IP 설정 및 확인\n---\n\n본인이 보유하고있는 도메인을 관리하는 업체 사이트에 로그인하여, 자신이 보유한 도메인(또는 서브도메인)에 대한 Host IP를 설정합니다. \n\n예시로, 제가 보유하고 있는 ssltest.fureweb.com 이라는 서브도메인에 대한 http 요청이 방금 만든 VPS 서버로 연결되도록 설정을 추가하겠습니다. 도메인 등록 대행업체마다 설정하는 방법은 다를 수 있으니, 아래 사진을 참고하셔서 비슷한 메뉴에서 설정을 처리해주세요. 일반적으로 DNS 관리 메뉴의 하위 메뉴에서 설정하실 수 있습니다.\n\n\n\n만약 이전에 해당 도메인으로의 연결을 한 적이 있다면, 로컬 PC의 DNS캐시를 삭제해야합니다. 없다면 무시하셔도 됩니다.\n```bash\n# OSX 10.10.4 이상인 경우\n$ killall -HUP mDNSResponder\n\n# Windows 10을 사용하는 경우 - powershell 또는 cmd에서\nipconfig /flushdns\n\n# 죄송하지만 이 외에는 검색해 주세요 -_-;;\n```\n\n브라우저가 크롬이라면, 주소표시줄에 다음의 경로를 복사&붙여넣기하여 조회되는 화면에서 `Clear Host Cache` 버튼을 클릭하여 캐시를 삭제하세요. \n```url\nchrome://net-internals/#dns\n```\n\n모든 설정에 문제가 없다면, 이제 웹 브라우저를 통해 내가 가지고 있는 도메인에 대한 연결 요청이 방금 만든 VPS로 전달되게 됩니다. 단, 도메인 관리 업체마다 해당 적용값이 얼마나 빨리 반영되는지는 차이가 있을 수 있으므로, 충분한 시간을 두고 확인을 진행해 주세요. 통상 1~2분 내에는 적용되는 걸로 알고 있으나, 다른 업체는 어떤지 사용해보지 않아서 잘 모르겠네요. ^^;\n\n# Certbot 설치 및 설정\n---\n\n먼저 certbot을 설치합니다.\n```bash\n$ add-apt-repository ppa:certbot/certbot\n```\n<br>\n해당 저장소에 담긴 패키지 정보를 확인할 수 있도록 다음과 같이 업데이트를 수행합니다.\n```bash\n$ apt-get update\n```\n<br>\n`apt-get`을 이용하여 Certbot을 설치합니다.\n```bash\n$ apt-get install python-certbot-nginx\n```\n<br>\n설치된 certbot을 이용하여 ssltest.fureweb.com 도메인에 대한 SSL 인증서만 발급받도록 합니다.\n\n```bash\n$ certbot certonly --nginx -d ssltest.fureweb.com\n# 위 명령을 실행하면 해당 도메인을 관리하는 사람의 이메일 주소를 입력하라고 나옵니다. 입력해 주세요.\n# 만료일에 대한 정보를 보내줍니다.\n# 약관에는 동의(A)하셔야 하며,\n# EFF 재단과의 이메일을 공유할지 여부를 묻는 부분에 대해서는 원하시는대로 진행하시면 됩니다.\n```\n<br>\n아래와 같은 메시지들이 출력됩니다.\n\n\n위 명령을 수행하고 나면, 아래 경로에 총 5개의 파일이 생성되어 있음을 확인할 수 있습니다. (실제로는 /etc/letsencrypt/archive/도메인명 디렉토리 내 파일에 대한 심볼릭 링크 입니다.)\n```bash\n$ ls -al /etc/letsencrypt/live/ssltest.fureweb.com\ntotal 12\ndrwxr-xr-x 2 root root 4096 Aug 7 17:03 ./\ndrwx------ 4 root root 4096 Aug 7 16:56 ../\nlrwxrwxrwx 1 root root 43 Aug 7 17:03 cert.pem -> ../../archive/ssltest.fureweb.com/cert1.pem\nlrwxrwxrwx 1 root root 44 Aug 7 17:03 chain.pem -> ../../archive/ssltest.fureweb.com/chain1.pem\nlrwxrwxrwx 1 root root 48 Aug 7 17:03 fullchain.pem -> ../../archive/ssltest.fureweb.com/fullchain1.pem\nlrwxrwxrwx 1 root root 46 Aug 7 17:03 privkey.pem -> ../../archive/ssltest.fureweb.com/privkey1.pem\n-rw-r--r-- 1 root root 543 Aug 7 17:03 README\n```\n<br>\n이제 ssltest.fureweb.com 이라는 도메인에 대한 ssl 요청을 처리하기위해 필요한 인증서가 준비된 상태가 되었습니다. nginx가 이 인증서를 통해 https 요청을 처리할 수 있도록, 아까 설정했던 conf 파일을 아래와 같이 수정해 보겠습니다. \n\n```bash\n# 아래 명령어로 기존 설정파일 편집\n$ vi /etc/nginx/conf.d/ssltest.fureweb.com.conf\n\n# 다음과 같은 형태가 되어야합니다.\nserver {\n # http://ssltest.fureweb.com 요청에 대해\n # https://ssltest.fureweb.com 으로 리다이렉트 처리합니다. \n listen 80;\n server_name ssltest.fureweb.com;\n return 301 https://ssltest.fureweb.com;\n}\n\nserver {\n # https://ssltest.fureweb.com 으로의 요청을 리스닝합니다.\n listen 443;\n server_name ssltest.fureweb.com;\n\n ssl on;\n ssl_certificate /etc/letsencrypt/live/ssltest.fureweb.com/fullchain.pem;\n ssl_certificate_key /etc/letsencrypt/live/ssltest.fureweb.com/privkey.pem;\n\n ssl_protocols TLSv1 TLSv1.1 TLSv1.2;\n ssl_ciphers HIGH:!aNULL:!MD5;\n\n # 예제에서는 이 외에 별도 설정을 추가하지 않고, SSL 요청이 정상적으로 처리되는지만 확인합니다.\n # 일반적으로 아래에는 현재 도메인과 연결된 document_root 등에 대한 설정 기술하거나\n # proxy 설정을 통해 동적 처리가 가능한 다른 WAS와 연동하여 응답을 핸들링합니다.\n}\n\n```\n<br>\n위 설정을 저장한 뒤, conf 파일에 오타는 없는지 확인하고 문제가 없다면 설정 내용을 적용시킵니다.\n\n```bash\n# 설정 파일들에 오류가 없는지 확인한 뒤\n$ nginx -t\nnginx: the configuration file /etc/nginx/nginx.conf syntax is ok\nnginx: configuration file /etc/nginx/nginx.conf test is successful\n# 오류가 없다면 설정 파일 내용을 적용합니다.\n$ nginx -s reload\n```\n<br>\n\n# 최종 확인\n---\n\n브라우저의 주소창에 https://ssltest.fureweb.com를 입력하여 연결이 제대로 이뤄지는지 확인합니다. 브라우저 캐시로 인해 https로 리다이렉트 처리가 되지 않은 페이지를 보여줄 수 있으니, 크롬 기준으로 강력 새로고침을 실행시켜주세요.\n\n브라우저 주소표시줄 좌측에 자물쇠가 활성화 된 모습을 확인하실 수 있게 됩니다. \n~~주소가 ssltest2.fureweb.com인건 무시해주세요... -_-;~~\n\n\n\n\n# 마치며\n---\n\n우분투 서버를 생성하는 것 부터 Nginx 설치 및 설정, 그리고 SSL 적용하기까지 모든 과정에 대해 확인해 보았습니다. 혹시라도 본 포스트를 보고 막히는 부분이 있거나 설명이 부족한 부분이 있다면 언제든지 댓글이나 질문 부탁 드리겠습니다. \n\n읽어주셔서 감사합니다!",
"json_metadata": "{\"tags\":[\"ssl\",\"nginx\",\"ubuntu\",\"letsencrypt\",\"vps\"],\"image\":[\"https://steemitimages.com/DQmT5UFQLESiCLNpXWp4EAyr2sTi5dZBphFoLYBzQ8v6CUd/20170807-nginx-status.png\",\"https://fureweb-com.github.io/assets/img/posts/20170807-set-host-ip.png\",\"https://fureweb-com.github.io/assets/img/posts/20170807-certbot-process.png\",\"https://fureweb-com.github.io/assets/img/posts/20170807-ssl-connection.png\"],\"links\":[\"https://fureweb-com.github.io/blog/2017/08/07/applying-free-ssl-to-your-ubuntu-server-using-nginx-and-let'sencrypt-from-scratch.html\",\"http://www.mingw.org/\",\"https://www.chiark.greenend.org.uk/~sgtatham/putty/latest.html\",\"//iwinv.kr\",\"https://ssltest.fureweb.com\"],\"app\":\"steemit/0.1\",\"format\":\"markdown\"}",
"parent_author": "",
"parent_permlink": "ssl",
"permlink": "nginx-ssl",
"title": "우분투에서 nginx 설치부터 무료 SSL 적용까지"
}
],
"op_in_trx": 0,
"timestamp": "2018-02-22T04:23:51",
"trx_id": "f019c4342342d4505dd97bc5f0067324bae69857",
"trx_in_block": 6,
"virtual_op": 0
}2018/02/22 03:30:09
2018/02/22 03:30:09
| author | fureweb |
| body | Is this issue still haven't solved yet? |
| json metadata | {"tags":["steemit"],"app":"steemit/0.1"} |
| parent author | slickwilly |
| parent permlink | steemit-feature-request-or-links-to-open-in-a-new-tab |
| permlink | re-slickwilly-steemit-feature-request-or-links-to-open-in-a-new-tab-20180222t033008394z |
| title | |
| Transaction Info | Block #20081832/Trx 60428c1dbd02b7e695728e7acbe2f6926e1557b2 |
View Raw JSON Data
{
  "block": 20081832,
  "op": [
    "comment",
    {
      "author": "fureweb",
      "body": "Is this issue still haven't solved yet?",
      "json_metadata": "{\"tags\":[\"steemit\"],\"app\":\"steemit/0.1\"}",
      "parent_author": "slickwilly",
      "parent_permlink": "steemit-feature-request-or-links-to-open-in-a-new-tab",
      "permlink": "re-slickwilly-steemit-feature-request-or-links-to-open-in-a-new-tab-20180222t033008394z",
      "title": ""
    }
  ],
  "op_in_trx": 0,
  "timestamp": "2018-02-22T03:30:09",
  "trx_id": "60428c1dbd02b7e695728e7acbe2f6926e1557b2",
  "trx_in_block": 12,
  "virtual_op": 0
}2018/02/20 23:11:24
2018/02/20 23:11:24
| amount | 19.208 SBD |
| from | fureweb |
| memo | 3711e58f-207c-4cbb-a7ad-4da5641e2dfd |
| to | myupbit |
| Transaction Info | Block #20047865/Trx 05d2d823b8f4ee2a18388ba2500cd31baf70c4a5 |
View Raw JSON Data
{
  "block": 20047865,
  "op": [
    "transfer",
    {
      "amount": "19.208 SBD",
      "from": "fureweb",
      "memo": "3711e58f-207c-4cbb-a7ad-4da5641e2dfd",
      "to": "myupbit"
    }
  ],
  "op_in_trx": 0,
  "timestamp": "2018-02-20T23:11:24",
  "trx_id": "05d2d823b8f4ee2a18388ba2500cd31baf70c4a5",
  "trx_in_block": 19,
  "virtual_op": 0
}2018/02/20 23:09:30
2018/02/20 23:09:30
| id | follow |
| json | ["follow",{"follower":"fureweb","following":"myupbit","what":["blog"]}] |
| required auths | [] |
| required posting auths | ["fureweb"] |
| Transaction Info | Block #20047827/Trx ade81947d2726162efaf69780a4d0298aa584070 |
View Raw JSON Data
{
  "block": 20047827,
  "op": [
    "custom_json",
    {
      "id": "follow",
      "json": "[\"follow\",{\"follower\":\"fureweb\",\"following\":\"myupbit\",\"what\":[\"blog\"]}]",
      "required_auths": [],
      "required_posting_auths": [
        "fureweb"
      ]
    }
  ],
  "op_in_trx": 0,
  "timestamp": "2018-02-20T23:09:30",
  "trx_id": "ade81947d2726162efaf69780a4d0298aa584070",
  "trx_in_block": 55,
  "virtual_op": 0
}2018/01/29 11:12:03
2018/01/29 11:12:03
| delegatee | fureweb |
| delegator | steem |
| vesting shares | 23153.235632 VESTS |
| Transaction Info | Block #19400698/Trx 96eb1501e658061ede4746b5a06566f3040cd335 |
View Raw JSON Data
{
  "block": 19400698,
  "op": [
    "delegate_vesting_shares",
    {
      "delegatee": "fureweb",
      "delegator": "steem",
      "vesting_shares": "23153.235632 VESTS"
    }
  ],
  "op_in_trx": 0,
  "timestamp": "2018-01-29T11:12:03",
  "trx_id": "96eb1501e658061ede4746b5a06566f3040cd335",
  "trx_in_block": 23,
  "virtual_op": 0
}furewebclaimed reward balance: 19.208 SBD, 4.007 SP2018/01/29 09:09:09
furewebclaimed reward balance: 19.208 SBD, 4.007 SP
2018/01/29 09:09:09
| account | fureweb |
| reward sbd | 19.208 SBD |
| reward steem | 0.000 STEEM |
| reward vests | 6517.549011 VESTS |
| Transaction Info | Block #19398240/Trx fa3b38b2261221026406d6c6dd793e8a605a117c |
View Raw JSON Data
{
  "block": 19398240,
  "op": [
    "claim_reward_balance",
    {
      "account": "fureweb",
      "reward_sbd": "19.208 SBD",
      "reward_steem": "0.000 STEEM",
      "reward_vests": "6517.549011 VESTS"
    }
  ],
  "op_in_trx": 0,
  "timestamp": "2018-01-29T09:09:09",
  "trx_id": "fa3b38b2261221026406d6c6dd793e8a605a117c",
  "trx_in_block": 3,
  "virtual_op": 0
}furewebreceived 19.208 SBD, 4.007 SP author reward for @fureweb / eos-github-repository2018/01/29 04:32:45
furewebreceived 19.208 SBD, 4.007 SP author reward for @fureweb / eos-github-repository
2018/01/29 04:32:45
| author | fureweb |
| permlink | eos-github-repository |
| sbd payout | 19.208 SBD |
| steem payout | 0.000 STEEM |
| vesting payout | 6517.549011 VESTS |
| Transaction Info | Block #19392714/Virtual Operation #29 |
View Raw JSON Data
{
  "block": 19392714,
  "op": [
    "author_reward",
    {
      "author": "fureweb",
      "permlink": "eos-github-repository",
      "sbd_payout": "19.208 SBD",
      "steem_payout": "0.000 STEEM",
      "vesting_payout": "6517.549011 VESTS"
    }
  ],
  "op_in_trx": 0,
  "timestamp": "2018-01-29T04:32:45",
  "trx_id": "0000000000000000000000000000000000000000",
  "trx_in_block": 4294967295,
  "virtual_op": 29
}furewebupvoted (100.00%) @wans / the-shanghai-accord2018/01/26 08:08:57
furewebupvoted (100.00%) @wans / the-shanghai-accord
2018/01/26 08:08:57
| author | wans |
| permlink | the-shanghai-accord |
| voter | fureweb |
| weight | 10000 (100.00%) |
| Transaction Info | Block #19310689/Trx 257f9c6dcca012d2c6b3c0ec299bef1c277326d9 |
View Raw JSON Data
{
  "block": 19310689,
  "op": [
    "vote",
    {
      "author": "wans",
      "permlink": "the-shanghai-accord",
      "voter": "fureweb",
      "weight": 10000
    }
  ],
  "op_in_trx": 0,
  "timestamp": "2018-01-26T08:08:57",
  "trx_id": "257f9c6dcca012d2c6b3c0ec299bef1c277326d9",
  "trx_in_block": 7,
  "virtual_op": 0
}furewebupvoted (100.00%) @polonius79 / steem-22018/01/25 10:04:03
furewebupvoted (100.00%) @polonius79 / steem-2
2018/01/25 10:04:03
| author | polonius79 |
| permlink | steem-2 |
| voter | fureweb |
| weight | 10000 (100.00%) |
| Transaction Info | Block #19284200/Trx 6d8205fc7965737118883fba9ab38399a2a549db |
View Raw JSON Data
{
  "block": 19284200,
  "op": [
    "vote",
    {
      "author": "polonius79",
      "permlink": "steem-2",
      "voter": "fureweb",
      "weight": 10000
    }
  ],
  "op_in_trx": 0,
  "timestamp": "2018-01-25T10:04:03",
  "trx_id": "6d8205fc7965737118883fba9ab38399a2a549db",
  "trx_in_block": 37,
  "virtual_op": 0
}2018/01/24 09:48:54
2018/01/24 09:48:54
| author | fureweb |
| body | Thanks for your post. |
| json metadata | {"tags":["eos"],"app":"steemit/0.1"} |
| parent author | skenan |
| parent permlink | eos-development-for-beginners-webassembly |
| permlink | re-skenan-eos-development-for-beginners-webassembly-20180124t094852631z |
| title | |
| Transaction Info | Block #19255106/Trx c86aae2b92e8d19c700146d77e85c486b55094e8 |
View Raw JSON Data
{
  "block": 19255106,
  "op": [
    "comment",
    {
      "author": "fureweb",
      "body": "Thanks for your post.",
      "json_metadata": "{\"tags\":[\"eos\"],\"app\":\"steemit/0.1\"}",
      "parent_author": "skenan",
      "parent_permlink": "eos-development-for-beginners-webassembly",
      "permlink": "re-skenan-eos-development-for-beginners-webassembly-20180124t094852631z",
      "title": ""
    }
  ],
  "op_in_trx": 0,
  "timestamp": "2018-01-24T09:48:54",
  "trx_id": "c86aae2b92e8d19c700146d77e85c486b55094e8",
  "trx_in_block": 28,
  "virtual_op": 0
}furewebupvoted (100.00%) @skenan / eos-development-for-beginners-webassembly2018/01/24 09:48:30
furewebupvoted (100.00%) @skenan / eos-development-for-beginners-webassembly
2018/01/24 09:48:30
| author | skenan |
| permlink | eos-development-for-beginners-webassembly |
| voter | fureweb |
| weight | 10000 (100.00%) |
| Transaction Info | Block #19255098/Trx 26bab71988baf9886dfd974276426a6198d75c6a |
View Raw JSON Data
{
  "block": 19255098,
  "op": [
    "vote",
    {
      "author": "skenan",
      "permlink": "eos-development-for-beginners-webassembly",
      "voter": "fureweb",
      "weight": 10000
    }
  ],
  "op_in_trx": 0,
  "timestamp": "2018-01-24T09:48:30",
  "trx_id": "26bab71988baf9886dfd974276426a6198d75c6a",
  "trx_in_block": 22,
  "virtual_op": 0
}2018/01/23 20:34:45
2018/01/23 20:34:45
| author | n3r0 |
| permlink | re-eosio-block-one-and-mike-novogratz-s-galaxy-digital-announce-joint-venture-for-new-usd325-million-eos-io-fund-20180123t164933092z |
| voter | fureweb |
| weight | 10000 (100.00%) |
| Transaction Info | Block #19239231/Trx 6eb6577fdd54844bd278e70c9815a3eb72e2e142 |
View Raw JSON Data
{
  "block": 19239231,
  "op": [
    "vote",
    {
      "author": "n3r0",
      "permlink": "re-eosio-block-one-and-mike-novogratz-s-galaxy-digital-announce-joint-venture-for-new-usd325-million-eos-io-fund-20180123t164933092z",
      "voter": "fureweb",
      "weight": 10000
    }
  ],
  "op_in_trx": 0,
  "timestamp": "2018-01-23T20:34:45",
  "trx_id": "6eb6577fdd54844bd278e70c9815a3eb72e2e142",
  "trx_in_block": 15,
  "virtual_op": 0
}furewebpublished a new post: eos-github-repository2018/01/23 05:20:48
furewebpublished a new post: eos-github-repository
2018/01/23 05:20:48
| author | fureweb |
| body | 여러 기여자들이 있지만, 그 중 상위 9개 계정(code additions기준)에 대해 간단하게 조사를 해 보았습니다. 해당 링크는 https://github.com/EOSIO/eos/graphs/contributors?from=2017-04-02&to=2018-01-20&type=a 입니다.  #1 - bytemaster : 아시다시피 대니얼 라리머입니다! #2 - jgiszczak : 현재로서는 소속을 확인할 수 없었습니다. EOS 관련 코어 부분 코드에 많은 기여를 하고 있음만 확인할 수 있었습니다. #3 - nathanhourt : Follow My vote라는 회사의 CTO입니다. 현재 수행중인 비즈니스와는 직접적으로 연관은 없어 보이지만, 아마 EOS 플랫폼 위에서 돌아가는 DApp을 개발중인 것으로 추정될 뿐입니다. #4 - pmesnier : Object Computing(이하 OCI) 회사 소속 프로그래머입니다. #5 - ChristianDunst : 현재로서는 소속을 확인할 수 없었습니다. #6 - heifner : OCI 소속 프로그래머입니다. #7 - elmato : 현재로서는 소속을 확인할 수 없었습니다. 해당 개발자의 리파지토리를 봤을 때, 암호화폐 하드웨어 지갑 관련하여 작업한 커밋 내역들이 있음을 확인하였습니다. #8 - brianjohnson5972 : OCI 소속 프로그래머입니다. #9 - dskvr : 헝가리에서 거주하는 개발자로 확인되며, 소속은 따로 확인할 수 없었습니다. 그 외에 코드 기여 정도를 확인해 보았을 때, 아래 처럼 OCI라는 회사 계정과 연결되어있는 계정들의 커밋 이력을 확인할 수 있습니다.  이 OCI라는 회사에 대한 정보를 조금 더 확인해 보았습니다. Object Computing이라는 이 회사는 세인트루이스 주에 설립된 'We are software engineers.' 라는 간지나는 슬로건을 내걸고 있는, Software Engineering, IOT, Machine Learning, Blockchain Consulting 네가지 분야에 대한 업무를 수행하고 있는 회사로 확인되었습니다. 이 중 블록체인 컨설팅 메뉴 하단에서 확인할 수 있는 파트너 회사들을 봤을 때, block.one과 eos는 제외하고 ripe.io라는 Transparency in Every Byte of Food 라는 메시지를 슬로건으로 하고 있는 회사를 파트너로 두고 있는, EOS 플랫폼에 큰 기여를 하고 있는 회사로 확인되고 있습니다.  이 회사 소속 엔지니어들이 중요한 역할을 하고 있음을 간접적으로 확인할 수 있었습니다. |
| json metadata | {"tags":["eos","kr"],"image":["https://steemitimages.com/DQmQofZf6k8nvavR2hE6ypELQnhEdnzWq3FZTqbKsuBAzrf/addtion_top10.png","https://steemitimages.com/DQmetps5FJ4QcUZ8ivhthQvYTSKqZ9vE8Q2zGsz5DnZZoad/included_oci_keywords.png","https://steemitimages.com/DQmY7DSES5mBS4Gm9BXmmx6Ar39SdHeb1YA4Fb8PB2jWYDU/clients.png"],"links":["https://github.com/EOSIO/eos/graphs/contributors?from=2017-04-02&to=2018-01-20&type=a"],"app":"steemit/0.1","format":"markdown"} |
| parent author | |
| parent permlink | eos |
| permlink | eos-github-repository |
| title | 누가 주요 개발진인지 EOS의 GITHUB repository를 털어(?)보았습니다. |
| Transaction Info | Block #19220961/Trx b2646848b08b300ddd0b13de1806ef4ba679d9eb |
View Raw JSON Data
{
"block": 19220961,
"op": [
"comment",
{
"author": "fureweb",
"body": "여러 기여자들이 있지만, 그 중 상위 9개 계정(code additions기준)에 대해 간단하게 조사를 해 보았습니다.\n\n해당 링크는 https://github.com/EOSIO/eos/graphs/contributors?from=2017-04-02&to=2018-01-20&type=a 입니다.\n\n\n\n#1 - bytemaster : 아시다시피 대니얼 라리머입니다!\n\n#2 - jgiszczak : 현재로서는 소속을 확인할 수 없었습니다. EOS 관련 코어 부분 코드에 많은 기여를 하고 있음만 확인할 수 있었습니다.\n\n#3 - nathanhourt : Follow My vote라는 회사의 CTO입니다. 현재 수행중인 비즈니스와는 직접적으로 연관은 없어 보이지만, 아마 EOS 플랫폼 위에서 돌아가는 DApp을 개발중인 것으로 추정될 뿐입니다.\n\n#4 - pmesnier : Object Computing(이하 OCI) 회사 소속 프로그래머입니다.\n\n#5 - ChristianDunst : 현재로서는 소속을 확인할 수 없었습니다.\n\n#6 - heifner : OCI 소속 프로그래머입니다.\n\n#7 - elmato : 현재로서는 소속을 확인할 수 없었습니다. 해당 개발자의 리파지토리를 봤을 때, 암호화폐 하드웨어 지갑 관련하여 작업한 커밋 내역들이 있음을 확인하였습니다.\n\n#8 - brianjohnson5972 : OCI 소속 프로그래머입니다.\n\n#9 - dskvr : 헝가리에서 거주하는 개발자로 확인되며, 소속은 따로 확인할 수 없었습니다.\n\n그 외에 코드 기여 정도를 확인해 보았을 때, 아래 처럼 OCI라는 회사 계정과 연결되어있는 계정들의 커밋 이력을 확인할 수 있습니다.\n\n\n\n이 OCI라는 회사에 대한 정보를 조금 더 확인해 보았습니다.\n\nObject Computing이라는 이 회사는 세인트루이스 주에 설립된 'We are software engineers.' 라는 간지나는 슬로건을 내걸고 있는, Software Engineering, IOT, Machine Learning, Blockchain Consulting 네가지 분야에 대한 업무를 수행하고 있는 회사로 확인되었습니다.\n\n이 중 블록체인 컨설팅 메뉴 하단에서 확인할 수 있는 파트너 회사들을 봤을 때, block.one과 eos는 제외하고 ripe.io라는 Transparency in Every Byte of Food 라는 메시지를 슬로건으로 하고 있는 회사를 파트너로 두고 있는, EOS 플랫폼에 큰 기여를 하고 있는 회사로 확인되고 있습니다.\n\n\n\n이 회사 소속 엔지니어들이 중요한 역할을 하고 있음을 간접적으로 확인할 수 있었습니다.",
"json_metadata": "{\"tags\":[\"eos\",\"kr\"],\"image\":[\"https://steemitimages.com/DQmQofZf6k8nvavR2hE6ypELQnhEdnzWq3FZTqbKsuBAzrf/addtion_top10.png\",\"https://steemitimages.com/DQmetps5FJ4QcUZ8ivhthQvYTSKqZ9vE8Q2zGsz5DnZZoad/included_oci_keywords.png\",\"https://steemitimages.com/DQmY7DSES5mBS4Gm9BXmmx6Ar39SdHeb1YA4Fb8PB2jWYDU/clients.png\"],\"links\":[\"https://github.com/EOSIO/eos/graphs/contributors?from=2017-04-02&to=2018-01-20&type=a\"],\"app\":\"steemit/0.1\",\"format\":\"markdown\"}",
"parent_author": "",
"parent_permlink": "eos",
"permlink": "eos-github-repository",
"title": "누가 주요 개발진인지 EOS의 GITHUB repository를 털어(?)보았습니다."
}
],
"op_in_trx": 0,
"timestamp": "2018-01-23T05:20:48",
"trx_id": "b2646848b08b300ddd0b13de1806ef4ba679d9eb",
"trx_in_block": 43,
"virtual_op": 0
}kim0375upvoted (100.00%) @fureweb / eos-github-repository2018/01/23 04:19:09
kim0375upvoted (100.00%) @fureweb / eos-github-repository
2018/01/23 04:19:09
| author | fureweb |
| permlink | eos-github-repository |
| voter | kim0375 |
| weight | 10000 (100.00%) |
| Transaction Info | Block #19219728/Trx 035a09710642008e74666abafb4ed3d7348a8646 |
View Raw JSON Data
{
  "block": 19219728,
  "op": [
    "vote",
    {
      "author": "fureweb",
      "permlink": "eos-github-repository",
      "voter": "kim0375",
      "weight": 10000
    }
  ],
  "op_in_trx": 0,
  "timestamp": "2018-01-23T04:19:09",
  "trx_id": "035a09710642008e74666abafb4ed3d7348a8646",
  "trx_in_block": 4,
  "virtual_op": 0
}greene0upvoted (100.00%) @fureweb / eos-github-repository2018/01/23 01:42:24
greene0upvoted (100.00%) @fureweb / eos-github-repository
2018/01/23 01:42:24
| author | fureweb |
| permlink | eos-github-repository |
| voter | greene0 |
| weight | 10000 (100.00%) |
| Transaction Info | Block #19216596/Trx 4fc09885a599da75f1918fde9b7126dc06a9c8d8 |
View Raw JSON Data
{
  "block": 19216596,
  "op": [
    "vote",
    {
      "author": "fureweb",
      "permlink": "eos-github-repository",
      "voter": "greene0",
      "weight": 10000
    }
  ],
  "op_in_trx": 0,
  "timestamp": "2018-01-23T01:42:24",
  "trx_id": "4fc09885a599da75f1918fde9b7126dc06a9c8d8",
  "trx_in_block": 16,
  "virtual_op": 0
}2018/01/22 23:37:09
2018/01/22 23:37:09
| id | follow |
| json | ["follow",{"follower":"fureweb","following":"eosio","what":["blog"]}] |
| required auths | [] |
| required posting auths | ["fureweb"] |
| Transaction Info | Block #19214092/Trx 4e57c00ec27da84ec4627a48c279a71bd3cffa96 |
View Raw JSON Data
{
  "block": 19214092,
  "op": [
    "custom_json",
    {
      "id": "follow",
      "json": "[\"follow\",{\"follower\":\"fureweb\",\"following\":\"eosio\",\"what\":[\"blog\"]}]",
      "required_auths": [],
      "required_posting_auths": [
        "fureweb"
      ]
    }
  ],
  "op_in_trx": 0,
  "timestamp": "2018-01-22T23:37:09",
  "trx_id": "4e57c00ec27da84ec4627a48c279a71bd3cffa96",
  "trx_in_block": 44,
  "virtual_op": 0
}djowaupvoted (100.00%) @fureweb / eos-github-repository2018/01/22 18:01:45
djowaupvoted (100.00%) @fureweb / eos-github-repository
2018/01/22 18:01:45
| author | fureweb |
| permlink | eos-github-repository |
| voter | djowa |
| weight | 10000 (100.00%) |
| Transaction Info | Block #19207386/Trx 3728c29d119bbd102c7732ec4c816f7c5ab9412c |
View Raw JSON Data
{
  "block": 19207386,
  "op": [
    "vote",
    {
      "author": "fureweb",
      "permlink": "eos-github-repository",
      "voter": "djowa",
      "weight": 10000
    }
  ],
  "op_in_trx": 0,
  "timestamp": "2018-01-22T18:01:45",
  "trx_id": "3728c29d119bbd102c7732ec4c816f7c5ab9412c",
  "trx_in_block": 15,
  "virtual_op": 0
}storysharingupvoted (100.00%) @fureweb / eos-github-repository2018/01/22 16:43:12
storysharingupvoted (100.00%) @fureweb / eos-github-repository
2018/01/22 16:43:12
| author | fureweb |
| permlink | eos-github-repository |
| voter | storysharing |
| weight | 10000 (100.00%) |
| Transaction Info | Block #19205815/Trx 7d4f39d4a95de3949233a3452ecf4267e92dd1fd |
View Raw JSON Data
{
  "block": 19205815,
  "op": [
    "vote",
    {
      "author": "fureweb",
      "permlink": "eos-github-repository",
      "voter": "storysharing",
      "weight": 10000
    }
  ],
  "op_in_trx": 0,
  "timestamp": "2018-01-22T16:43:12",
  "trx_id": "7d4f39d4a95de3949233a3452ecf4267e92dd1fd",
  "trx_in_block": 34,
  "virtual_op": 0
}donghyunkimupvoted (100.00%) @fureweb / eos-github-repository2018/01/22 15:08:18
donghyunkimupvoted (100.00%) @fureweb / eos-github-repository
2018/01/22 15:08:18
| author | fureweb |
| permlink | eos-github-repository |
| voter | donghyunkim |
| weight | 10000 (100.00%) |
| Transaction Info | Block #19203918/Trx 74b06826bfdbef3745c7ca19c0413b0b1c0d6906 |
View Raw JSON Data
{
  "block": 19203918,
  "op": [
    "vote",
    {
      "author": "fureweb",
      "permlink": "eos-github-repository",
      "voter": "donghyunkim",
      "weight": 10000
    }
  ],
  "op_in_trx": 0,
  "timestamp": "2018-01-22T15:08:18",
  "trx_id": "74b06826bfdbef3745c7ca19c0413b0b1c0d6906",
  "trx_in_block": 7,
  "virtual_op": 0
}lylmupvoted (75.00%) @fureweb / eos-github-repository2018/01/22 14:46:12
lylmupvoted (75.00%) @fureweb / eos-github-repository
2018/01/22 14:46:12
| author | fureweb |
| permlink | eos-github-repository |
| voter | lylm |
| weight | 7500 (75.00%) |
| Transaction Info | Block #19203476/Trx 98546c1b76dff77d5eca80f7390ff87c15fd5cd5 |
View Raw JSON Data
{
  "block": 19203476,
  "op": [
    "vote",
    {
      "author": "fureweb",
      "permlink": "eos-github-repository",
      "voter": "lylm",
      "weight": 7500
    }
  ],
  "op_in_trx": 0,
  "timestamp": "2018-01-22T14:46:12",
  "trx_id": "98546c1b76dff77d5eca80f7390ff87c15fd5cd5",
  "trx_in_block": 6,
  "virtual_op": 0
}lestoupvoted (30.00%) @fureweb / eos-github-repository2018/01/22 14:12:36
lestoupvoted (30.00%) @fureweb / eos-github-repository
2018/01/22 14:12:36
| author | fureweb |
| permlink | eos-github-repository |
| voter | lesto |
| weight | 3000 (30.00%) |
| Transaction Info | Block #19202804/Trx 90d3fefa75113b79c4206598c1e5ccc833ebcb92 |
View Raw JSON Data
{
  "block": 19202804,
  "op": [
    "vote",
    {
      "author": "fureweb",
      "permlink": "eos-github-repository",
      "voter": "lesto",
      "weight": 3000
    }
  ],
  "op_in_trx": 0,
  "timestamp": "2018-01-22T14:12:36",
  "trx_id": "90d3fefa75113b79c4206598c1e5ccc833ebcb92",
  "trx_in_block": 34,
  "virtual_op": 0
}2018/01/22 13:36:36
2018/01/22 13:36:36
| author | fureweb |
| body | 감사합니다 :) |
| json metadata | {"tags":["eos"],"app":"steemit/0.1"} |
| parent author | jjangdol69 |
| parent permlink | re-fureweb-eos-github-repository-20180122t092448865z |
| permlink | re-jjangdol69-re-fureweb-eos-github-repository-20180122t133633661z |
| title | |
| Transaction Info | Block #19202085/Trx 7d3076e29e00a7e506e9e157d67c6ca2c86614ea |
View Raw JSON Data
{
  "block": 19202085,
  "op": [
    "comment",
    {
      "author": "fureweb",
      "body": "감사합니다 :)",
      "json_metadata": "{\"tags\":[\"eos\"],\"app\":\"steemit/0.1\"}",
      "parent_author": "jjangdol69",
      "parent_permlink": "re-fureweb-eos-github-repository-20180122t092448865z",
      "permlink": "re-jjangdol69-re-fureweb-eos-github-repository-20180122t133633661z",
      "title": ""
    }
  ],
  "op_in_trx": 0,
  "timestamp": "2018-01-22T13:36:36",
  "trx_id": "7d3076e29e00a7e506e9e157d67c6ca2c86614ea",
  "trx_in_block": 4,
  "virtual_op": 0
}Manabar
Voting Power100.00%
Downvote Power100.00%
Resource Credits100.00%
Reputation Progress9.24%
{
  "voting_manabar": {
    "current_mana": "9974486094",
    "last_update_time": 1743859593
  },
  "downvote_manabar": {
    "current_mana": 2493621524,
    "last_update_time": 1743859593
  },
  "rc_account": {
    "account": "fureweb",
    "max_rc": "11995235067",
    "max_rc_creation_adjustment": {
      "amount": "2020748973",
      "nai": "@@000000037",
      "precision": 6
    },
    "rc_manabar": {
      "current_mana": "12162981513",
      "last_update_time": 1743859593
    }
  }
}
Account Metadata
| POSTING JSON METADATA | |
| profile | {"profile_image":"https://us.v-cdn.net/6030588/uploads/userpics/593/pYJVW1N7GLYZ9.png","name":"fureweb","location":"Seoul","website":"https://fureweb-com.github.io"} |
| JSON METADATA | |
| profile | {"profile_image":"https://us.v-cdn.net/6030588/uploads/userpics/593/pYJVW1N7GLYZ9.png","name":"fureweb","location":"Seoul","website":"https://fureweb-com.github.io"} |
{
  "posting_json_metadata": {
    "profile": {
      "profile_image": "https://us.v-cdn.net/6030588/uploads/userpics/593/pYJVW1N7GLYZ9.png",
      "name": "fureweb",
      "location": "Seoul",
      "website": "https://fureweb-com.github.io"
    }
  },
  "json_metadata": {
    "profile": {
      "profile_image": "https://us.v-cdn.net/6030588/uploads/userpics/593/pYJVW1N7GLYZ9.png",
      "name": "fureweb",
      "location": "Seoul",
      "website": "https://fureweb-com.github.io"
    }
  }
}
Auth Keys
Owner
Single Signature
Public Keys
STM6nQ64PzsSeiqufnvCT1PUfnoFh9JhyCuYw2tPwFfXx5RpuytMB1/1
Active
Single Signature
Public Keys
STM5Qpzye4kiA4HjaP5CnqeYbcdPWGS78EzryBhPkfQPqqjSsCWKp1/1
Posting
Single Signature
Public Keys
STM7Hf9eLLqTmJkgcUqPkVh1mY8NDoiMwZobTEZwU6ydEDe5bMGQf1/1
Memo
STM8iPJ3gKittsH9Ae8uLDzXHzpv2n56dd9iKt8Z1P4TS775rsaAD
{
  "owner": {
    "account_auths": [],
    "key_auths": [
      [
        "STM6nQ64PzsSeiqufnvCT1PUfnoFh9JhyCuYw2tPwFfXx5RpuytMB",
        1
      ]
    ],
    "weight_threshold": 1
  },
  "active": {
    "account_auths": [],
    "key_auths": [
      [
        "STM5Qpzye4kiA4HjaP5CnqeYbcdPWGS78EzryBhPkfQPqqjSsCWKp",
        1
      ]
    ],
    "weight_threshold": 1
  },
  "posting": {
    "account_auths": [],
    "key_auths": [
      [
        "STM7Hf9eLLqTmJkgcUqPkVh1mY8NDoiMwZobTEZwU6ydEDe5bMGQf",
        1
      ]
    ],
    "weight_threshold": 1
  },
  "memo": "STM8iPJ3gKittsH9Ae8uLDzXHzpv2n56dd9iKt8Z1P4TS775rsaAD"
}
Witness Votes
0 / 30
No active witness votes.
[]