VOTING POWER100.00%
DOWNVOTE POWER100.00%
RESOURCE CREDITS100.00%
REPUTATION PROGRESS34.76%
Net Worth
0.044USD
STEEM
0.001STEEM
SBD
0.091SBD
Effective Power
3.365SP
├── Own SP
0.000SP
└── Incoming DelegationsDeleg
+3.365SP
Detailed Balance
| STEEM | ||
| balance | 0.001STEEM | STEEM |
| market_balance | 0.000STEEM | STEEM |
| savings_balance | 0.000STEEM | STEEM |
| reward_steem_balance | 0.000STEEM | STEEM |
| STEEM POWER | ||
| Own SP | 0.000SP | SP |
| Delegated Out | 0.000SP | SP |
| Delegation In | 3.365SP | SP |
| Effective Power | 3.365SP | SP |
| Reward SP (pending) | 0.152SP | SP |
| SBD | ||
| sbd_balance | 0.000SBD | SBD |
| sbd_conversions | 0.000SBD | SBD |
| sbd_market_balance | 0.000SBD | SBD |
| savings_sbd_balance | 0.000SBD | SBD |
| reward_sbd_balance | 0.091SBD | SBD |
{
  "balance": "0.001 STEEM",
  "savings_balance": "0.000 STEEM",
  "reward_steem_balance": "0.000 STEEM",
  "vesting_shares": "0.000000 VESTS",
  "delegated_vesting_shares": "0.000000 VESTS",
  "received_vesting_shares": "5472.996220 VESTS",
  "sbd_balance": "0.000 SBD",
  "savings_sbd_balance": "0.000 SBD",
  "reward_sbd_balance": "0.091 SBD",
  "conversions": []
}
Account Info
| name | yenterey |
| id | 1576431 |
| rank | 1,322,013 |
| reputation | 10929983210 |
| created | 2021-08-20T11:48:06 |
| recovery_account | steem |
| proxy | None |
| post_count | 75 |
| comment_count | 0 |
| lifetime_vote_count | 0 |
| witnesses_voted_for | 0 |
| last_post | 2021-10-11T10:15:15 |
| last_root_post | 2021-10-11T10:15:15 |
| last_vote_time | 2021-10-09T10:49:18 |
| proxied_vsf_votes | 0, 0, 0, 0 |
| can_vote | 1 |
| voting_power | 0 |
| delayed_votes | 0 |
| balance | 0.001 STEEM |
| savings_balance | 0.000 STEEM |
| sbd_balance | 0.000 SBD |
| savings_sbd_balance | 0.000 SBD |
| vesting_shares | 0.000000 VESTS |
| delegated_vesting_shares | 0.000000 VESTS |
| received_vesting_shares | 5472.996220 VESTS |
| reward_vesting_balance | 282.611736 VESTS |
| vesting_balance | 0.000 STEEM |
| vesting_withdraw_rate | 0.000000 VESTS |
| next_vesting_withdrawal | 1969-12-31T23:59:59 |
| withdrawn | 0 |
| to_withdraw | 0 |
| withdraw_routes | 0 |
| savings_withdraw_requests | 0 |
| last_account_recovery | 1970-01-01T00:00:00 |
| reset_account | null |
| last_owner_update | 1970-01-01T00:00:00 |
| last_account_update | 2021-10-05T17:52:03 |
| mined | No |
| sbd_seconds | 0 |
| sbd_last_interest_payment | 1970-01-01T00:00:00 |
| savings_sbd_last_interest_payment | 1970-01-01T00:00:00 |
{
  "id": 1576431,
  "name": "yenterey",
  "owner": {
    "weight_threshold": 1,
    "account_auths": [],
    "key_auths": [
      [
        "STM6RfgMyDSztDvyz3qFmbzv8yUPmTEwHYqyMbqmp9iy5AiToDe9r",
        1
      ]
    ]
  },
  "active": {
    "weight_threshold": 1,
    "account_auths": [],
    "key_auths": [
      [
        "STM6xiz3cccFRwXoJwYFDNfYEM1x27JruQrTe5MJeH7q1JRu2u5r7",
        1
      ]
    ]
  },
  "posting": {
    "weight_threshold": 1,
    "account_auths": [],
    "key_auths": [
      [
        "STM5Yypv6hULD8KWyxHZKRfTuyCJNNZ97yHDW9hLLZNfVMLgjxEyV",
        1
      ]
    ]
  },
  "memo_key": "STM51B2Gw423aJCxjt8XHvch1ZXghXzv3VQ58ugJvvozjgNkqhqgu",
  "json_metadata": "{}",
  "posting_json_metadata": "{\"profile\":{\"profile_image\":\"https://cdn.steemitimages.com/DQmW1y5YwXRWAE4J4UFHSP4jNe7Ju9jLmooJNgsXDzotyWB/ac07db51f450247f986c6291e72ec9fc-375.jpg\",\"version\":2}}",
  "proxy": "",
  "last_owner_update": "1970-01-01T00:00:00",
  "last_account_update": "2021-10-05T17:52:03",
  "created": "2021-08-20T11:48:06",
  "mined": false,
  "recovery_account": "steem",
  "last_account_recovery": "1970-01-01T00:00:00",
  "reset_account": "null",
  "comment_count": 0,
  "lifetime_vote_count": 0,
  "post_count": 75,
  "can_vote": true,
  "voting_manabar": {
    "current_mana": "5472996220",
    "last_update_time": 1769233872
  },
  "downvote_manabar": {
    "current_mana": 1368249055,
    "last_update_time": 1769233872
  },
  "voting_power": 0,
  "balance": "0.001 STEEM",
  "savings_balance": "0.000 STEEM",
  "sbd_balance": "0.000 SBD",
  "sbd_seconds": "0",
  "sbd_seconds_last_update": "1970-01-01T00:00:00",
  "sbd_last_interest_payment": "1970-01-01T00:00:00",
  "savings_sbd_balance": "0.000 SBD",
  "savings_sbd_seconds": "0",
  "savings_sbd_seconds_last_update": "1970-01-01T00:00:00",
  "savings_sbd_last_interest_payment": "1970-01-01T00:00:00",
  "savings_withdraw_requests": 0,
  "reward_sbd_balance": "0.091 SBD",
  "reward_steem_balance": "0.000 STEEM",
  "reward_vesting_balance": "282.611736 VESTS",
  "reward_vesting_steem": "0.152 STEEM",
  "vesting_shares": "0.000000 VESTS",
  "delegated_vesting_shares": "0.000000 VESTS",
  "received_vesting_shares": "5472.996220 VESTS",
  "vesting_withdraw_rate": "0.000000 VESTS",
  "next_vesting_withdrawal": "1969-12-31T23:59:59",
  "withdrawn": 0,
  "to_withdraw": 0,
  "withdraw_routes": 0,
  "curation_rewards": 0,
  "posting_rewards": 303,
  "proxied_vsf_votes": [
    0,
    0,
    0,
    0
  ],
  "witnesses_voted_for": 0,
  "last_post": "2021-10-11T10:15:15",
  "last_root_post": "2021-10-11T10:15:15",
  "last_vote_time": "2021-10-09T10:49:18",
  "post_bandwidth": 0,
  "pending_claimed_accounts": 0,
  "vesting_balance": "0.000 STEEM",
  "reputation": "10929983210",
  "transfer_history": [],
  "market_history": [],
  "post_history": [],
  "vote_history": [],
  "other_history": [],
  "witness_votes": [],
  "tags_usage": [],
  "guest_bloggers": [],
  "rank": 1322013
}
Withdraw Routes
| Incoming | Outgoing |
|---|---|
Empty | Empty |
{
  "incoming": [],
  "outgoing": []
}From Date
To Date
2026/01/24 05:51:12
2026/01/24 05:51:12
| delegator | steem |
| delegatee | yenterey |
| vesting shares | 5472.996220 VESTS |
| Transaction Info | Block #102878218/Trx cf9e4c07d4402db263f20d43b7dcc0a6ab8de4d3 |
View Raw JSON Data
{
  "trx_id": "cf9e4c07d4402db263f20d43b7dcc0a6ab8de4d3",
  "block": 102878218,
  "trx_in_block": 0,
  "op_in_trx": 0,
  "virtual_op": 0,
  "timestamp": "2026-01-24T05:51:12",
  "op": [
    "delegate_vesting_shares",
    {
      "delegator": "steem",
      "delegatee": "yenterey",
      "vesting_shares": "5472.996220 VESTS"
    }
  ]
}2024/12/18 01:00:03
2024/12/18 01:00:03
| delegator | steem |
| delegatee | yenterey |
| vesting shares | 5637.215417 VESTS |
| Transaction Info | Block #91324413/Trx 5400882ec8486063dd427cf090a307dbf49c724e |
View Raw JSON Data
{
  "trx_id": "5400882ec8486063dd427cf090a307dbf49c724e",
  "block": 91324413,
  "trx_in_block": 3,
  "op_in_trx": 0,
  "virtual_op": 0,
  "timestamp": "2024-12-18T01:00:03",
  "op": [
    "delegate_vesting_shares",
    {
      "delegator": "steem",
      "delegatee": "yenterey",
      "vesting_shares": "5637.215417 VESTS"
    }
  ]
}2023/11/14 16:39:15
2023/11/14 16:39:15
| delegator | steem |
| delegatee | yenterey |
| vesting shares | 5806.348949 VESTS |
| Transaction Info | Block #79878513/Trx 1f561ece7ff93172b85fc199f3436363f123f423 |
View Raw JSON Data
{
  "trx_id": "1f561ece7ff93172b85fc199f3436363f123f423",
  "block": 79878513,
  "trx_in_block": 11,
  "op_in_trx": 0,
  "virtual_op": 0,
  "timestamp": "2023-11-14T16:39:15",
  "op": [
    "delegate_vesting_shares",
    {
      "delegator": "steem",
      "delegatee": "yenterey",
      "vesting_shares": "5806.348949 VESTS"
    }
  ]
}2023/09/22 12:57:30
2023/09/22 12:57:30
| delegator | steem |
| delegatee | yenterey |
| vesting shares | 8743.257735 VESTS |
| Transaction Info | Block #78365936/Trx 12f8d61afeaa9fca6761678c6717e6196f4d3fc6 |
View Raw JSON Data
{
  "trx_id": "12f8d61afeaa9fca6761678c6717e6196f4d3fc6",
  "block": 78365936,
  "trx_in_block": 4,
  "op_in_trx": 0,
  "virtual_op": 0,
  "timestamp": "2023-09-22T12:57:30",
  "op": [
    "delegate_vesting_shares",
    {
      "delegator": "steem",
      "delegatee": "yenterey",
      "vesting_shares": "8743.257735 VESTS"
    }
  ]
}2022/11/03 20:05:00
2022/11/03 20:05:00
| delegator | steem |
| delegatee | yenterey |
| vesting shares | 8965.309173 VESTS |
| Transaction Info | Block #69123272/Trx 55cec2165b28fe34d36502e2898adb8d020f37bf |
View Raw JSON Data
{
  "trx_id": "55cec2165b28fe34d36502e2898adb8d020f37bf",
  "block": 69123272,
  "trx_in_block": 5,
  "op_in_trx": 0,
  "virtual_op": 0,
  "timestamp": "2022-11-03T20:05:00",
  "op": [
    "delegate_vesting_shares",
    {
      "delegator": "steem",
      "delegatee": "yenterey",
      "vesting_shares": "8965.309173 VESTS"
    }
  ]
}2022/01/10 12:18:39
2022/01/10 12:18:39
| delegator | steem |
| delegatee | yenterey |
| vesting shares | 9191.362153 VESTS |
| Transaction Info | Block #60610500/Trx 9c4d2efe38aa65d0ddc73a1b781decad4cd8bfb6 |
View Raw JSON Data
{
  "trx_id": "9c4d2efe38aa65d0ddc73a1b781decad4cd8bfb6",
  "block": 60610500,
  "trx_in_block": 26,
  "op_in_trx": 0,
  "virtual_op": 0,
  "timestamp": "2022-01-10T12:18:39",
  "op": [
    "delegate_vesting_shares",
    {
      "delegator": "steem",
      "delegatee": "yenterey",
      "vesting_shares": "9191.362153 VESTS"
    }
  ]
}2021/11/03 16:31:03
2021/11/03 16:31:03
| delegator | steem |
| delegatee | yenterey |
| vesting shares | 27737.281460 VESTS |
| Transaction Info | Block #58679861/Trx ecd9dc2eaec669d03ed56d3cca6cefb607a54a19 |
View Raw JSON Data
{
  "trx_id": "ecd9dc2eaec669d03ed56d3cca6cefb607a54a19",
  "block": 58679861,
  "trx_in_block": 0,
  "op_in_trx": 0,
  "virtual_op": 0,
  "timestamp": "2021-11-03T16:31:03",
  "op": [
    "delegate_vesting_shares",
    {
      "delegator": "steem",
      "delegatee": "yenterey",
      "vesting_shares": "27737.281460 VESTS"
    }
  ]
}prima-steemupvoted (100.00%) @yenterey / slow-cooker-thai-chicken-curry2021/10/17 07:07:39
prima-steemupvoted (100.00%) @yenterey / slow-cooker-thai-chicken-curry
2021/10/17 07:07:39
| voter | prima-steem |
| author | yenterey |
| permlink | slow-cooker-thai-chicken-curry |
| weight | 10000 (100.00%) |
| Transaction Info | Block #58182056/Trx 879c136fdc91ad31aa9e55eb60a27200463fc559 |
View Raw JSON Data
{
  "trx_id": "879c136fdc91ad31aa9e55eb60a27200463fc559",
  "block": 58182056,
  "trx_in_block": 6,
  "op_in_trx": 0,
  "virtual_op": 0,
  "timestamp": "2021-10-17T07:07:39",
  "op": [
    "vote",
    {
      "voter": "prima-steem",
      "author": "yenterey",
      "permlink": "slow-cooker-thai-chicken-curry",
      "weight": 10000
    }
  ]
}prima-steemupvoted (100.00%) @yenterey / macaroni-cheese-lasagne2021/10/17 07:07:27
prima-steemupvoted (100.00%) @yenterey / macaroni-cheese-lasagne
2021/10/17 07:07:27
| voter | prima-steem |
| author | yenterey |
| permlink | macaroni-cheese-lasagne |
| weight | 10000 (100.00%) |
| Transaction Info | Block #58182052/Trx c92c227f7a843a6427c2c5a6e765bdd56d283326 |
View Raw JSON Data
{
  "trx_id": "c92c227f7a843a6427c2c5a6e765bdd56d283326",
  "block": 58182052,
  "trx_in_block": 0,
  "op_in_trx": 0,
  "virtual_op": 0,
  "timestamp": "2021-10-17T07:07:27",
  "op": [
    "vote",
    {
      "voter": "prima-steem",
      "author": "yenterey",
      "permlink": "macaroni-cheese-lasagne",
      "weight": 10000
    }
  ]
}yentereypublished a new post: macaroni-cheese-lasagne2021/10/11 10:15:15
yentereypublished a new post: macaroni-cheese-lasagne
2021/10/11 10:15:15
| parent author | |
| parent permlink | whalepower |
| author | yenterey |
| permlink | macaroni-cheese-lasagne |
| title | Macaroni cheese lasagne |
| body | 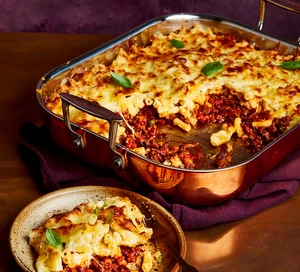 Ingredients 2 tbsp olive oil 400g lean beef mince 50g smoked pancetta, chopped ½ onion, finely chopped ½ celery stick, finely chopped ½ carrot, finely chopped 1 garlic clove, crushed 150ml red wine 1 tbsp tomato purée 400g can chopped tomatoes 250ml beef stock 2 bay leaves 1 rosemary sprig 1 tsp sugar 400g macaroni 80g grated mozzarella a few whole basil leaves, to serve (optional) For the cheese sauce 50g butter 50g plain flour 2 tsp English mustard 800ml semi-skimmed milk small grating of nutmeg 100g grated parmesan 100g mature cheddar, grated Method STEP 1 Heat half the oil in a large, heavy-based frying pan or casserole dish over a medium-high heat, and fry the mince and pancetta until golden. Transfer to a bowl using a slotted spoon and set aside. STEP 2 Add the remaining oil to the pan and fry the onion, celery and carrot for 10 mins until just softened. Add the garlic and cook for 1 min more, then return the meat to the pan.Tip in the wine, bring to a simmer and cook until the mixture is reduced by half. Stir in the tomato purée, tomatoes, stock, bay, rosemary and sugar. Simmer, covered, for 30 mins, then remove the lid and simmer uncovered for another 10 mins until reduced. The ragu will keep in the freezer for up to two months. Leave to cool completely before freezing. STEP 3 Meanwhile, make the cheese sauce. Melt the butter in a saucepan until foaming, then stir in the flour and cook for 2 mins. Stir in the mustard, then remove from the heat and gradually whisk in the milk in small additions. Return the pan to the heat and simmer for 5-6 mins, whisking continuously until thick and smooth. Add the nutmeg, parmesan and 80g of the cheddar, then season to taste. STEP 4 Heat the oven to 200C/180C fan/gas 6, and cook the macaroni in a large pan of boiling water for 5 mins. Drain, then stir into the cheese sauce. Spread the ragu into the base of a large rectangular baking dish (ours was 28 x 22 x 5cm), then spoon over the mac ‘n’ cheese and gently spread out using the back of a spoon to cover the ragu. Top with the remaining cheddar and the mozzarella, and bake for 25-30 mins until golden and bubbling. Leave to rest for 5 mins, then scatter over a few basil leaves to serve, if you like. |
| json metadata | {"tags":["whalepower"],"image":["https://cdn.steemitimages.com/DQmRBJ6543fwi26xZRmqfTR9eu3aGU8ynM1FjwyRTH4UsYz/Macaroni-cheese-lasagne-2966089.webp"],"app":"steemit/0.2","format":"markdown"} |
| Transaction Info | Block #58013974/Trx 8bd68f259288359121c9774c9cc92010056aeb2f |
View Raw JSON Data
{
"trx_id": "8bd68f259288359121c9774c9cc92010056aeb2f",
"block": 58013974,
"trx_in_block": 13,
"op_in_trx": 0,
"virtual_op": 0,
"timestamp": "2021-10-11T10:15:15",
"op": [
"comment",
{
"parent_author": "",
"parent_permlink": "whalepower",
"author": "yenterey",
"permlink": "macaroni-cheese-lasagne",
"title": "Macaroni cheese lasagne",
"body": "\n\n\nIngredients\n2 tbsp olive oil\n400g lean beef mince\n50g smoked pancetta, chopped\n½ onion, finely chopped\n½ celery stick, finely chopped\n½ carrot, finely chopped\n1 garlic clove, crushed\n150ml red wine\n1 tbsp tomato purée\n400g can chopped tomatoes\n250ml beef stock\n2 bay leaves\n1 rosemary sprig\n1 tsp sugar\n400g macaroni\n80g grated mozzarella\na few whole basil leaves, to serve (optional)\n\n\nFor the cheese sauce\n50g butter\n50g plain flour\n2 tsp English mustard\n800ml semi-skimmed milk\nsmall grating of nutmeg\n100g grated parmesan\n100g mature cheddar, grated\n\n\nMethod\nSTEP 1\nHeat half the oil in a large, heavy-based frying pan or casserole dish over a medium-high heat, and fry the mince and pancetta until golden. Transfer to a bowl using a slotted spoon and set aside.\n\nSTEP 2\nAdd the remaining oil to the pan and fry the onion, celery and carrot for 10 mins until just softened. Add the garlic and cook for 1 min more, then return the meat to the pan.Tip in the wine, bring to a simmer and cook until the mixture is reduced by half. Stir in the tomato purée, tomatoes, stock, bay, rosemary and sugar. Simmer, covered, for 30 mins, then remove the lid and simmer uncovered for another 10 mins until reduced. The ragu will keep in the freezer for up to two months. Leave to cool completely before freezing.\n\nSTEP 3\nMeanwhile, make the cheese sauce. Melt the butter in a saucepan until foaming, then stir in the flour and cook for 2 mins. Stir in the mustard, then remove from the heat and gradually whisk in the milk in small additions. Return the pan to the heat and simmer for 5-6 mins, whisking continuously until thick and smooth. Add the nutmeg, parmesan and 80g of the cheddar, then season to taste.\n\nSTEP 4\nHeat the oven to 200C/180C fan/gas 6, and cook the macaroni in a large pan of boiling water for 5 mins. Drain, then stir into the cheese sauce. Spread the ragu into the base of a large rectangular baking dish (ours was 28 x 22 x 5cm), then spoon over the mac ‘n’ cheese and gently spread out using the back of a spoon to cover the ragu. Top with the remaining cheddar and the mozzarella, and bake for 25-30 mins until golden and bubbling. Leave to rest for 5 mins, then scatter over a few basil leaves to serve, if you like.",
"json_metadata": "{\"tags\":[\"whalepower\"],\"image\":[\"https://cdn.steemitimages.com/DQmRBJ6543fwi26xZRmqfTR9eu3aGU8ynM1FjwyRTH4UsYz/Macaroni-cheese-lasagne-2966089.webp\"],\"app\":\"steemit/0.2\",\"format\":\"markdown\"}"
}
]
}yentereypublished a new post: slow-cooker-thai-chicken-curry2021/10/09 12:22:24
yentereypublished a new post: slow-cooker-thai-chicken-curry
2021/10/09 12:22:24
| parent author | |
| parent permlink | food |
| author | yenterey |
| permlink | slow-cooker-thai-chicken-curry |
| title | Slow cooker Thai chicken curry |
| body | 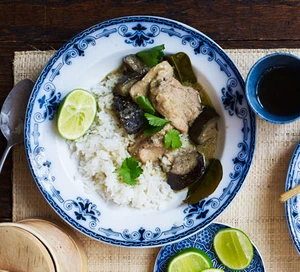 Ingredients 3 tbsp Thai green curry paste 400ml coconut milk 800g skinless and boneless chicken thighs, halved 1 aubergine, chopped 2 fresh lemongrass stalks, sliced thumbsized piece root ginger, sliced 6 lime leaves 1 tbsp brown sugar 1 tbsp fish sauce To serve cooked rice and fresh Thai basil leaves Method STEP 1 Gently fry the Thai green curry paste in a dry non-stick frying pan until fragrant, then pour in the coconut milk. Mix well until smooth then take off the heat. STEP 2 Put the chicken thighs into a slow cooker along with the aubergine, lemongrass stalks, sliced ginger, lime leaves, brown sugar and fish sauce. STEP 3 Pour over the curried coconut milk, give everything a good stir with a wooden spoon then cook on low for 6-8 hours. STEP 4 Serve with rice and Thai basil scattered over. |
| json metadata | {"tags":["food"],"image":["https://cdn.steemitimages.com/DQmNq6t616n25BB3N8yL39fUjFQEjMHrxxVAbDnNJx1gZnq/slow-cooker-thai-curry-cff684c.webp"],"app":"steemit/0.2","format":"markdown"} |
| Transaction Info | Block #57959269/Trx 8b794ef1e42196b04e4b8a87643cc56c0e5a0100 |
View Raw JSON Data
{
"trx_id": "8b794ef1e42196b04e4b8a87643cc56c0e5a0100",
"block": 57959269,
"trx_in_block": 4,
"op_in_trx": 0,
"virtual_op": 0,
"timestamp": "2021-10-09T12:22:24",
"op": [
"comment",
{
"parent_author": "",
"parent_permlink": "food",
"author": "yenterey",
"permlink": "slow-cooker-thai-chicken-curry",
"title": "Slow cooker Thai chicken curry",
"body": "\n\n\nIngredients\n3 tbsp Thai green curry paste\n400ml coconut milk\n800g skinless and boneless chicken thighs, halved\n1 aubergine, chopped\n2 fresh lemongrass stalks, sliced\nthumbsized piece root ginger, sliced\n6 lime leaves\n1 tbsp brown sugar\n1 tbsp fish sauce\nTo serve\ncooked rice and fresh Thai basil leaves\n\n\nMethod\nSTEP 1\nGently fry the Thai green curry paste in a dry non-stick frying pan until fragrant, then pour in the coconut milk. Mix well until smooth then take off the heat.\n\nSTEP 2\nPut the chicken thighs into a slow cooker along with the aubergine, lemongrass stalks, sliced ginger, lime leaves, brown sugar and fish sauce.\n\nSTEP 3\nPour over the curried coconut milk, give everything a good stir with a wooden spoon then cook on low for 6-8 hours.\n\nSTEP 4\nServe with rice and Thai basil scattered over.",
"json_metadata": "{\"tags\":[\"food\"],\"image\":[\"https://cdn.steemitimages.com/DQmNq6t616n25BB3N8yL39fUjFQEjMHrxxVAbDnNJx1gZnq/slow-cooker-thai-curry-cff684c.webp\"],\"app\":\"steemit/0.2\",\"format\":\"markdown\"}"
}
]
}yentereypublished a new post: slow-cooker-pork-shoulder2021/10/09 12:09:51
yentereypublished a new post: slow-cooker-pork-shoulder
2021/10/09 12:09:51
| parent author | |
| parent permlink | food |
| author | yenterey |
| permlink | slow-cooker-pork-shoulder |
| title | Slow cooker pork shoulder |
| body | 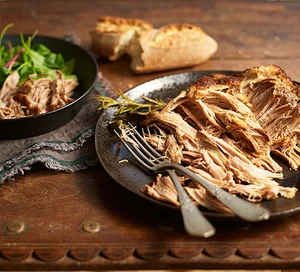 Ingredients 2 tbsp olive oil 1.5kg piece pork shoulder 250ml white wine 250ml chicken stock 4 bay leaves 2 sprigs of rosemary 1 tsp black peppercorns 1 garlic bulb Method STEP 1 Remove the fat from the pork shoulder (you can get your butcher to do this bit for you). Season the pork with salt and pepper then heat the oil in a large frying pan over a medium to high heat. Brown the pork shoulder on all sides then transfer to a slow cooker. Add all the other ingredients, then cook on low for 6-8 hours until the meat pulls apart when pressed with two forks. STEP 2 Remove the meat, place on a plate and shred it with two forks. Remove the herbs from the sauce and squeeze the garlic cloves out of their skins back into the pot. Put the meat back into its sauce for wonderfully tender and moist slow cooker pork. Serve as an alternative to your Sunday roast with roasted new potatoes, or with a big green salad, mustard and warmed baguettes. |
| json metadata | {"tags":["food"],"image":["https://cdn.steemitimages.com/DQmcDoYwDKdBGKR8G7NFNUQz6GSQGDbTh1z3kaTUumEBpVx/slow-cooker-pork-d4e4923.webp"],"app":"steemit/0.2","format":"markdown"} |
| Transaction Info | Block #57959022/Trx 7dc30127f6b1f3d0e9db2d832d39a74a69905b66 |
View Raw JSON Data
{
"trx_id": "7dc30127f6b1f3d0e9db2d832d39a74a69905b66",
"block": 57959022,
"trx_in_block": 0,
"op_in_trx": 0,
"virtual_op": 0,
"timestamp": "2021-10-09T12:09:51",
"op": [
"comment",
{
"parent_author": "",
"parent_permlink": "food",
"author": "yenterey",
"permlink": "slow-cooker-pork-shoulder",
"title": "Slow cooker pork shoulder",
"body": "\n\nIngredients\n2 tbsp olive oil\n1.5kg piece pork shoulder\n250ml white wine\n250ml chicken stock\n4 bay leaves\n2 sprigs of rosemary\n1 tsp black peppercorns\n1 garlic bulb\n\n\nMethod\nSTEP 1\nRemove the fat from the pork shoulder (you can get your butcher to do this bit for you). Season the pork with salt and pepper then heat the oil in a large frying pan over a medium to high heat. Brown the pork shoulder on all sides then transfer to a slow cooker. Add all the other ingredients, then cook on low for 6-8 hours until the meat pulls apart when pressed with two forks.\n\nSTEP 2\nRemove the meat, place on a plate and shred it with two forks. Remove the herbs from the sauce and squeeze the garlic cloves out of their skins back into the pot. Put the meat back into its sauce for wonderfully tender and moist slow cooker pork. Serve as an alternative to your Sunday roast with roasted new potatoes, or with a big green salad, mustard and warmed baguettes.",
"json_metadata": "{\"tags\":[\"food\"],\"image\":[\"https://cdn.steemitimages.com/DQmcDoYwDKdBGKR8G7NFNUQz6GSQGDbTh1z3kaTUumEBpVx/slow-cooker-pork-d4e4923.webp\"],\"app\":\"steemit/0.2\",\"format\":\"markdown\"}"
}
]
}yentereypublished a new post: slow-cooker-paella2021/10/09 11:49:57
yentereypublished a new post: slow-cooker-paella
2021/10/09 11:49:57
| parent author | |
| parent permlink | food |
| author | yenterey |
| permlink | slow-cooker-paella |
| title | Slow cooker paella |
| body | 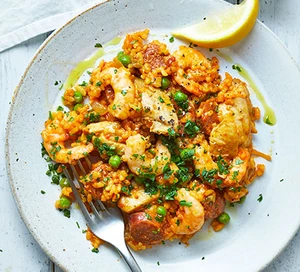 Ingredients 2 tbsp olive oil 4 skinless, boneless chicken thighs , thickly sliced 240g chorizo ring, sliced 1 onion , sliced 2 garlic cloves , crushed 1 tbsp sweet smoked paprika pinch of saffron (optional) 150ml white wine 300g paella rice 400g can chopped tomatoes 400ml chicken stock 150g frozen peas 200g fresh or frozen raw king prawns , peeled ½ small bunch of parsley , finely chopped lemon wedges and crusty bread, to serve (optional) Method STEP 1 Set the slow cooker to low. Heat the oil in a frying pan over a medium heat and fry the chicken and chorizo for 7-10 mins until golden. Transfer to the slow cooker using tongs. Add the onion to the pan and fry for 5-7 mins, or until just softened. Stir in the garlic, paprika and saffron, if using, and cook for 2 mins. Pour in the wine and simmer until reduced by half. Tip into the slow cooker with the rice, tomatoes and stock. Season. Cover and cook for 1½ hrs. STEP 2 Add the peas and prawns and cook for 30 mins more. Check the rice is tender; if not, cook for another 15-30 mins. STEP 3 Scatter over the parsley and serve with lemon wedges and crusty bread, if you like. |
| json metadata | {"tags":["food"],"image":["https://cdn.steemitimages.com/DQmVWPbRyzxiukobtAhLUiQi3fvhN8VHcUGJDYhZE9oAs53/paella-slow-cooker-dbe8a92.webp"],"app":"steemit/0.2","format":"markdown"} |
| Transaction Info | Block #57958631/Trx 781ba7c05f35ae194480be58bbafc39cf523a758 |
View Raw JSON Data
{
"trx_id": "781ba7c05f35ae194480be58bbafc39cf523a758",
"block": 57958631,
"trx_in_block": 1,
"op_in_trx": 0,
"virtual_op": 0,
"timestamp": "2021-10-09T11:49:57",
"op": [
"comment",
{
"parent_author": "",
"parent_permlink": "food",
"author": "yenterey",
"permlink": "slow-cooker-paella",
"title": "Slow cooker paella",
"body": "\n\n\nIngredients\n2 tbsp olive oil\n4 skinless, boneless chicken thighs , thickly sliced\n240g chorizo ring, sliced\n1 onion , sliced\n2 garlic cloves , crushed\n1 tbsp sweet smoked paprika\npinch of saffron (optional)\n150ml white wine\n300g paella rice\n400g can chopped tomatoes\n400ml chicken stock\n150g frozen peas\n200g fresh or frozen raw king prawns , peeled\n½ small bunch of parsley , finely chopped\nlemon wedges and crusty bread, to serve (optional)\n\n\nMethod\nSTEP 1\nSet the slow cooker to low. Heat the oil in a frying pan over a medium heat and fry the chicken and chorizo for 7-10 mins until golden. Transfer to the slow cooker using tongs. Add the onion to the pan and fry for 5-7 mins, or until just softened. Stir in the garlic, paprika and saffron, if using, and cook for 2 mins. Pour in the wine and simmer until reduced by half. Tip into the slow cooker with the rice, tomatoes and stock. Season. Cover and cook for 1½ hrs.\n\nSTEP 2\nAdd the peas and prawns and cook for 30 mins more. Check the rice is tender; if not, cook for another 15-30 mins.\n\nSTEP 3\nScatter over the parsley and serve with lemon wedges and crusty bread, if you like.",
"json_metadata": "{\"tags\":[\"food\"],\"image\":[\"https://cdn.steemitimages.com/DQmVWPbRyzxiukobtAhLUiQi3fvhN8VHcUGJDYhZE9oAs53/paella-slow-cooker-dbe8a92.webp\"],\"app\":\"steemit/0.2\",\"format\":\"markdown\"}"
}
]
}lorianny010upvoted (100.00%) @yenterey / slow-cooker-beef-topside-with-red-wine-gravy2021/10/09 11:04:33
lorianny010upvoted (100.00%) @yenterey / slow-cooker-beef-topside-with-red-wine-gravy
2021/10/09 11:04:33
| voter | lorianny010 |
| author | yenterey |
| permlink | slow-cooker-beef-topside-with-red-wine-gravy |
| weight | 10000 (100.00%) |
| Transaction Info | Block #57957725/Trx b7db93a8a1af4e01aba9357598c71a20c192bf0e |
View Raw JSON Data
{
  "trx_id": "b7db93a8a1af4e01aba9357598c71a20c192bf0e",
  "block": 57957725,
  "trx_in_block": 6,
  "op_in_trx": 0,
  "virtual_op": 0,
  "timestamp": "2021-10-09T11:04:33",
  "op": [
    "vote",
    {
      "voter": "lorianny010",
      "author": "yenterey",
      "permlink": "slow-cooker-beef-topside-with-red-wine-gravy",
      "weight": 10000
    }
  ]
}yentereypublished a new post: slow-cooker-beef-topside-with-red-wine-gravy2021/10/09 11:00:03
yentereypublished a new post: slow-cooker-beef-topside-with-red-wine-gravy
2021/10/09 11:00:03
| parent author | |
| parent permlink | food |
| author | yenterey |
| permlink | slow-cooker-beef-topside-with-red-wine-gravy |
| title | Slow cooker beef topside with red wine gravy |
| body | 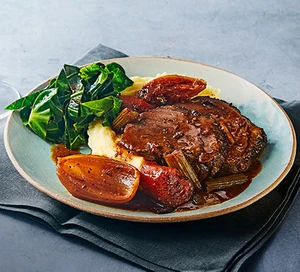 Ingredients 1 tbsp black peppercorns 1 tbsp English mustard powder 2 tbsp chopped rosemary 1 tsp celery seeds 15g dried porcini mushrooms 4 tbsp olive or rapeseed oil 1.6kg beef topside, cut into 12 slices 600ml hot beef stock 1 large carrot, peeled and roughly chopped 1 large onion, roughly chopped 2 sticks celery, roughly chopped 2 tbsp tomato purée 200ml red wine 1 tbsp cornflour (optional) Method STEP 1 Crush the peppercorns with the mustard, rosemary, celery seeds and a little salt using a pestle and mortar. Blitz the mushrooms to a fine powder in a food processor, then stir them in with 2 tbsp oil and rub all over the beef. Cover and chill for at least 1 hr, but overnight is best. STEP 2 Heat the slow cooker to high and pour in the stock. Heat 2 tbsp oil in a large pan and brown the beef, then put in the slow cooker skin-side up. Fry the carrot, onion and celery in the same pan over a medium-high heat for about 10 mins. Stir in the tomato purée and wine, scraping the bits off the bottom of the pan, then add this to the slow cooker. STEP 3 Cook on low for 6 hrs, then strain the liquid into a pan. Keep the meat and veg covered with foil so they stay warm. Bring the liquid to the boil, then simmer until reduced by a third and season. For thicker gravy, mix the cornflour with 2 tbsp water and whisk into the boiling liquid. Serve the beef with the gravy, along with some mash and greens. |
| json metadata | {"tags":["food"],"image":["https://cdn.steemitimages.com/DQmV6auLH7uD4oKuMK5NqMybeSUeRf9W151yBPDYAqTGayK/slow-cooker-beef-topside-with-red-wine-gravy-e2408a2.webp"],"app":"steemit/0.2","format":"markdown"} |
| Transaction Info | Block #57957635/Trx 50bec045a0589ae9aa2d50e865da838bf7177d77 |
View Raw JSON Data
{
"trx_id": "50bec045a0589ae9aa2d50e865da838bf7177d77",
"block": 57957635,
"trx_in_block": 7,
"op_in_trx": 0,
"virtual_op": 0,
"timestamp": "2021-10-09T11:00:03",
"op": [
"comment",
{
"parent_author": "",
"parent_permlink": "food",
"author": "yenterey",
"permlink": "slow-cooker-beef-topside-with-red-wine-gravy",
"title": "Slow cooker beef topside with red wine gravy",
"body": "\n\n\nIngredients\n1 tbsp black peppercorns\n1 tbsp English mustard powder\n2 tbsp chopped rosemary\n1 tsp celery seeds\n15g dried porcini mushrooms\n4 tbsp olive or rapeseed oil\n1.6kg beef topside, cut into 12 slices\n600ml hot beef stock\n1 large carrot, peeled and roughly chopped\n1 large onion, roughly chopped\n2 sticks celery, roughly chopped\n2 tbsp tomato purée\n200ml red wine\n1 tbsp cornflour (optional)\n\n\nMethod\nSTEP 1\nCrush the peppercorns with the mustard, rosemary, celery seeds and a little salt using a pestle and mortar. Blitz the mushrooms to a fine powder in a food processor, then stir them in with 2 tbsp oil and rub all over the beef. Cover and chill for at least 1 hr, but overnight is best.\n\nSTEP 2\nHeat the slow cooker to high and pour in the stock. Heat 2 tbsp oil in a large pan and brown the beef, then put in the slow cooker skin-side up. Fry the carrot, onion and celery in the same pan over a medium-high heat for about 10 mins. Stir in the tomato purée and wine, scraping the bits off the bottom of the pan, then add this to the slow cooker.\n\nSTEP 3\nCook on low for 6 hrs, then strain the liquid into a pan. Keep the meat and veg covered with foil so they stay warm. Bring the liquid to the boil, then simmer until reduced by a third and season. For thicker gravy, mix the cornflour with 2 tbsp water and whisk into the boiling liquid. Serve the beef with the gravy, along with some mash and greens.",
"json_metadata": "{\"tags\":[\"food\"],\"image\":[\"https://cdn.steemitimages.com/DQmV6auLH7uD4oKuMK5NqMybeSUeRf9W151yBPDYAqTGayK/slow-cooker-beef-topside-with-red-wine-gravy-e2408a2.webp\"],\"app\":\"steemit/0.2\",\"format\":\"markdown\"}"
}
]
}isaaaupvoted (100.00%) @yenterey / slow-cooker-beef-goulash2021/10/09 10:56:18
isaaaupvoted (100.00%) @yenterey / slow-cooker-beef-goulash
2021/10/09 10:56:18
| voter | isaaa |
| author | yenterey |
| permlink | slow-cooker-beef-goulash |
| weight | 10000 (100.00%) |
| Transaction Info | Block #57957562/Trx c508bbd604a9ff877a091f014ddec8e4679baf2a |
View Raw JSON Data
{
  "trx_id": "c508bbd604a9ff877a091f014ddec8e4679baf2a",
  "block": 57957562,
  "trx_in_block": 7,
  "op_in_trx": 0,
  "virtual_op": 0,
  "timestamp": "2021-10-09T10:56:18",
  "op": [
    "vote",
    {
      "voter": "isaaa",
      "author": "yenterey",
      "permlink": "slow-cooker-beef-goulash",
      "weight": 10000
    }
  ]
}yentereypublished a new post: slow-cooker-beef-goulash2021/10/09 10:51:45
yentereypublished a new post: slow-cooker-beef-goulash
2021/10/09 10:51:45
| parent author | |
| parent permlink | food |
| author | yenterey |
| permlink | slow-cooker-beef-goulash |
| title | Slow-cooker beef goulash |
| body | 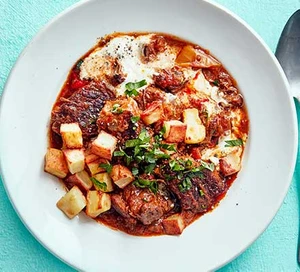 Ingredients 3 tbsp olive oil 2kg braising or stewing steak, cut into chunks 2 large onions, finely chopped 4 mixed peppers, cut into 4cm chunks 3 garlic cloves, crushed 2 tbsp flour 2 tsp caraway seeds 2 tsp hot smoked paprika 1 tbsp sweet smoked paprika, plus extra to serve 4 tbsp tomato purée 4 large tomatoes cut into small chunks 400-500ml beef stock 300ml soured cream small bunch of parsley, chopped Method STEP 1 Heat the slow cooker to low and heat 2 tbsp oil in a deep frying pan over a medium heat. Season and sear the beef in batches until brown on all sides. Transfer to a plate. STEP 2 Put the remaining oil in the pan and fry the onions for 10 mins until lightly golden. Add the peppers and garlic, and fry for another 5-10 mins, then stir in the flour and all of the spices. Cook for 2 mins more, then stir in the tomato purée, tomatoes and 400ml beef stock. Season well. Bring the mixture to a simmer, then tip into the slow cooker with the seared beef. Add the remaining stock, if needed, to cover the meat completely. Cover and cook for 6-7 hrs until the beef is tender and the sauce has thickened slightly. STEP 3 Season to taste, then swirl the soured cream and most of the parsley through the stew. Scatter over the remaining parsley and some sweet smoked paprika, then serve with small roasted potatoes or brown rice, if you like. |
| json metadata | {"tags":["food"],"image":["https://cdn.steemitimages.com/DQmYE6vpUsPjotYZFajmKRLJtDyrzUYaoxzCVuofx5MQUmR/goulash-8982fc1.webp"],"app":"steemit/0.2","format":"markdown"} |
| Transaction Info | Block #57957471/Trx 1ec3a43cbfa50ca8487792bd276577e8808d9a4c |
View Raw JSON Data
{
"trx_id": "1ec3a43cbfa50ca8487792bd276577e8808d9a4c",
"block": 57957471,
"trx_in_block": 5,
"op_in_trx": 0,
"virtual_op": 0,
"timestamp": "2021-10-09T10:51:45",
"op": [
"comment",
{
"parent_author": "",
"parent_permlink": "food",
"author": "yenterey",
"permlink": "slow-cooker-beef-goulash",
"title": "Slow-cooker beef goulash",
"body": "\n\n\nIngredients\n3 tbsp olive oil\n2kg braising or stewing steak, cut into chunks\n2 large onions, finely chopped\n4 mixed peppers, cut into 4cm chunks\n3 garlic cloves, crushed\n2 tbsp flour\n2 tsp caraway seeds\n2 tsp hot smoked paprika\n1 tbsp sweet smoked paprika, plus extra to serve\n4 tbsp tomato purée\n4 large tomatoes cut into small chunks\n400-500ml beef stock\n300ml soured cream\nsmall bunch of parsley, chopped\n\n\nMethod\nSTEP 1\nHeat the slow cooker to low and heat 2 tbsp oil in a deep frying pan over a medium heat. Season and sear the beef in batches until brown on all sides. Transfer to a plate.\n\nSTEP 2\nPut the remaining oil in the pan and fry the onions for 10 mins until lightly golden. Add the peppers and garlic, and fry for another 5-10 mins, then stir in the flour and all of the spices. Cook for 2 mins more, then stir in the tomato purée, tomatoes and 400ml beef stock. Season well. Bring the mixture to a simmer, then tip into the slow cooker with the seared beef. Add the remaining stock, if needed, to cover the meat completely. Cover and cook for 6-7 hrs until the beef is tender and the sauce has thickened slightly.\n\nSTEP 3\nSeason to taste, then swirl the soured cream and most of the parsley through the stew. Scatter over the remaining parsley and some sweet smoked paprika, then serve with small roasted potatoes or brown rice, if you like.",
"json_metadata": "{\"tags\":[\"food\"],\"image\":[\"https://cdn.steemitimages.com/DQmYE6vpUsPjotYZFajmKRLJtDyrzUYaoxzCVuofx5MQUmR/goulash-8982fc1.webp\"],\"app\":\"steemit/0.2\",\"format\":\"markdown\"}"
}
]
}yentereyupvoted (100.00%) @sasyasheema12 / dhe-green-garden-seafood2021/10/09 10:49:18
yentereyupvoted (100.00%) @sasyasheema12 / dhe-green-garden-seafood
2021/10/09 10:49:18
| voter | yenterey |
| author | sasyasheema12 |
| permlink | dhe-green-garden-seafood |
| weight | 10000 (100.00%) |
| Transaction Info | Block #57957422/Trx bca87107eabeb7174c4a738914e6a3134b6e4b8d |
View Raw JSON Data
{
  "trx_id": "bca87107eabeb7174c4a738914e6a3134b6e4b8d",
  "block": 57957422,
  "trx_in_block": 9,
  "op_in_trx": 0,
  "virtual_op": 0,
  "timestamp": "2021-10-09T10:49:18",
  "op": [
    "vote",
    {
      "voter": "yenterey",
      "author": "sasyasheema12",
      "permlink": "dhe-green-garden-seafood",
      "weight": 10000
    }
  ]
}yentereyupvoted (100.00%) @lorianny010 / wherein-1633776261432-s2021/10/09 10:49:12
yentereyupvoted (100.00%) @lorianny010 / wherein-1633776261432-s
2021/10/09 10:49:12
| voter | yenterey |
| author | lorianny010 |
| permlink | wherein-1633776261432-s |
| weight | 10000 (100.00%) |
| Transaction Info | Block #57957420/Trx a0c20fd7eda3b5a290d54af7b91c4687fee02e95 |
View Raw JSON Data
{
  "trx_id": "a0c20fd7eda3b5a290d54af7b91c4687fee02e95",
  "block": 57957420,
  "trx_in_block": 12,
  "op_in_trx": 0,
  "virtual_op": 0,
  "timestamp": "2021-10-09T10:49:12",
  "op": [
    "vote",
    {
      "voter": "yenterey",
      "author": "lorianny010",
      "permlink": "wherein-1633776261432-s",
      "weight": 10000
    }
  ]
}yentereyupvoted (100.00%) @qianlinghan / wherein-1633776293553-s2021/10/09 10:49:06
yentereyupvoted (100.00%) @qianlinghan / wherein-1633776293553-s
2021/10/09 10:49:06
| voter | yenterey |
| author | qianlinghan |
| permlink | wherein-1633776293553-s |
| weight | 10000 (100.00%) |
| Transaction Info | Block #57957418/Trx 11451e3b38b93ef3985364656aac1425bc10835b |
View Raw JSON Data
{
  "trx_id": "11451e3b38b93ef3985364656aac1425bc10835b",
  "block": 57957418,
  "trx_in_block": 13,
  "op_in_trx": 0,
  "virtual_op": 0,
  "timestamp": "2021-10-09T10:49:06",
  "op": [
    "vote",
    {
      "voter": "yenterey",
      "author": "qianlinghan",
      "permlink": "wherein-1633776293553-s",
      "weight": 10000
    }
  ]
}yentereyupvoted (100.00%) @arifps / recently-flower-seeds2021/10/09 10:49:00
yentereyupvoted (100.00%) @arifps / recently-flower-seeds
2021/10/09 10:49:00
| voter | yenterey |
| author | arifps |
| permlink | recently-flower-seeds |
| weight | 10000 (100.00%) |
| Transaction Info | Block #57957416/Trx d6064ca30d2440c6fd4423578a0b29f8698c6a61 |
View Raw JSON Data
{
  "trx_id": "d6064ca30d2440c6fd4423578a0b29f8698c6a61",
  "block": 57957416,
  "trx_in_block": 12,
  "op_in_trx": 0,
  "virtual_op": 0,
  "timestamp": "2021-10-09T10:49:00",
  "op": [
    "vote",
    {
      "voter": "yenterey",
      "author": "arifps",
      "permlink": "recently-flower-seeds",
      "weight": 10000
    }
  ]
}2021/10/09 10:48:54
2021/10/09 10:48:54
| voter | yenterey |
| author | crisvera |
| permlink | the-diary-game-08-10-21-or-pasando-una-manana-con-malestar-de-cuerpo-pero-una-tarde-con-la-familia-or-por-crisvera |
| weight | 10000 (100.00%) |
| Transaction Info | Block #57957414/Trx db56e10dc8edcd70c53f3547e5cc3e7b2d87ee3d |
View Raw JSON Data
{
  "trx_id": "db56e10dc8edcd70c53f3547e5cc3e7b2d87ee3d",
  "block": 57957414,
  "trx_in_block": 3,
  "op_in_trx": 0,
  "virtual_op": 0,
  "timestamp": "2021-10-09T10:48:54",
  "op": [
    "vote",
    {
      "voter": "yenterey",
      "author": "crisvera",
      "permlink": "the-diary-game-08-10-21-or-pasando-una-manana-con-malestar-de-cuerpo-pero-una-tarde-con-la-familia-or-por-crisvera",
      "weight": 10000
    }
  ]
}2021/10/09 10:48:48
2021/10/09 10:48:48
| voter | yenterey |
| author | shivamm |
| permlink | landscape |
| weight | 10000 (100.00%) |
| Transaction Info | Block #57957412/Trx 47b7139eba3c847b90755529bfd603b33a8b4a1a |
View Raw JSON Data
{
  "trx_id": "47b7139eba3c847b90755529bfd603b33a8b4a1a",
  "block": 57957412,
  "trx_in_block": 2,
  "op_in_trx": 0,
  "virtual_op": 0,
  "timestamp": "2021-10-09T10:48:48",
  "op": [
    "vote",
    {
      "voter": "yenterey",
      "author": "shivamm",
      "permlink": "landscape",
      "weight": 10000
    }
  ]
}yentereyupvoted (100.00%) @befair / institutions-say-they-want-defi2021/10/09 10:48:39
yentereyupvoted (100.00%) @befair / institutions-say-they-want-defi
2021/10/09 10:48:39
| voter | yenterey |
| author | befair |
| permlink | institutions-say-they-want-defi |
| weight | 10000 (100.00%) |
| Transaction Info | Block #57957409/Trx 87686016a1bbaa62c45e8af40c40edaee0aee049 |
View Raw JSON Data
{
  "trx_id": "87686016a1bbaa62c45e8af40c40edaee0aee049",
  "block": 57957409,
  "trx_in_block": 3,
  "op_in_trx": 0,
  "virtual_op": 0,
  "timestamp": "2021-10-09T10:48:39",
  "op": [
    "vote",
    {
      "voter": "yenterey",
      "author": "befair",
      "permlink": "institutions-say-they-want-defi",
      "weight": 10000
    }
  ]
}squbeupvoted (1.00%) @yenterey / slow-cooker-chicken-korma2021/10/08 18:50:51
squbeupvoted (1.00%) @yenterey / slow-cooker-chicken-korma
2021/10/08 18:50:51
| voter | sqube |
| author | yenterey |
| permlink | slow-cooker-chicken-korma |
| weight | 100 (1.00%) |
| Transaction Info | Block #57938359/Trx 98be13101141a491d95ae66e87a387b0b4274ba8 |
View Raw JSON Data
{
  "trx_id": "98be13101141a491d95ae66e87a387b0b4274ba8",
  "block": 57938359,
  "trx_in_block": 8,
  "op_in_trx": 0,
  "virtual_op": 0,
  "timestamp": "2021-10-08T18:50:51",
  "op": [
    "vote",
    {
      "voter": "sqube",
      "author": "yenterey",
      "permlink": "slow-cooker-chicken-korma",
      "weight": 100
    }
  ]
}yentereypublished a new post: slow-cooker-chicken-korma2021/10/08 18:50:45
yentereypublished a new post: slow-cooker-chicken-korma
2021/10/08 18:50:45
| parent author | |
| parent permlink | food |
| author | yenterey |
| permlink | slow-cooker-chicken-korma |
| title | Slow-cooker chicken korma |
| body |  Ingredients 2 garlic cloves thumb-sized piece ginger, peeled 2 large onions, finely chopped 2 tbsp vegetable oil 6 skinless chicken breasts, cut into large chunks 2 tbsp tomato purée 1 tsp ground cumin 1 tsp paprika 1 tsp turmeric 1 tsp ground coriander ¼-½ tsp chilli powder 2 tsp sugar 300ml chicken stock 150ml double cream 6 tbsp ground almonds toasted flaked almonds , coriander, basmati rice and naan breads, to serve (optional) Method STEP 1 Heat the slow cooker to low. Put the garlic, ginger and onions in a small blender with a splash of water and whizz to a paste. Heat the oil in a frying pan over a medium-high heat and sear the chicken all over. Remove from the pan and set aside, then add the onion paste. Fry over a medium heat for 10 mins until lightly golden. STEP 2 Stir in the tomato purée, spices, 1 tsp salt and the sugar, fry for 1 min until aromatic, then put the chicken back into the pan (with any resting juices) and add the stock. Stir and bring to a simmer, then spoon into the slow cooker. Cook on low for 5-6 hrs until the chicken is tender and cooked through. STEP 3 Stir through the cream and the ground almonds and bubble for 10 mins to reduce, if needed. Scatter with flaked almonds and coriander, if using, then serve with rice and naans, if you like. |
| json metadata | {"tags":["food"],"image":["https://cdn.steemitimages.com/DQmXWDUW3ZH5eDipDjAmpqwrhm3m8wbhhG48NQvaeQyRshQ/korma-5ffa80d.webp"],"app":"steemit/0.2","format":"markdown"} |
| Transaction Info | Block #57938357/Trx 13d8e7907f0b3111444a9a5aee97c3ad866ed7cb |
View Raw JSON Data
{
"trx_id": "13d8e7907f0b3111444a9a5aee97c3ad866ed7cb",
"block": 57938357,
"trx_in_block": 0,
"op_in_trx": 0,
"virtual_op": 0,
"timestamp": "2021-10-08T18:50:45",
"op": [
"comment",
{
"parent_author": "",
"parent_permlink": "food",
"author": "yenterey",
"permlink": "slow-cooker-chicken-korma",
"title": "Slow-cooker chicken korma",
"body": "\n\n\nIngredients\n2 garlic cloves\nthumb-sized piece ginger, peeled\n2 large onions, finely chopped\n2 tbsp vegetable oil\n6 skinless chicken breasts, cut into large chunks\n2 tbsp tomato purée\n1 tsp ground cumin\n1 tsp paprika\n1 tsp turmeric\n1 tsp ground coriander\n¼-½ tsp chilli powder\n2 tsp sugar\n300ml chicken stock\n150ml double cream\n6 tbsp ground almonds\ntoasted flaked almonds , coriander, basmati rice and naan breads, to serve (optional)\n\nMethod\nSTEP 1\nHeat the slow cooker to low. Put the garlic, ginger and onions in a small blender with a splash of water and whizz to a paste. Heat the oil in a frying pan over a medium-high heat and sear the chicken all over. Remove from the pan and set aside, then add the onion paste. Fry over a medium heat for 10 mins until lightly golden.\n\nSTEP 2\nStir in the tomato purée, spices, 1 tsp salt and the sugar, fry for 1 min until aromatic, then put the chicken back into the pan (with any resting juices) and add the stock. Stir and bring to a simmer, then spoon into the slow cooker. Cook on low for 5-6 hrs until the chicken is tender and cooked through.\n\nSTEP 3\nStir through the cream and the ground almonds and bubble for 10 mins to reduce, if needed. Scatter with flaked almonds and coriander, if using, then serve with rice and naans, if you like.",
"json_metadata": "{\"tags\":[\"food\"],\"image\":[\"https://cdn.steemitimages.com/DQmXWDUW3ZH5eDipDjAmpqwrhm3m8wbhhG48NQvaeQyRshQ/korma-5ffa80d.webp\"],\"app\":\"steemit/0.2\",\"format\":\"markdown\"}"
}
]
}yentereycustom json: notify2021/10/08 15:49:36
yentereycustom json: notify
2021/10/08 15:49:36
| required auths | [] |
| required posting auths | ["yenterey"] |
| id | notify |
| json | ["setLastRead",{"date":"2021-10-08T15:49:33"}] |
| Transaction Info | Block #57934755/Trx 505b354536fcc2061a4ce992835532a0160b09c7 |
View Raw JSON Data
{
  "trx_id": "505b354536fcc2061a4ce992835532a0160b09c7",
  "block": 57934755,
  "trx_in_block": 20,
  "op_in_trx": 0,
  "virtual_op": 0,
  "timestamp": "2021-10-08T15:49:36",
  "op": [
    "custom_json",
    {
      "required_auths": [],
      "required_posting_auths": [
        "yenterey"
      ],
      "id": "notify",
      "json": "[\"setLastRead\",{\"date\":\"2021-10-08T15:49:33\"}]"
    }
  ]
}squbeupvoted (1.00%) @yenterey / slow-cooker-chicken-chasseur2021/10/08 15:49:15
squbeupvoted (1.00%) @yenterey / slow-cooker-chicken-chasseur
2021/10/08 15:49:15
| voter | sqube |
| author | yenterey |
| permlink | slow-cooker-chicken-chasseur |
| weight | 100 (1.00%) |
| Transaction Info | Block #57934748/Trx 499252c1f256160f95b94eb7034dfaf03ea93b69 |
View Raw JSON Data
{
  "trx_id": "499252c1f256160f95b94eb7034dfaf03ea93b69",
  "block": 57934748,
  "trx_in_block": 22,
  "op_in_trx": 0,
  "virtual_op": 0,
  "timestamp": "2021-10-08T15:49:15",
  "op": [
    "vote",
    {
      "voter": "sqube",
      "author": "yenterey",
      "permlink": "slow-cooker-chicken-chasseur",
      "weight": 100
    }
  ]
}yentereypublished a new post: slow-cooker-chicken-chasseur2021/10/08 15:49:09
yentereypublished a new post: slow-cooker-chicken-chasseur
2021/10/08 15:49:09
| parent author | |
| parent permlink | food |
| author | yenterey |
| permlink | slow-cooker-chicken-chasseur |
| title | Slow cooker chicken chasseur |
| body | 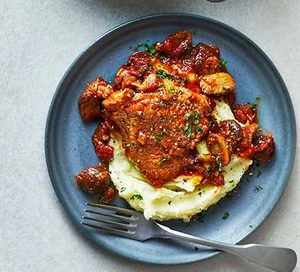 Ingredients 2 tbsp olive oil 4 chicken thighs, skin-on and bone-in 2 shallots or 1 onion, finely chopped 2 garlic cloves , crushed 200g baby chestnut mushrooms , halved 200ml white wine 1 tbsp tomato purée 200g chopped tomatoes 2 thyme sprigs 1 bay leaf 400ml hot chicken stock small handful of parsley , finely chopped, to serve mash , jackets, pasta or roast potatoes, to serve (optional) Method STEP 1 Heat the slow cooker to low. Put the oil in a frying pan over a medium-high heat. Season the chicken and fry, skin-side down, for 4-5 mins until crisp. Turn and fry for 3-4 mins more until golden all over. Put on a plate and set aside. STEP 2 Tip the shallots into the pan and fry for 10 mins over a medium heat until soft. Add the garlic and mushrooms and fry for 10 mins more until the mushrooms are golden. Pour in the wine and bubble for a few minutes until reduced by half. Stir in the tomato purée, chopped tomatoes and herbs. Season well and bring to a simmer. STEP 3 Tip the sauce into the slow cooker, and top with the chicken thighs (in one layer, if possible). Pour over the chicken stock until the chicken thighs are covered, adding a little more if needed. Cover and cook for 6-8 hrs until the sauce has thickened and the chicken is tender. Transfer the chicken to a plate and bubble the sauce for a few minutes more with the lid off, if you prefer a thicker sauce (you can only do this if there’s a reduce function on the slow cooker. If not, pour the sauce into a pan and simmer until reduced). Remove the skin from the chicken before serving, if you prefer. STEP 4 Sprinkle over the parsley and serve the chicken and sauce with buttery mash, jackets, pasta or small roast potatoes, if you like. |
| json metadata | {"tags":["food"],"image":["https://cdn.steemitimages.com/DQmbbQc8BuDkRQEWvVBiBhWtFKuHBH2vg19E6uW39haq5ga/chicken-chasseur-7a5a984.webp"],"app":"steemit/0.2","format":"markdown"} |
| Transaction Info | Block #57934746/Trx efa341ba5a2e42b64c74ecaa5342c60966cd2583 |
View Raw JSON Data
{
"trx_id": "efa341ba5a2e42b64c74ecaa5342c60966cd2583",
"block": 57934746,
"trx_in_block": 14,
"op_in_trx": 0,
"virtual_op": 0,
"timestamp": "2021-10-08T15:49:09",
"op": [
"comment",
{
"parent_author": "",
"parent_permlink": "food",
"author": "yenterey",
"permlink": "slow-cooker-chicken-chasseur",
"title": "Slow cooker chicken chasseur",
"body": "\n\n\nIngredients\n2 tbsp olive oil\n4 chicken thighs, skin-on and bone-in\n2 shallots or 1 onion, finely chopped\n2 garlic cloves , crushed\n200g baby chestnut mushrooms , halved\n200ml white wine\n1 tbsp tomato purée\n200g chopped tomatoes\n2 thyme sprigs\n1 bay leaf\n400ml hot chicken stock\nsmall handful of parsley , finely chopped, to serve\nmash , jackets, pasta or roast potatoes, to serve (optional)\n\n\nMethod\nSTEP 1\nHeat the slow cooker to low. Put the oil in a frying pan over a medium-high heat. Season the chicken and fry, skin-side down, for 4-5 mins until crisp. Turn and fry for 3-4 mins more until golden all over. Put on a plate and set aside.\n\nSTEP 2\nTip the shallots into the pan and fry for 10 mins over a medium heat until soft. Add the garlic and mushrooms and fry for 10 mins more until the mushrooms are golden. Pour in the wine and bubble for a few minutes until reduced by half. Stir in the tomato purée, chopped tomatoes and herbs. Season well and bring to a simmer. \n\nSTEP 3\nTip the sauce into the slow cooker, and top with the chicken thighs (in one layer, if possible). Pour over the chicken stock until the chicken thighs are covered, adding a little more if needed. Cover and cook for 6-8 hrs until the sauce has thickened and the chicken is tender. Transfer the chicken to a plate and bubble the sauce for a few minutes more with the lid off, if you prefer a thicker sauce (you can only do this if there’s a reduce function on the slow cooker. If not, pour the sauce into a pan and simmer until reduced). Remove the skin from the chicken before serving, if you prefer. \n\nSTEP 4\nSprinkle over the parsley and serve the chicken and sauce with buttery mash, jackets, pasta or small roast potatoes, if you like.",
"json_metadata": "{\"tags\":[\"food\"],\"image\":[\"https://cdn.steemitimages.com/DQmbbQc8BuDkRQEWvVBiBhWtFKuHBH2vg19E6uW39haq5ga/chicken-chasseur-7a5a984.webp\"],\"app\":\"steemit/0.2\",\"format\":\"markdown\"}"
}
]
}yentereypublished a new post: slow-cooker-pulled-chicken2021/10/08 15:02:09
yentereypublished a new post: slow-cooker-pulled-chicken
2021/10/08 15:02:09
| parent author | |
| parent permlink | food |
| author | yenterey |
| permlink | slow-cooker-pulled-chicken |
| title | Slow cooker pulled chicken |
| body | 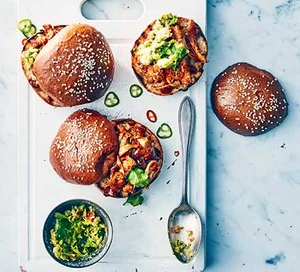 Ingredients 2 tbsp vegetable or rapeseed oil 10-12 boneless, skinless chicken thighs 2 red onions, halved and sliced 2 garlic cloves, crushed 2 tsp paprika 2 tbsp chipotle paste 250ml passata 100g barbecue sauce 1 tbsp light brown soft sugar 1 lime, juiced burger buns, taco shells, jacket potatoes or rice; coriander leaves; deseeded and sliced chillies, and guacamole, to serve (optional) Method STEP 1 Heat the slow cooker to low and heat 1 tbsp oil in a pan. Brown the chicken in batches, transferring it to the slow cooker as you go. Add the remaining oil to the pan and fry the onions for 5 mins, or until just softened, then stir in the garlic and paprika and cook for another minute. Tip into the slow cooker, then swirl 100ml water around the pan and pour this in as well. STEP 2 Add the chipotle, passata, barbecue sauce, sugar and lime juice, then season and stir. Cover and cook for 6-8 hrs until the chicken is really tender. Using two forks, shred the chicken through the sauce. Serve in buns, taco shells, jacket potatoes or over rice, with coriander leaves, chillies and guacamole, if you like. |
| json metadata | {"tags":["food"],"image":["https://cdn.steemitimages.com/DQmSoKLcT5JoPfYg8KAhDUxpsPBvaS6mzCADVugm5uNGwfx/pulled-chicken-ecb7673.webp"],"app":"steemit/0.2","format":"markdown"} |
| Transaction Info | Block #57933814/Trx 83d68f341999defe6dbce0cf27f276401f671301 |
View Raw JSON Data
{
"trx_id": "83d68f341999defe6dbce0cf27f276401f671301",
"block": 57933814,
"trx_in_block": 0,
"op_in_trx": 0,
"virtual_op": 0,
"timestamp": "2021-10-08T15:02:09",
"op": [
"comment",
{
"parent_author": "",
"parent_permlink": "food",
"author": "yenterey",
"permlink": "slow-cooker-pulled-chicken",
"title": "Slow cooker pulled chicken",
"body": "\n\n\nIngredients\n2 tbsp vegetable or rapeseed oil\n10-12 boneless, skinless chicken thighs\n2 red onions, halved and sliced\n2 garlic cloves, crushed\n2 tsp paprika\n2 tbsp chipotle paste\n250ml passata\n100g barbecue sauce\n1 tbsp light brown soft sugar\n1 lime, juiced\nburger buns, taco shells, jacket potatoes or rice; coriander leaves; deseeded and sliced chillies, and guacamole, to serve (optional)\n\n\nMethod\nSTEP 1\nHeat the slow cooker to low and heat 1 tbsp oil in a pan. Brown the chicken in batches, transferring it to the slow cooker as you go. Add the remaining oil to the pan and fry the onions for 5 mins, or until just softened, then stir in the garlic and paprika and cook for another minute. Tip into the slow cooker, then swirl 100ml water around the pan and pour this in as well.\n\nSTEP 2\nAdd the chipotle, passata, barbecue sauce, sugar and lime juice, then season and stir. Cover and cook for 6-8 hrs until the chicken is really tender. Using two forks, shred the chicken through the sauce. Serve in buns, taco shells, jacket potatoes or over rice, with coriander leaves, chillies and guacamole, if you like.",
"json_metadata": "{\"tags\":[\"food\"],\"image\":[\"https://cdn.steemitimages.com/DQmSoKLcT5JoPfYg8KAhDUxpsPBvaS6mzCADVugm5uNGwfx/pulled-chicken-ecb7673.webp\"],\"app\":\"steemit/0.2\",\"format\":\"markdown\"}"
}
]
}yentereypublished a new post: slow-cooker-leg-of-lamb2021/10/08 14:11:21
yentereypublished a new post: slow-cooker-leg-of-lamb
2021/10/08 14:11:21
| parent author | |
| parent permlink | food |
| author | yenterey |
| permlink | slow-cooker-leg-of-lamb |
| title | Slow cooker leg of lamb |
| body | 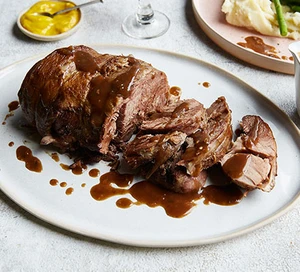 Ingredients 2 tbsp olive oil 1.3kg boneless leg of lamb , tied 30g unsalted butter 2 tbsp plain flour 300ml lamb stock 200ml red wine 2 red onions , cut into wedges 2 garlic cloves , sliced 5 sprigs of thyme 5 sprigs of rosemary mashed potatoes and steamed veg, to serve Method STEP 1 Heat the oil in a large non-stick frying pan. Add the lamb and brown on each side for 4-5 mins. Set the slow cooker to low. Melt the butter in a saucepan until foaming, then stir through the flour. Whisk in the stock gradually until incorporated, add the wine and bring to the boil. Set aside. STEP 2 Put the onion, garlic, thyme and rosemary into your slow cooker and sit the lamb on top. Pour over the lamb gravy. Put the lid on and cook for 8 hrs or until soft and tender. STEP 3 Remove the lamb and set, covered, on a plate. Strain the liquid into a pan and simmer until slightly thickened. Serve the lamb thickly sliced or shredded (it'll be quite soft) with mashed potatoes, green veg and the gravy. |
| json metadata | {"tags":["food"],"image":["https://cdn.steemitimages.com/DQmXFVseDfTT5CGcUVvqBHMmjmxkAjqY58weVz8UsUmJrU8/slow-cooker-lamb-e452d91.webp"],"app":"steemit/0.2","format":"markdown"} |
| Transaction Info | Block #57932805/Trx 259f63d73106c61e577f50f5207c9bc9db08559c |
View Raw JSON Data
{
"trx_id": "259f63d73106c61e577f50f5207c9bc9db08559c",
"block": 57932805,
"trx_in_block": 14,
"op_in_trx": 0,
"virtual_op": 0,
"timestamp": "2021-10-08T14:11:21",
"op": [
"comment",
{
"parent_author": "",
"parent_permlink": "food",
"author": "yenterey",
"permlink": "slow-cooker-leg-of-lamb",
"title": "Slow cooker leg of lamb",
"body": "\n\n\nIngredients\n2 tbsp olive oil\n1.3kg boneless leg of lamb , tied\n30g unsalted butter\n2 tbsp plain flour\n300ml lamb stock\n200ml red wine\n2 red onions , cut into wedges\n2 garlic cloves , sliced\n5 sprigs of thyme\n5 sprigs of rosemary\nmashed potatoes and steamed veg, to serve\n\n\nMethod\nSTEP 1\nHeat the oil in a large non-stick frying pan. Add the lamb and brown on each side for 4-5 mins. Set the slow cooker to low. Melt the butter in a saucepan until foaming, then stir through the flour. Whisk in the stock gradually until incorporated, add the wine and bring to the boil. Set aside. \n\nSTEP 2\nPut the onion, garlic, thyme and rosemary into your slow cooker and sit the lamb on top. Pour over the lamb gravy. Put the lid on and cook for 8 hrs or until soft and tender.\n\nSTEP 3\nRemove the lamb and set, covered, on a plate. Strain the liquid into a pan and simmer until slightly thickened. Serve the lamb thickly sliced or shredded (it'll be quite soft) with mashed potatoes, green veg and the gravy.",
"json_metadata": "{\"tags\":[\"food\"],\"image\":[\"https://cdn.steemitimages.com/DQmXFVseDfTT5CGcUVvqBHMmjmxkAjqY58weVz8UsUmJrU8/slow-cooker-lamb-e452d91.webp\"],\"app\":\"steemit/0.2\",\"format\":\"markdown\"}"
}
]
}squbeupvoted (1.00%) @yenterey / slow-cooker-vegetable-stew-with-cheddar-dumplings2021/10/08 13:58:03
squbeupvoted (1.00%) @yenterey / slow-cooker-vegetable-stew-with-cheddar-dumplings
2021/10/08 13:58:03
| voter | sqube |
| author | yenterey |
| permlink | slow-cooker-vegetable-stew-with-cheddar-dumplings |
| weight | 100 (1.00%) |
| Transaction Info | Block #57932540/Trx e64399b82b23291529966831c8b59cffdc33937d |
View Raw JSON Data
{
  "trx_id": "e64399b82b23291529966831c8b59cffdc33937d",
  "block": 57932540,
  "trx_in_block": 1,
  "op_in_trx": 0,
  "virtual_op": 0,
  "timestamp": "2021-10-08T13:58:03",
  "op": [
    "vote",
    {
      "voter": "sqube",
      "author": "yenterey",
      "permlink": "slow-cooker-vegetable-stew-with-cheddar-dumplings",
      "weight": 100
    }
  ]
}yentereypublished a new post: slow-cooker-vegetable-stew-with-cheddar-dumplings2021/10/08 13:57:54
yentereypublished a new post: slow-cooker-vegetable-stew-with-cheddar-dumplings
2021/10/08 13:57:54
| parent author | |
| parent permlink | food |
| author | yenterey |
| permlink | slow-cooker-vegetable-stew-with-cheddar-dumplings |
| title | Slow cooker vegetable stew with cheddar dumplings |
| body | 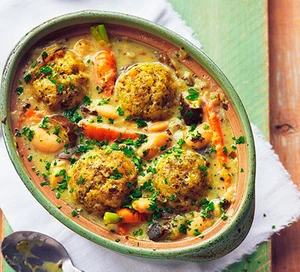 Ingredients 2 tbsp olive oil 200g baby carrots , scrubbed, trimmed and halved if large 3 leeks , cut into thick slices 3 garlic cloves , crushed 3 tbsp plain flour 400ml vegetable stock 2 courgettes , cut into large chunks 2 x 400g cans butter or cannellini beans , drained and rinsed 1 bay leaf 4 thyme , rosemary or tarragon sprigs 200ml crème fraîche 1 tbsp wholegrain mustard 200g broad beans or peas 200g spinach ½ small bunch of parsley , finely chopped, plus extra to serve For the dumplings 100g self-raising flour 50g vegetarian suet or cold butter, grated 100g mature cheddar ½ small bunch of parsley , finely chopped Method STEP 1 Set the slow cooker to low. Heat 1 tbsp of the oil in a frying pan and fry the carrots for 5 mins until just golden, then tip into the slow cooker. STEP 2 Heat the remaining oil in the pan and fry the leeks with a pinch of salt for 5 mins until soft. Add the garlic and stir in the flour. Gradually add the stock, stirring, until the flour has dissolved and there are no lumps. Bring to the boil, then tip into the slow cooker. Add the courgettes, beans and herbs, topping up with water to cover the veg, if needed. Cover and cook for 4 hrs. STEP 3 To make the dumplings, tip the flour into a bowl and stir in the suet or butter until evenly distributed. Add the cheese, parsley, ½ tsp cracked black pepper and a pinch of salt. Mix in 3-4 tbsp cold water with your hands to make a soft, slightly sticky dough (add a little more water if needed). Divide into six and roll into balls. STEP 4 Add the crème fraîche, mustard, broad beans or peas and spinach to the slow cooker and turn it to high. Arrange the dumplings over the stew, cover and cook for 1-2 hrs more until firm and doubled in size. Scatter with parsley and serve. Will keep for up to three days in the fridge or in the freezer for up to three months. |
| json metadata | {"tags":["food"],"image":["https://cdn.steemitimages.com/DQmdhJbJGHPdwQZ2FXG3PqGwRSUwwNLVGyhhNMoMpqBbLk1/spring-veg-stew-with-cheddar-dumplings-2bb2085.webp"],"app":"steemit/0.2","format":"markdown"} |
| Transaction Info | Block #57932537/Trx 1eca8f92a10e27af771bf5aae00e182903812872 |
View Raw JSON Data
{
"trx_id": "1eca8f92a10e27af771bf5aae00e182903812872",
"block": 57932537,
"trx_in_block": 12,
"op_in_trx": 0,
"virtual_op": 0,
"timestamp": "2021-10-08T13:57:54",
"op": [
"comment",
{
"parent_author": "",
"parent_permlink": "food",
"author": "yenterey",
"permlink": "slow-cooker-vegetable-stew-with-cheddar-dumplings",
"title": "Slow cooker vegetable stew with cheddar dumplings",
"body": "\n\n\nIngredients\n2 tbsp olive oil\n200g baby carrots , scrubbed, trimmed and halved if large\n3 leeks , cut into thick slices\n3 garlic cloves , crushed\n3 tbsp plain flour\n400ml vegetable stock\n2 courgettes , cut into large chunks\n2 x 400g cans butter or cannellini beans , drained and rinsed\n1 bay leaf\n4 thyme , rosemary or tarragon sprigs\n200ml crème fraîche\n1 tbsp wholegrain mustard\n200g broad beans or peas\n200g spinach\n½ small bunch of parsley , finely chopped, plus extra to serve\n\n\nFor the dumplings\n100g self-raising flour\n50g vegetarian suet or cold butter, grated\n100g mature cheddar\n½ small bunch of parsley , finely chopped\n\nMethod\nSTEP 1\nSet the slow cooker to low. Heat 1 tbsp of the oil in a frying pan and fry the carrots for 5 mins until just golden, then tip into the slow cooker. \n\nSTEP 2\nHeat the remaining oil in the pan and fry the leeks with a pinch of salt for 5 mins until soft. Add the garlic and stir in the flour. Gradually add the stock, stirring, until the flour has dissolved and there are no lumps. Bring to the boil, then tip into the slow cooker. Add the courgettes, beans and herbs, topping up with water to cover the veg, if needed. Cover and cook for 4 hrs.\n\nSTEP 3\nTo make the dumplings, tip the flour into a bowl and stir in the suet or butter until evenly distributed. Add the cheese, parsley, ½ tsp cracked black pepper and a pinch of salt. Mix in 3-4 tbsp cold water with your hands to make a soft, slightly sticky dough (add a little more water if needed). Divide into six and roll into balls.\n\nSTEP 4\nAdd the crème fraîche, mustard, broad beans or peas and spinach to the slow cooker and turn it to high. Arrange the dumplings over the stew, cover and cook for 1-2 hrs more until firm and doubled in size. Scatter with parsley and serve. Will keep for up to three days in the fridge or in the freezer for up to three months.",
"json_metadata": "{\"tags\":[\"food\"],\"image\":[\"https://cdn.steemitimages.com/DQmdhJbJGHPdwQZ2FXG3PqGwRSUwwNLVGyhhNMoMpqBbLk1/spring-veg-stew-with-cheddar-dumplings-2bb2085.webp\"],\"app\":\"steemit/0.2\",\"format\":\"markdown\"}"
}
]
}squbeupvoted (1.00%) @yenterey / slow-cooker-bread2021/10/08 13:33:27
squbeupvoted (1.00%) @yenterey / slow-cooker-bread
2021/10/08 13:33:27
| voter | sqube |
| author | yenterey |
| permlink | slow-cooker-bread |
| weight | 100 (1.00%) |
| Transaction Info | Block #57932049/Trx 5992cda63c5793a201844fc5dbaccd3db88ab78d |
View Raw JSON Data
{
  "trx_id": "5992cda63c5793a201844fc5dbaccd3db88ab78d",
  "block": 57932049,
  "trx_in_block": 0,
  "op_in_trx": 0,
  "virtual_op": 0,
  "timestamp": "2021-10-08T13:33:27",
  "op": [
    "vote",
    {
      "voter": "sqube",
      "author": "yenterey",
      "permlink": "slow-cooker-bread",
      "weight": 100
    }
  ]
}yentereypublished a new post: slow-cooker-bread2021/10/08 13:33:15
yentereypublished a new post: slow-cooker-bread
2021/10/08 13:33:15
| parent author | |
| parent permlink | food |
| author | yenterey |
| permlink | slow-cooker-bread |
| title | Slow cooker bread |
| body | 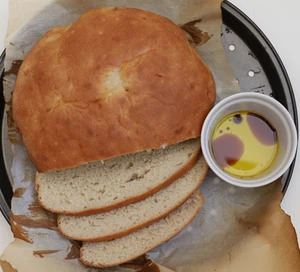 Ingredients 500g strong wholemeal flour or strong white flour (or a mix of flours, see tip), plus extra for dusting 7g sachet fast-action dried yeast 1g fine sea salt Method STEP 1 Mix the flour, yeast and salt in a large bowl and make a well in the middle. Measure 350ml warm water and pour most of it into the well. Mix the flour and water together with your fingers or a wooden spoon until combined into a slightly wet, pillowy, workable dough – add a splash more water if necessary. STEP 2 Tip the dough onto a lightly floured surface and knead for at least 10 mins until smooth and elastic. This can also be done in a tabletop mixer with a dough hook. STEP 3 Shape the dough into a large, tight ball and sit the ball on a square of baking parchment. Use the parchment to lift the dough into your slow cooker, cover and set the slow cooker to high. Leave for 2 hrs. STEP 4 Lift the bread out using the parchment. The bottom should be crusty and the top should be springy, not soft. (If you have a digital cooking thermometer, the middle of the loaf should be 90C.) If it isn’t ready, return to the slow cooker for 15 mins and test again – it could take up to 2 hrs 30 mins. STEP 5 The bread won’t get a significant crust or golden colour in the slow cooker. Once cooked, you can leave it to cool, or put in the oven at 240C/220C fan/gas 9 for 5-10 mins to get some colour. |
| json metadata | {"tags":["food"],"image":["https://cdn.steemitimages.com/DQmTkNsaPDEu3TJk51RpASBkPaBZFUGKyrmimTt9JkQtwHu/slow-cooker-bread1-f4ab372.webp"],"app":"steemit/0.2","format":"markdown"} |
| Transaction Info | Block #57932045/Trx d8c26d28fa890049847d0cad59f840683a2dcc8a |
View Raw JSON Data
{
"trx_id": "d8c26d28fa890049847d0cad59f840683a2dcc8a",
"block": 57932045,
"trx_in_block": 25,
"op_in_trx": 0,
"virtual_op": 0,
"timestamp": "2021-10-08T13:33:15",
"op": [
"comment",
{
"parent_author": "",
"parent_permlink": "food",
"author": "yenterey",
"permlink": "slow-cooker-bread",
"title": "Slow cooker bread",
"body": "\n\n\nIngredients\n500g strong wholemeal flour or strong white flour (or a mix of flours, see tip), plus extra for dusting\n7g sachet fast-action dried yeast\n1g fine sea salt\n\nMethod\nSTEP 1\nMix the flour, yeast and salt in a large bowl and make a well in the middle. Measure 350ml warm water and pour most of it into the well. Mix the flour and water together with your fingers or a wooden spoon until combined into a slightly wet, pillowy, workable dough – add a splash more water if necessary.\n\nSTEP 2\nTip the dough onto a lightly floured surface and knead for at least 10 mins until smooth and elastic. This can also be done in a tabletop mixer with a dough hook.\n\nSTEP 3\nShape the dough into a large, tight ball and sit the ball on a square of baking parchment. Use the parchment to lift the dough into your slow cooker, cover and set the slow cooker to high. Leave for 2 hrs.\n\nSTEP 4\nLift the bread out using the parchment. The bottom should be crusty and the top should be springy, not soft. (If you have a digital cooking thermometer, the middle of the loaf should be 90C.) If it isn’t ready, return to the slow cooker for 15 mins and test again – it could take up to 2 hrs 30 mins.\n\nSTEP 5\nThe bread won’t get a significant crust or golden colour in the slow cooker. Once cooked, you can leave it to cool, or put in the oven at 240C/220C fan/gas 9 for 5-10 mins to get some colour.",
"json_metadata": "{\"tags\":[\"food\"],\"image\":[\"https://cdn.steemitimages.com/DQmTkNsaPDEu3TJk51RpASBkPaBZFUGKyrmimTt9JkQtwHu/slow-cooker-bread1-f4ab372.webp\"],\"app\":\"steemit/0.2\",\"format\":\"markdown\"}"
}
]
}squbeupvoted (1.00%) @yenterey / slow-cooker-vegetable-lasagne2021/10/08 13:18:15
squbeupvoted (1.00%) @yenterey / slow-cooker-vegetable-lasagne
2021/10/08 13:18:15
| voter | sqube |
| author | yenterey |
| permlink | slow-cooker-vegetable-lasagne |
| weight | 100 (1.00%) |
| Transaction Info | Block #57931747/Trx ae41bd98e9cdec083c3ac49eaff6471e7e090e5c |
View Raw JSON Data
{
  "trx_id": "ae41bd98e9cdec083c3ac49eaff6471e7e090e5c",
  "block": 57931747,
  "trx_in_block": 1,
  "op_in_trx": 0,
  "virtual_op": 0,
  "timestamp": "2021-10-08T13:18:15",
  "op": [
    "vote",
    {
      "voter": "sqube",
      "author": "yenterey",
      "permlink": "slow-cooker-vegetable-lasagne",
      "weight": 100
    }
  ]
}yentereypublished a new post: slow-cooker-vegetable-lasagne2021/10/08 13:18:06
yentereypublished a new post: slow-cooker-vegetable-lasagne
2021/10/08 13:18:06
| parent author | |
| parent permlink | food |
| author | yenterey |
| permlink | slow-cooker-vegetable-lasagne |
| title | Slow-cooker vegetable lasagne |
| body | 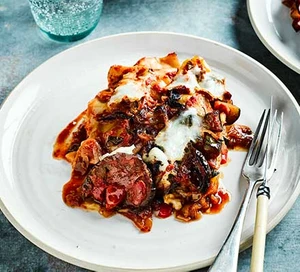 Ingredients 1 tbsp rapeseed oil 2 onions, sliced 2 large garlic cloves, chopped 2 large courgettes, diced (400g) 1 red and 1 yellow pepper, deseeded and roughly sliced 400g can chopped tomatoes 2 tbsp tomato purée 2 tsp vegetable bouillon 15g fresh basil, chopped plus a few leaves 1 large aubergine, sliced across length or width for maximum surface area 6 wholewheat lasagne sheets (105g) 125g vegetarian buffalo mozzarella, chopped Method STEP 1 Heat 1 tbsp rapeseed oil in a large non-stick pan and fry 2 sliced onions and 2 chopped large garlic cloves for 5 mins, stirring frequently until softened. STEP 2 Tip in 2 diced large courgettes, 1 red and 1 yellow pepper, both roughly sliced, and 400g chopped tomatoes with 2 tbsp tomato purée, 2 tsp vegetable bouillon and 15g chopped basil. STEP 3 Stir well, cover and cook for 5 mins. Don't be tempted to add more liquid as plenty of moisture will come from the vegetables once they start cooking. STEP 4 Slice 1 large aubergine. Lay half the slices of aubergine in the base of the slow cooker and top with 3 sheets of lasagne. STEP 5 Add a third of the ratatouille mixture, then the remaining aubergine slices, 3 more lasagne sheets, then the remaining ratatouille mixture. STEP 6 Cover and cook on High for 2½ - 3 hours until the pasta and vegetables are tender. Turn off the machine. STEP 7 Scatter 125g vegetarian buffalo mozzarella over the vegetables then cover and leave for 10 mins to settle and melt the cheese. STEP 8 Scatter with extra basil and serve with a handful of rocket. |
| json metadata | {"tags":["food"],"image":["https://cdn.steemitimages.com/DQmV4okFiTvDy8VrYHxXLVfDDQrwBvnxZor2d4c84qYxsD3/vegelasagne-43d04d5.webp"],"app":"steemit/0.2","format":"markdown"} |
| Transaction Info | Block #57931744/Trx ca9f5722acadd7f666ffbb602d7b4dc6d6bbe103 |
View Raw JSON Data
{
"trx_id": "ca9f5722acadd7f666ffbb602d7b4dc6d6bbe103",
"block": 57931744,
"trx_in_block": 19,
"op_in_trx": 0,
"virtual_op": 0,
"timestamp": "2021-10-08T13:18:06",
"op": [
"comment",
{
"parent_author": "",
"parent_permlink": "food",
"author": "yenterey",
"permlink": "slow-cooker-vegetable-lasagne",
"title": "Slow-cooker vegetable lasagne",
"body": "\n\n\nIngredients\n1 tbsp rapeseed oil\n2 onions, sliced\n2 large garlic cloves, chopped\n2 large courgettes, diced (400g)\n1 red and 1 yellow pepper, deseeded and roughly sliced\n400g can chopped tomatoes\n2 tbsp tomato purée\n2 tsp vegetable bouillon\n15g fresh basil, chopped plus a few leaves\n1 large aubergine, sliced across length or width for maximum surface area\n6 wholewheat lasagne sheets (105g)\n125g vegetarian buffalo mozzarella, chopped\n\nMethod\nSTEP 1\nHeat 1 tbsp rapeseed oil in a large non-stick pan and fry 2 sliced onions and 2 chopped large garlic cloves for 5 mins, stirring frequently until softened.\n\nSTEP 2\nTip in 2 diced large courgettes, 1 red and 1 yellow pepper, both roughly sliced, and 400g chopped tomatoes with 2 tbsp tomato purée, 2 tsp vegetable bouillon and 15g chopped basil.\n\nSTEP 3\nStir well, cover and cook for 5 mins. Don't be tempted to add more liquid as plenty of moisture will come from the vegetables once they start cooking.\n\nSTEP 4\nSlice 1 large aubergine. Lay half the slices of aubergine in the base of the slow cooker and top with 3 sheets of lasagne.\n\nSTEP 5\nAdd a third of the ratatouille mixture, then the remaining aubergine slices, 3 more lasagne sheets, then the remaining ratatouille mixture.\n\nSTEP 6\nCover and cook on High for 2½ - 3 hours until the pasta and vegetables are tender. Turn off the machine.\n\nSTEP 7\nScatter 125g vegetarian buffalo mozzarella over the vegetables then cover and leave for 10 mins to settle and melt the cheese.\n\nSTEP 8\nScatter with extra basil and serve with a handful of rocket.",
"json_metadata": "{\"tags\":[\"food\"],\"image\":[\"https://cdn.steemitimages.com/DQmV4okFiTvDy8VrYHxXLVfDDQrwBvnxZor2d4c84qYxsD3/vegelasagne-43d04d5.webp\"],\"app\":\"steemit/0.2\",\"format\":\"markdown\"}"
}
]
}squbeupvoted (1.00%) @yenterey / slow-cooker-chicken-soup2021/10/08 13:08:36
squbeupvoted (1.00%) @yenterey / slow-cooker-chicken-soup
2021/10/08 13:08:36
| voter | sqube |
| author | yenterey |
| permlink | slow-cooker-chicken-soup |
| weight | 100 (1.00%) |
| Transaction Info | Block #57931555/Trx 18cf4a2f5a2e58f20e4ce79f161282122e2c629a |
View Raw JSON Data
{
  "trx_id": "18cf4a2f5a2e58f20e4ce79f161282122e2c629a",
  "block": 57931555,
  "trx_in_block": 22,
  "op_in_trx": 0,
  "virtual_op": 0,
  "timestamp": "2021-10-08T13:08:36",
  "op": [
    "vote",
    {
      "voter": "sqube",
      "author": "yenterey",
      "permlink": "slow-cooker-chicken-soup",
      "weight": 100
    }
  ]
}yentereypublished a new post: slow-cooker-chicken-soup2021/10/08 13:08:30
yentereypublished a new post: slow-cooker-chicken-soup
2021/10/08 13:08:30
| parent author | |
| parent permlink | food |
| author | yenterey |
| permlink | slow-cooker-chicken-soup |
| title | Slow cooker chicken soup |
| body | 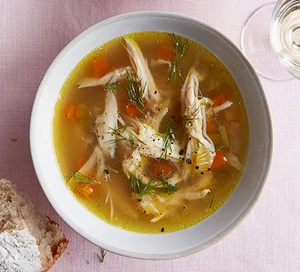 Ingredients 1 onion , finely chopped 2 celery sticks, finely chopped 2 carrots , chopped into 1.5cm pieces 2 leeks , halved and sliced 1 bay leaf and 3 thyme sprigs, tied together 1 whole medium chicken (about 1.4kg) 2l chicken stock 1 lemon , juiced ½ small bunch of dill or parsley, finely chopped crusty bread , to serve (optional) Method STEP 1 Set your slow cooker to low. Tip in the onion, celery, carrots and leeks and nestle in the bunch of herbs. Sit the chicken on top of the veg and pour over the stock. Cook for 6-8 hours. STEP 2 Remove the chicken from the slow cooker and transfer to a board. Shred the meat from the bones using two forks, then return the meat to the slow cooker, discarding the bones. Season to taste and stir through the lemon juice. STEP 3 Remove and discard the bunch of herbs. Ladle the soup into bowls and top with the dill or parsley. Serve with crusty bread, if you like. |
| json metadata | {"tags":["food"],"image":["https://cdn.steemitimages.com/DQmY1YZ7tt5Kb7a4ZyBr9bkzoBxPpgX4mzFHDb7LJn3nGmB/chicken_soup-4fdd786.webp"],"app":"steemit/0.2","format":"markdown"} |
| Transaction Info | Block #57931553/Trx 1950bebd5e49d848ca5ffec32a9c4b90c33bfc94 |
View Raw JSON Data
{
"trx_id": "1950bebd5e49d848ca5ffec32a9c4b90c33bfc94",
"block": 57931553,
"trx_in_block": 2,
"op_in_trx": 0,
"virtual_op": 0,
"timestamp": "2021-10-08T13:08:30",
"op": [
"comment",
{
"parent_author": "",
"parent_permlink": "food",
"author": "yenterey",
"permlink": "slow-cooker-chicken-soup",
"title": "Slow cooker chicken soup",
"body": "\n\n\nIngredients\n1 onion , finely chopped\n2 celery sticks, finely chopped\n2 carrots , chopped into 1.5cm pieces\n2 leeks , halved and sliced\n1 bay leaf and 3 thyme sprigs, tied together\n1 whole medium chicken (about 1.4kg)\n2l chicken stock\n1 lemon , juiced\n½ small bunch of dill or parsley, finely chopped\ncrusty bread , to serve (optional)\n\n\nMethod\nSTEP 1\nSet your slow cooker to low. Tip in the onion, celery, carrots and leeks and nestle in the bunch of herbs. Sit the chicken on top of the veg and pour over the stock. Cook for 6-8 hours.\n\nSTEP 2\nRemove the chicken from the slow cooker and transfer to a board. Shred the meat from the bones using two forks, then return the meat to the slow cooker, discarding the bones. Season to taste and stir through the lemon juice.\n\nSTEP 3\nRemove and discard the bunch of herbs. Ladle the soup into bowls and top with the dill or parsley. Serve with crusty bread, if you like.",
"json_metadata": "{\"tags\":[\"food\"],\"image\":[\"https://cdn.steemitimages.com/DQmY1YZ7tt5Kb7a4ZyBr9bkzoBxPpgX4mzFHDb7LJn3nGmB/chicken_soup-4fdd786.webp\"],\"app\":\"steemit/0.2\",\"format\":\"markdown\"}"
}
]
}yentereyfollowed @lolitaart2021/10/08 12:37:36
yentereyfollowed @lolitaart
2021/10/08 12:37:36
| required auths | [] |
| required posting auths | ["yenterey"] |
| id | follow |
| json | ["follow",{"follower":"yenterey","following":"lolitaart","what":["blog",""]}] |
| Transaction Info | Block #57930940/Trx 0f90bdf326494db4630151482f3e2caf3e3cdb95 |
View Raw JSON Data
{
  "trx_id": "0f90bdf326494db4630151482f3e2caf3e3cdb95",
  "block": 57930940,
  "trx_in_block": 0,
  "op_in_trx": 0,
  "virtual_op": 0,
  "timestamp": "2021-10-08T12:37:36",
  "op": [
    "custom_json",
    {
      "required_auths": [],
      "required_posting_auths": [
        "yenterey"
      ],
      "id": "follow",
      "json": "[\"follow\",{\"follower\":\"yenterey\",\"following\":\"lolitaart\",\"what\":[\"blog\",\"\"]}]"
    }
  ]
}yentereyfollowed @prima-steem2021/10/08 12:37:06
yentereyfollowed @prima-steem
2021/10/08 12:37:06
| required auths | [] |
| required posting auths | ["yenterey"] |
| id | follow |
| json | ["follow",{"follower":"yenterey","following":"prima-steem","what":["blog",""]}] |
| Transaction Info | Block #57930930/Trx f0502bc1130158317cfaeab3b69cd0e8d513cad4 |
View Raw JSON Data
{
  "trx_id": "f0502bc1130158317cfaeab3b69cd0e8d513cad4",
  "block": 57930930,
  "trx_in_block": 22,
  "op_in_trx": 0,
  "virtual_op": 0,
  "timestamp": "2021-10-08T12:37:06",
  "op": [
    "custom_json",
    {
      "required_auths": [],
      "required_posting_auths": [
        "yenterey"
      ],
      "id": "follow",
      "json": "[\"follow\",{\"follower\":\"yenterey\",\"following\":\"prima-steem\",\"what\":[\"blog\",\"\"]}]"
    }
  ]
}squbeupvoted (1.00%) @yenterey / slow-cooker-chicken-casserole2021/10/07 12:16:39
squbeupvoted (1.00%) @yenterey / slow-cooker-chicken-casserole
2021/10/07 12:16:39
| voter | sqube |
| author | yenterey |
| permlink | slow-cooker-chicken-casserole |
| weight | 100 (1.00%) |
| Transaction Info | Block #57901883/Trx 76d6eac37c56dfd06bea9284b76de8641faf4e50 |
View Raw JSON Data
{
  "trx_id": "76d6eac37c56dfd06bea9284b76de8641faf4e50",
  "block": 57901883,
  "trx_in_block": 31,
  "op_in_trx": 0,
  "virtual_op": 0,
  "timestamp": "2021-10-07T12:16:39",
  "op": [
    "vote",
    {
      "voter": "sqube",
      "author": "yenterey",
      "permlink": "slow-cooker-chicken-casserole",
      "weight": 100
    }
  ]
}yentereypublished a new post: slow-cooker-chicken-casserole2021/10/07 12:16:33
yentereypublished a new post: slow-cooker-chicken-casserole
2021/10/07 12:16:33
| parent author | |
| parent permlink | food |
| author | yenterey |
| permlink | slow-cooker-chicken-casserole |
| title | Slow-cooker chicken casserole |
| body | 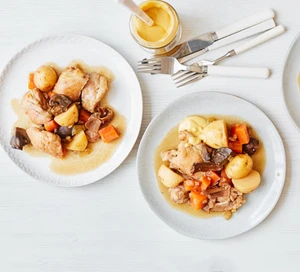 Ingredients knob of butter ½ tbsp rapeseed or olive oil 1 large onion, finely chopped 1 ½ tbsp flour 650g boneless, skinless chicken thigh fillets 3 garlic cloves, crushed 400g baby new potatoes, halved 2 sticks celery, diced 2 carrots, diced 250g mushrooms, quartered 15g dried porcini mushroom, soaked in 50ml boiling water 500ml stock made with 2 very low salt chicken stock cubes (we used Kallo) 2 tsp Dijon mustard, plus extra to serve 2 bay leaves Method STEP 1 Heat a knob of butter and ½ tbsp rapeseed or olive oil in a large frying pan, cook 1 finely chopped large onion for 8-10 mins until softened and starting to caramelise. STEP 2 Meanwhile, put 1 ½ tbsp flour and a little salt and pepper in a bowl and toss 650g boneless, skinless chicken thigh fillets in it. STEP 3 Add 3 crushed garlic cloves and the chicken to the pan and cook for 4-5 mins more until the chicken is starting to brown. STEP 4 Transfer to your slow cooker, along with 400g halved baby new potatoes, 2 diced celery sticks, 2 diced carrots, 250g quartered mushrooms, 15g dried and soaked porcini mushrooms with the 50ml soaking liquid, 500ml chicken stock, 2 tsp Dijon mustard and 2 bay leaves. STEP 5 Give it a good stir. Cook on Low for 7 hours or High for 4 hours. STEP 6 Remove the bay leaves and serve with a little Dijon mustard on the side. |
| json metadata | {"tags":["food"],"image":["https://cdn.steemitimages.com/DQmYqjz8RzoFa33PED37aaU3rsbigveK2pd6n6PByYT4Qfz/slow-cooker-chicken-casserole-1172edc.webp"],"app":"steemit/0.2","format":"markdown"} |
| Transaction Info | Block #57901881/Trx 4c076360797f2c2c2a5a88edb7575b60f96c8589 |
View Raw JSON Data
{
"trx_id": "4c076360797f2c2c2a5a88edb7575b60f96c8589",
"block": 57901881,
"trx_in_block": 14,
"op_in_trx": 0,
"virtual_op": 0,
"timestamp": "2021-10-07T12:16:33",
"op": [
"comment",
{
"parent_author": "",
"parent_permlink": "food",
"author": "yenterey",
"permlink": "slow-cooker-chicken-casserole",
"title": "Slow-cooker chicken casserole",
"body": "\n\nIngredients\nknob of butter\n½ tbsp rapeseed or olive oil\n1 large onion, finely chopped\n1 ½ tbsp flour\n650g boneless, skinless chicken thigh fillets\n3 garlic cloves, crushed\n400g baby new potatoes, halved\n2 sticks celery, diced\n2 carrots, diced\n250g mushrooms, quartered\n15g dried porcini mushroom, soaked in 50ml boiling water\n500ml stock made with 2 very low salt chicken stock cubes (we used Kallo)\n2 tsp Dijon mustard, plus extra to serve\n2 bay leaves\n\n\nMethod\nSTEP 1\nHeat a knob of butter and ½ tbsp rapeseed or olive oil in a large frying pan, cook 1 finely chopped large onion for 8-10 mins until softened and starting to caramelise.\n\nSTEP 2\nMeanwhile, put 1 ½ tbsp flour and a little salt and pepper in a bowl and toss 650g boneless, skinless chicken thigh fillets in it.\n\nSTEP 3\nAdd 3 crushed garlic cloves and the chicken to the pan and cook for 4-5 mins more until the chicken is starting to brown.\n\nSTEP 4\nTransfer to your slow cooker, along with 400g halved baby new potatoes, 2 diced celery sticks, 2 diced carrots, 250g quartered mushrooms, 15g dried and soaked porcini mushrooms with the 50ml soaking liquid, 500ml chicken stock, 2 tsp Dijon mustard and 2 bay leaves.\n\nSTEP 5\nGive it a good stir. Cook on Low for 7 hours or High for 4 hours.\n\nSTEP 6\nRemove the bay leaves and serve with a little Dijon mustard on the side.",
"json_metadata": "{\"tags\":[\"food\"],\"image\":[\"https://cdn.steemitimages.com/DQmYqjz8RzoFa33PED37aaU3rsbigveK2pd6n6PByYT4Qfz/slow-cooker-chicken-casserole-1172edc.webp\"],\"app\":\"steemit/0.2\",\"format\":\"markdown\"}"
}
]
}squbeupvoted (1.00%) @yenterey / slow-cooker-chilli-con-carne2021/10/07 11:48:39
squbeupvoted (1.00%) @yenterey / slow-cooker-chilli-con-carne
2021/10/07 11:48:39
| voter | sqube |
| author | yenterey |
| permlink | slow-cooker-chilli-con-carne |
| weight | 100 (1.00%) |
| Transaction Info | Block #57901325/Trx 15d8e6b728d9e6d18bc446ca82c2e56765c181ef |
View Raw JSON Data
{
  "trx_id": "15d8e6b728d9e6d18bc446ca82c2e56765c181ef",
  "block": 57901325,
  "trx_in_block": 14,
  "op_in_trx": 0,
  "virtual_op": 0,
  "timestamp": "2021-10-07T11:48:39",
  "op": [
    "vote",
    {
      "voter": "sqube",
      "author": "yenterey",
      "permlink": "slow-cooker-chilli-con-carne",
      "weight": 100
    }
  ]
}yentereypublished a new post: slow-cooker-chilli-con-carne2021/10/07 11:48:30
yentereypublished a new post: slow-cooker-chilli-con-carne
2021/10/07 11:48:30
| parent author | |
| parent permlink | food |
| author | yenterey |
| permlink | slow-cooker-chilli-con-carne |
| title | Slow cooker chilli con carne |
| body | 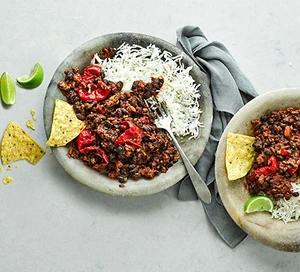 Ingredients 3 tbsp olive oil 500g beef mince 1 onion , finely chopped 1 celery stick , finely chopped 1 large red pepper , thickly sliced 2 garlic cloves , finely grated 2 tsp ground cumin 1 tsp smoked paprika 2 tsp dried oregano 2-3 tbsp chipotle chilli paste 3 tbsp tomato purée 400g can chopped tomatoes 400ml beef stock 2 x 400g can black beans , drained 4 small squares dark chocolate tortilla chips or cooked rice and soured cream, to serve Method STEP 1 Set the slow cooker to low. Heat 1½ tbsp oil in a large, non-stick pan over a high heat and fry the mince for 10-12 mins or until evenly browned. Tip into the slow cooker. STEP 2 Heat the remaining oil in the pan. Fry the onion, celery and pepper for 10 mins or until softened. Add the garlic, cumin and paprika and fry for 1 min. Tip into the slow cooker. STEP 3 Stir in the oregano, chipotle paste, tomato purée, tomatoes and stock. Season. Cover and cook for 6-8 hrs. STEP 4 Stir in the beans and chocolate during the final 30 mins of cooking. Serve with a bowl of rice or tortilla chips and a dollop of soured cream. |
| json metadata | {"tags":["food"],"image":["https://cdn.steemitimages.com/DQmXCG9x6mPiDg9d9W23vf6rNTN9nPFxZCBM61LWmSnEBf5/slow-cooker-chilli-1c68664.webp"],"app":"steemit/0.2","format":"markdown"} |
| Transaction Info | Block #57901322/Trx e6fbdd1255330819a1de3f20d2c87a85cb1e1430 |
View Raw JSON Data
{
"trx_id": "e6fbdd1255330819a1de3f20d2c87a85cb1e1430",
"block": 57901322,
"trx_in_block": 2,
"op_in_trx": 0,
"virtual_op": 0,
"timestamp": "2021-10-07T11:48:30",
"op": [
"comment",
{
"parent_author": "",
"parent_permlink": "food",
"author": "yenterey",
"permlink": "slow-cooker-chilli-con-carne",
"title": "Slow cooker chilli con carne",
"body": "\n\n\nIngredients\n3 tbsp olive oil\n500g beef mince\n1 onion , finely chopped\n1 celery stick , finely chopped\n1 large red pepper , thickly sliced\n2 garlic cloves , finely grated\n2 tsp ground cumin\n1 tsp smoked paprika\n2 tsp dried oregano\n2-3 tbsp chipotle chilli paste\n3 tbsp tomato purée\n400g can chopped tomatoes\n400ml beef stock\n2 x 400g can black beans , drained\n4 small squares dark chocolate\ntortilla chips or cooked rice and soured cream, to serve\n\n\nMethod\nSTEP 1\nSet the slow cooker to low. Heat 1½ tbsp oil in a large, non-stick pan over a high heat and fry the mince for 10-12 mins or until evenly browned. Tip into the slow cooker.\n\nSTEP 2\nHeat the remaining oil in the pan. Fry the onion, celery and pepper for 10 mins or until softened. Add the garlic, cumin and paprika and fry for 1 min. Tip into the slow cooker.\n\nSTEP 3\nStir in the oregano, chipotle paste, tomato purée, tomatoes and stock. Season. Cover and cook for 6-8 hrs.\n\nSTEP 4\nStir in the beans and chocolate during the final 30 mins of cooking. Serve with a bowl of rice or tortilla chips and a dollop of soured cream.",
"json_metadata": "{\"tags\":[\"food\"],\"image\":[\"https://cdn.steemitimages.com/DQmXCG9x6mPiDg9d9W23vf6rNTN9nPFxZCBM61LWmSnEBf5/slow-cooker-chilli-1c68664.webp\"],\"app\":\"steemit/0.2\",\"format\":\"markdown\"}"
}
]
}squbeupvoted (1.00%) @yenterey / slow-cooker-beef-stew2021/10/07 11:21:00
squbeupvoted (1.00%) @yenterey / slow-cooker-beef-stew
2021/10/07 11:21:00
| voter | sqube |
| author | yenterey |
| permlink | slow-cooker-beef-stew |
| weight | 100 (1.00%) |
| Transaction Info | Block #57900776/Trx 316c6b4bbed8d999c60266c4cf5bd47fe65e3d4c |
View Raw JSON Data
{
  "trx_id": "316c6b4bbed8d999c60266c4cf5bd47fe65e3d4c",
  "block": 57900776,
  "trx_in_block": 0,
  "op_in_trx": 0,
  "virtual_op": 0,
  "timestamp": "2021-10-07T11:21:00",
  "op": [
    "vote",
    {
      "voter": "sqube",
      "author": "yenterey",
      "permlink": "slow-cooker-beef-stew",
      "weight": 100
    }
  ]
}yentereypublished a new post: slow-cooker-beef-stew2021/10/07 11:20:48
yentereypublished a new post: slow-cooker-beef-stew
2021/10/07 11:20:48
| parent author | |
| parent permlink | food |
| author | yenterey |
| permlink | slow-cooker-beef-stew |
| title | Slow-cooker beef stew |
| body | 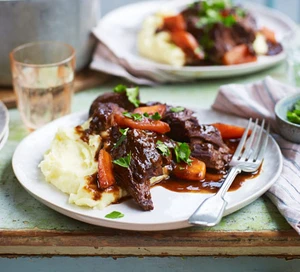 Ingredients 1 onion, chopped 2 celery sticks, finely chopped 2 tbsp rapeseed oil 3 carrots, halved and cut into chunks 2 bay leaves ½ pack thyme 2 tbsp tomato purée 2 tbsp Worcestershire sauce 2 beef stock cubes or stock pots 900g beef for braising such as skirt, buy a whole piece and cut it yourself for bigger chunks or buy ready-diced 2 tsp cornflour (optional) ½ small bunch parsley, chopped buttery mash, to serve (optional) Method STEP 1 Fry the onion and celery in 1 tbsp oil over a low heat until they start to soften – about 5 mins. Add the carrots, bay and thyme, fry for 2 mins, stir in the purée and Worcestershire sauce, add 600ml boiling water, stir and tip everything into a slow cooker. Crumble over the stock cubes or add the stock pots and stir, then season with pepper (don’t add salt as the stock may be salty). STEP 2 Clean out the frying pan and fry the beef in the remaining oil in batches until it is well browned, then tip each batch into the slow cooker. Cook on low for 8-10 hrs, or on high for 4 hrs. STEP 3 If you want to thicken the gravy, mix the cornflour with a splash of cold water to make a paste, then stir in 2 tbsp of the liquid from the slow cooker. Tip back into the slow cooker, stir and cook for a further 30 mins on high. Stir in the parsley and season again to taste. Serve with mash, if you like. Leave to cool before freezing. |
| json metadata | {"tags":["food"],"image":["https://cdn.steemitimages.com/DQmPCjLuWLv5whqTCrUiw2caNiEkihcLStJ9RuayD2DGmyh/slow-cooker-beef-stew-8ade07f.webp"],"app":"steemit/0.2","format":"markdown"} |
| Transaction Info | Block #57900772/Trx 40b5d01d9400095aec0653747b15d16594080164 |
View Raw JSON Data
{
"trx_id": "40b5d01d9400095aec0653747b15d16594080164",
"block": 57900772,
"trx_in_block": 11,
"op_in_trx": 0,
"virtual_op": 0,
"timestamp": "2021-10-07T11:20:48",
"op": [
"comment",
{
"parent_author": "",
"parent_permlink": "food",
"author": "yenterey",
"permlink": "slow-cooker-beef-stew",
"title": "Slow-cooker beef stew",
"body": "\n\n\nIngredients\n1 onion, chopped\n2 celery sticks, finely chopped\n2 tbsp rapeseed oil\n3 carrots, halved and cut into chunks\n2 bay leaves\n½ pack thyme\n2 tbsp tomato purée\n2 tbsp Worcestershire sauce\n2 beef stock cubes or stock pots\n900g beef for braising such as skirt, buy a whole piece and cut it yourself for bigger chunks or buy ready-diced\n2 tsp cornflour (optional)\n½ small bunch parsley, chopped\nbuttery mash, to serve (optional)\n\n\nMethod\nSTEP 1\nFry the onion and celery in 1 tbsp oil over a low heat until they start to soften – about 5 mins. Add the carrots, bay and thyme, fry for 2 mins, stir in the purée and Worcestershire sauce, add 600ml boiling water, stir and tip everything into a slow cooker. Crumble over the stock cubes or add the stock pots and stir, then season with pepper (don’t add salt as the stock may be salty).\n\nSTEP 2\nClean out the frying pan and fry the beef in the remaining oil in batches until it is well browned, then tip each batch into the slow cooker. Cook on low for 8-10 hrs, or on high for 4 hrs.\n\nSTEP 3\nIf you want to thicken the gravy, mix the cornflour with a splash of cold water to make a paste, then stir in 2 tbsp of the liquid from the slow cooker. Tip back into the slow cooker, stir and cook for a further 30 mins on high. Stir in the parsley and season again to taste. Serve with mash, if you like. Leave to cool before freezing.",
"json_metadata": "{\"tags\":[\"food\"],\"image\":[\"https://cdn.steemitimages.com/DQmPCjLuWLv5whqTCrUiw2caNiEkihcLStJ9RuayD2DGmyh/slow-cooker-beef-stew-8ade07f.webp\"],\"app\":\"steemit/0.2\",\"format\":\"markdown\"}"
}
]
}squbeupvoted (1.00%) @yenterey / easy-bread-rolls2021/10/07 10:55:39
squbeupvoted (1.00%) @yenterey / easy-bread-rolls
2021/10/07 10:55:39
| voter | sqube |
| author | yenterey |
| permlink | easy-bread-rolls |
| weight | 100 (1.00%) |
| Transaction Info | Block #57900269/Trx 5f89b2f48d0e9a1fdb9d7932e0842790ee26b2aa |
View Raw JSON Data
{
  "trx_id": "5f89b2f48d0e9a1fdb9d7932e0842790ee26b2aa",
  "block": 57900269,
  "trx_in_block": 4,
  "op_in_trx": 0,
  "virtual_op": 0,
  "timestamp": "2021-10-07T10:55:39",
  "op": [
    "vote",
    {
      "voter": "sqube",
      "author": "yenterey",
      "permlink": "easy-bread-rolls",
      "weight": 100
    }
  ]
}yentereypublished a new post: easy-bread-rolls2021/10/07 10:55:30
yentereypublished a new post: easy-bread-rolls
2021/10/07 10:55:30
| parent author | |
| parent permlink | bakery |
| author | yenterey |
| permlink | easy-bread-rolls |
| title | Easy bread rolls |
| body | 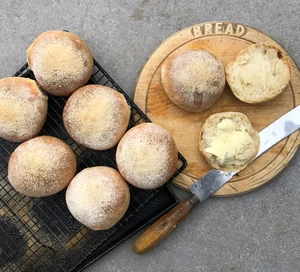 Ingredients 500g strong white bread flour , plus extra for dusting 7g sachet fast action yeast 1 tsp white caster sugar 2 tsp fine salt 1 tsp sunflower oil , plus extra for the work surface and bowl Method STEP 1 Tip the flour, yeast, sugar, salt and oil into a bowl. Pour over 325ml warm water, then mix (with a spatula or your hand), until it comes together as a shaggy dough. Make sure all the flour has been incorporated. Cover and leave for 10 mins. STEP 2 Lightly oil your work surface and tip the dough onto it. Knead the dough for at least 10 mins until it becomes tighter and springy – if you have a stand mixer you can do this with a dough hook for 5 mins. Pull the dough into a ball and put in a clean, oiled bowl. Leave for 1 hr, or until doubled in size. STEP 3 Tip the dough onto a lightly floured surface and roll into a long sausage shape. Halve the dough, then divide each half into four pieces, so you have eight equal-sized portions. Roll each into a tight ball and put on a dusted baking tray, leaving some room between each ball for rising. Cover with a damp tea towel and leave in a warm place to prove for 40 mins-1 hr or until almost doubled in size. STEP 4 Heat the oven to 230C/210C fan/gas 8. When the dough is ready, dust each ball with a bit more flour. (If you like, you can glaze the rolls with milk or beaten egg, and top with seeds.) Bake for 25-30mins, until light brown and hollow sounding when tapped on the base. Leave to cool on a wire rack. |
| json metadata | {"tags":["bakery"],"image":["https://cdn.steemitimages.com/DQmW6BRHg6kLRpHLcw8sFqBgFiFFfrPEAJR8PRBSErLujT5/bread-rolls_440x400-8add9d2.webp"],"app":"steemit/0.2","format":"markdown"} |
| Transaction Info | Block #57900266/Trx a27fb990d3f7ad8efbe114440ed88d0c723ebad4 |
View Raw JSON Data
{
"trx_id": "a27fb990d3f7ad8efbe114440ed88d0c723ebad4",
"block": 57900266,
"trx_in_block": 6,
"op_in_trx": 0,
"virtual_op": 0,
"timestamp": "2021-10-07T10:55:30",
"op": [
"comment",
{
"parent_author": "",
"parent_permlink": "bakery",
"author": "yenterey",
"permlink": "easy-bread-rolls",
"title": "Easy bread rolls",
"body": "\n\n\nIngredients\n500g strong white bread flour , plus extra for dusting\n7g sachet fast action yeast\n1 tsp white caster sugar\n2 tsp fine salt\n1 tsp sunflower oil , plus extra for the work surface and bowl\n\n\nMethod\nSTEP 1\nTip the flour, yeast, sugar, salt and oil into a bowl. Pour over 325ml warm water, then mix (with a spatula or your hand), until it comes together as a shaggy dough. Make sure all the flour has been incorporated. Cover and leave for 10 mins.\n\nSTEP 2\nLightly oil your work surface and tip the dough onto it. Knead the dough for at least 10 mins until it becomes tighter and springy – if you have a stand mixer you can do this with a dough hook for 5 mins. Pull the dough into a ball and put in a clean, oiled bowl. Leave for 1 hr, or until doubled in size.\n\nSTEP 3\nTip the dough onto a lightly floured surface and roll into a long sausage shape. Halve the dough, then divide each half into four pieces, so you have eight equal-sized portions. Roll each into a tight ball and put on a dusted baking tray, leaving some room between each ball for rising. Cover with a damp tea towel and leave in a warm place to prove for 40 mins-1 hr or until almost doubled in size.\n\nSTEP 4\nHeat the oven to 230C/210C fan/gas 8. When the dough is ready, dust each ball with a bit more flour. (If you like, you can glaze the rolls with milk or beaten egg, and top with seeds.) Bake for 25-30mins, until light brown and hollow sounding when tapped on the base. Leave to cool on a wire rack.",
"json_metadata": "{\"tags\":[\"bakery\"],\"image\":[\"https://cdn.steemitimages.com/DQmW6BRHg6kLRpHLcw8sFqBgFiFFfrPEAJR8PRBSErLujT5/bread-rolls_440x400-8add9d2.webp\"],\"app\":\"steemit/0.2\",\"format\":\"markdown\"}"
}
]
}squbeupvoted (1.00%) @yenterey / easy-white-bread2021/10/07 10:38:24
squbeupvoted (1.00%) @yenterey / easy-white-bread
2021/10/07 10:38:24
| voter | sqube |
| author | yenterey |
| permlink | easy-white-bread |
| weight | 100 (1.00%) |
| Transaction Info | Block #57899925/Trx ce0e5ec8ff29026deda90a7b87241807c09f2624 |
View Raw JSON Data
{
  "trx_id": "ce0e5ec8ff29026deda90a7b87241807c09f2624",
  "block": 57899925,
  "trx_in_block": 0,
  "op_in_trx": 0,
  "virtual_op": 0,
  "timestamp": "2021-10-07T10:38:24",
  "op": [
    "vote",
    {
      "voter": "sqube",
      "author": "yenterey",
      "permlink": "easy-white-bread",
      "weight": 100
    }
  ]
}yentereypublished a new post: easy-white-bread2021/10/07 10:38:15
yentereypublished a new post: easy-white-bread
2021/10/07 10:38:15
| parent author | |
| parent permlink | bakery |
| author | yenterey |
| permlink | easy-white-bread |
| title | Easy white bread |
| body | 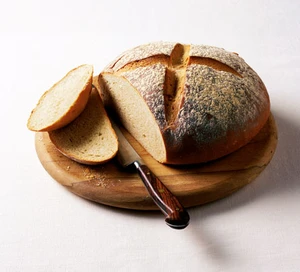 Ingredients 500g strong white flour, plus extra for dusting 2 tsp salt 7g sachet fast-action yeast 3 tbsp olive oil 300ml water Method STEP 1 Mix 500g strong white flour, 2 tsp salt and a 7g sachet of fast-action yeast in a large bowl. STEP 2 Make a well in the centre, then add 3 tbsp olive oil and 300ml water, and mix well. If the dough seems a little stiff, add another 1-2 tbsp water and mix well. STEP 3 Tip onto a lightly floured work surface and knead for around 10 mins. STEP 4 Once the dough is satin-smooth, place it in a lightly oiled bowl and cover with cling film. Leave to rise for 1 hour until doubled in size or place in the fridge overnight. STEP 5 Line a baking tray with baking parchment. Knock back the dough (punch the air out and pull the dough in on itself) then gently mould the dough into a ball. STEP 6 Place it on the baking parchment to prove for a further hour until doubled in size. STEP 7 Heat oven to 220C/fan 200C/gas 7. STEP 8 Dust the loaf with some extra flour and cut a cross about 6cm long into the top of the loaf with a sharp knife. STEP 9 Bake for 25-30 mins until golden brown and the loaf sounds hollow when tapped underneath. Cool on a wire rack. |
| json metadata | {"tags":["bakery"],"image":["https://cdn.steemitimages.com/DQmV8Bd2djuu3z1hzW81hdrJCzCAyWLoX98p1GNs7KaKgu5/easy-bread-7455dce.webp"],"app":"steemit/0.2","format":"markdown"} |
| Transaction Info | Block #57899922/Trx e4a3627a81d6a20b5e846376a546bddb13856017 |
View Raw JSON Data
{
"trx_id": "e4a3627a81d6a20b5e846376a546bddb13856017",
"block": 57899922,
"trx_in_block": 6,
"op_in_trx": 0,
"virtual_op": 0,
"timestamp": "2021-10-07T10:38:15",
"op": [
"comment",
{
"parent_author": "",
"parent_permlink": "bakery",
"author": "yenterey",
"permlink": "easy-white-bread",
"title": "Easy white bread",
"body": "\n\n\nIngredients\n500g strong white flour, plus extra for dusting\n2 tsp salt\n7g sachet fast-action yeast\n3 tbsp olive oil\n300ml water\n\n\nMethod\nSTEP 1\nMix 500g strong white flour, 2 tsp salt and a 7g sachet of fast-action yeast in a large bowl.\n\nSTEP 2\nMake a well in the centre, then add 3 tbsp olive oil and 300ml water, and mix well. If the dough seems a little stiff, add another 1-2 tbsp water and mix well.\n\nSTEP 3\nTip onto a lightly floured work surface and knead for around 10 mins.\n\nSTEP 4\nOnce the dough is satin-smooth, place it in a lightly oiled bowl and cover with cling film. Leave to rise for 1 hour until doubled in size or place in the fridge overnight.\n\nSTEP 5\nLine a baking tray with baking parchment. Knock back the dough (punch the air out and pull the dough in on itself) then gently mould the dough into a ball.\n\nSTEP 6\nPlace it on the baking parchment to prove for a further hour until doubled in size.\n\nSTEP 7\nHeat oven to 220C/fan 200C/gas 7.\n\nSTEP 8\nDust the loaf with some extra flour and cut a cross about 6cm long into the top of the loaf with a sharp knife.\n\nSTEP 9\nBake for 25-30 mins until golden brown and the loaf sounds hollow when tapped underneath. Cool on a wire rack.",
"json_metadata": "{\"tags\":[\"bakery\"],\"image\":[\"https://cdn.steemitimages.com/DQmV8Bd2djuu3z1hzW81hdrJCzCAyWLoX98p1GNs7KaKgu5/easy-bread-7455dce.webp\"],\"app\":\"steemit/0.2\",\"format\":\"markdown\"}"
}
]
}kosmatimucupvoted (100.00%) @yenterey / chicken-and-sweetcorn-tacos2021/10/06 15:27:48
kosmatimucupvoted (100.00%) @yenterey / chicken-and-sweetcorn-tacos
2021/10/06 15:27:48
| voter | kosmatimuc |
| author | yenterey |
| permlink | chicken-and-sweetcorn-tacos |
| weight | 10000 (100.00%) |
| Transaction Info | Block #57877050/Trx 9432734f8f39ee11ff6cd6e244cc63f41ddd3a5e |
View Raw JSON Data
{
  "trx_id": "9432734f8f39ee11ff6cd6e244cc63f41ddd3a5e",
  "block": 57877050,
  "trx_in_block": 2,
  "op_in_trx": 0,
  "virtual_op": 0,
  "timestamp": "2021-10-06T15:27:48",
  "op": [
    "vote",
    {
      "voter": "kosmatimuc",
      "author": "yenterey",
      "permlink": "chicken-and-sweetcorn-tacos",
      "weight": 10000
    }
  ]
}squbeupvoted (1.00%) @yenterey / chicken-and-sweetcorn-tacos2021/10/06 14:55:27
squbeupvoted (1.00%) @yenterey / chicken-and-sweetcorn-tacos
2021/10/06 14:55:27
| voter | sqube |
| author | yenterey |
| permlink | chicken-and-sweetcorn-tacos |
| weight | 100 (1.00%) |
| Transaction Info | Block #57876405/Trx bc3c0acaa00456710956ff3004191e8b3590e41b |
View Raw JSON Data
{
  "trx_id": "bc3c0acaa00456710956ff3004191e8b3590e41b",
  "block": 57876405,
  "trx_in_block": 0,
  "op_in_trx": 0,
  "virtual_op": 0,
  "timestamp": "2021-10-06T14:55:27",
  "op": [
    "vote",
    {
      "voter": "sqube",
      "author": "yenterey",
      "permlink": "chicken-and-sweetcorn-tacos",
      "weight": 100
    }
  ]
}yentereypublished a new post: chicken-and-sweetcorn-tacos2021/10/06 14:55:18
yentereypublished a new post: chicken-and-sweetcorn-tacos
2021/10/06 14:55:18
| parent author | |
| parent permlink | food |
| author | yenterey |
| permlink | chicken-and-sweetcorn-tacos |
| title | Chicken & sweetcorn tacos |
| body | 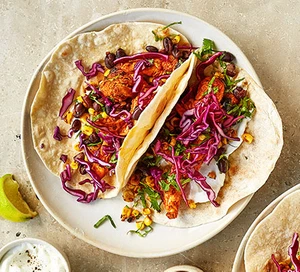 Ingredients 250g plain flour , plus extra for dusting 2 tbsp rapeseed oil 2 tbsp taco or fajita seasoning (see tip, below) 5-6 skinless chicken breasts, sliced ¼ red cabbage , finely shredded 3 limes , 1 juiced, 2 cut into wedges small bunch of coriander , chopped 4 sweetcorn cob , kernels sliced off, or 400g frozen sweetcorn 400g can black beans , drained and rinsed 2 garlic cloves , crushed 4 tbsp fat-free yogurt , to serve chilli sauce , to serve Method STEP 1 Combine the flour with half the oil and a small pinch of salt in a bowl. Pour over 125-150ml warm water, then bring together into a soft dough with your hands. Cut into six equal pieces, then cut four of the pieces in half again, so you have eight small pieces and two large. Roll all the pieces out on a floured work surface until they’re as thin as you can get them. STEP 2 Heat a dry frying pan over a medium-high heat and cook the small and large tortillas for 2-3 mins on each side until golden and toasted (do this one at a time). Leave the large tortillas to cool, then cover and reserve for use in the lunchboxes (see tip below). Keep the small tortillas warm in foil. STEP 3 Sprinkle the taco seasoning over the chicken in a bowl, and toss to combine. Toss the cabbage with the lime juice, half the coriander and some seasoning in another bowl, then leave to pickle. STEP 4 Meanwhile, heat two frying pans over a high heat. Divide the remaining oil between the pans and fry the sweetcorn and a pinch of salt until sizzling and turning golden, stirring occasionally – you want the sweetcorn to char slightly, as this adds flavour, so you may need to leave it to cook undisturbed for a bit. While the sweetcorn cooks and chars, fry the chicken in the larger pan until cooked through and golden (you may need to do this in batches). STEP 5 Tip the black beans and garlic into the sweetcorn and stir to warm through. Squeeze over two of the lime wedges. STEP 6 Reserve two spoonfuls each of the chicken (about 1 chicken breast) and sweetcorn mix for use in the lunchboxes (see tip, below), then serve the rest in bowls alongside the cabbage, yogurt, lime wedges, remaining coriander, chilli sauce and tortillas for everyone to dig into. |
| json metadata | {"tags":["food"],"image":["https://cdn.steemitimages.com/DQmS9sBd2sLnmcKtwHXyQyUWyB938gRjRVQsbS5wpqk9YoN/chicken-sweetcorn-tacos-f01abbf.webp"],"app":"steemit/0.2","format":"markdown"} |
| Transaction Info | Block #57876402/Trx 6952661864098e4ccbe1ea03b451afb51ccfbb21 |
View Raw JSON Data
{
"trx_id": "6952661864098e4ccbe1ea03b451afb51ccfbb21",
"block": 57876402,
"trx_in_block": 1,
"op_in_trx": 0,
"virtual_op": 0,
"timestamp": "2021-10-06T14:55:18",
"op": [
"comment",
{
"parent_author": "",
"parent_permlink": "food",
"author": "yenterey",
"permlink": "chicken-and-sweetcorn-tacos",
"title": "Chicken & sweetcorn tacos",
"body": "\n\n\nIngredients\n250g plain flour , plus extra for dusting\n2 tbsp rapeseed oil\n2 tbsp taco or fajita seasoning (see tip, below)\n5-6 skinless chicken breasts, sliced\n¼ red cabbage , finely shredded\n3 limes , 1 juiced, 2 cut into wedges\nsmall bunch of coriander , chopped\n4 sweetcorn cob , kernels sliced off, or 400g frozen sweetcorn\n400g can black beans , drained and rinsed\n2 garlic cloves , crushed\n4 tbsp fat-free yogurt , to serve\nchilli sauce , to serve\n\nMethod\nSTEP 1\nCombine the flour with half the oil and a small pinch of salt in a bowl. Pour over 125-150ml warm water, then bring together into a soft dough with your hands. Cut into six equal pieces, then cut four of the pieces in half again, so you have eight small pieces and two large. Roll all the pieces out on a floured work surface until they’re as thin as you can get them.\n\nSTEP 2\nHeat a dry frying pan over a medium-high heat and cook the small and large tortillas for 2-3 mins on each side until golden and toasted (do this one at a time). Leave the large tortillas to cool, then cover and reserve for use in the lunchboxes (see tip below). Keep the small tortillas warm in foil.\n\nSTEP 3\nSprinkle the taco seasoning over the chicken in a bowl, and toss to combine. Toss the cabbage with the lime juice, half the coriander and some seasoning in another bowl, then leave to pickle.\n\nSTEP 4\nMeanwhile, heat two frying pans over a high heat. Divide the remaining oil between the pans and fry the sweetcorn and a pinch of salt until sizzling and turning golden, stirring occasionally – you want the sweetcorn to char slightly, as this adds flavour, so you may need to leave it to cook undisturbed for a bit. While the sweetcorn cooks and chars, fry the chicken in the larger pan until cooked through and golden (you may need to do this in batches).\n\nSTEP 5\nTip the black beans and garlic into the sweetcorn and stir to warm through. Squeeze over two of the lime wedges.\n\nSTEP 6\nReserve two spoonfuls each of the chicken (about 1 chicken breast) and sweetcorn mix for use in the lunchboxes (see tip, below), then serve the rest in bowls alongside the cabbage, yogurt, lime wedges, remaining coriander, chilli sauce and tortillas for everyone to dig into.",
"json_metadata": "{\"tags\":[\"food\"],\"image\":[\"https://cdn.steemitimages.com/DQmS9sBd2sLnmcKtwHXyQyUWyB938gRjRVQsbS5wpqk9YoN/chicken-sweetcorn-tacos-f01abbf.webp\"],\"app\":\"steemit/0.2\",\"format\":\"markdown\"}"
}
]
}yentereypublished a new post: carrot-pilaf-with-coriander-chutney2021/10/06 14:37:12
yentereypublished a new post: carrot-pilaf-with-coriander-chutney
2021/10/06 14:37:12
| parent author | |
| parent permlink | food |
| author | yenterey |
| permlink | carrot-pilaf-with-coriander-chutney |
| title | Carrot pilaf with coriander chutney |
| body | 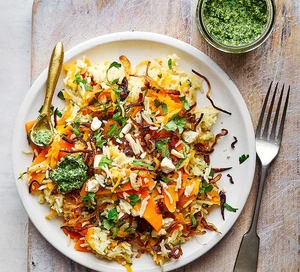 Ingredients 2 tbsp rapeseed oil 1 large onion, finely sliced 2 tbsp grated ginger 2 green chillies, sliced 2 garlic cloves, crushed 2 tsp coriander seeds, crushed 4 cardamom pods, bruised ½ cinnamon stick 1 tbsp garam masala 400g carrots, peeled and ½ coarsely grated, ½ sliced on an angle 300g basmati rice, rinsed well 600ml hot vegetable stock large bunch of coriander, finely chopped (stalks included) 60g cashews, toasted and chopped Method STEP 1 Heat the oil in a large pan that has a tight-fitting lid. Fry the onions with a pinch of salt over a medium heat for 10-15 mins until golden and crisp. Remove from the pan with a slotted spoon and drain on kitchen paper, leaving the oil in the pan. STEP 2 Add half the ginger, half the chilli, all the garlic, spices, and both types of carrots to the pan, and fry for 6-8 mins until the carrot slices are starting to turn golden. Add the rice, stir briefly, then add the stock, a handful of the coriander, a good pinch of salt and grinding of black pepper. Bring to a simmer, and as soon as it starts to boil, turn the heat down to low, cover with a lid and leave to cook for 12-15 mins. STEP 3 Meanwhile, put the remaining ginger and green chilli, most of the cashews and most of the remaining coriander in a small blender with 50ml water. Blend until smooth, adding another 2-3 tbsp water, if needed, to make a spoonable sauce. STEP 4 When all the liquid has been absorbed into the pilaf and the rice is tender, fluff up the grains with a fork. Spoon over the coriander chutney, and sprinkle with the fried onions, reserved coriander and remaining cashews to serve. |
| json metadata | {"tags":["food"],"image":["https://cdn.steemitimages.com/DQmcSPUuGAWWBWjuLFSv8DiQwVVx6jU9C9apADSGJju8i4P/Carrot-Pilaf-With-Coriander-Chutney-8b7acf4.webp"],"app":"steemit/0.2","format":"markdown"} |
| Transaction Info | Block #57876042/Trx 2b296693ea37fce1a75969bf83d8d6813006765d |
View Raw JSON Data
{
"trx_id": "2b296693ea37fce1a75969bf83d8d6813006765d",
"block": 57876042,
"trx_in_block": 17,
"op_in_trx": 0,
"virtual_op": 0,
"timestamp": "2021-10-06T14:37:12",
"op": [
"comment",
{
"parent_author": "",
"parent_permlink": "food",
"author": "yenterey",
"permlink": "carrot-pilaf-with-coriander-chutney",
"title": "Carrot pilaf with coriander chutney",
"body": "\n\n\nIngredients\n2 tbsp rapeseed oil\n1 large onion, finely sliced\n2 tbsp grated ginger\n2 green chillies, sliced\n2 garlic cloves, crushed\n2 tsp coriander seeds, crushed\n4 cardamom pods, bruised\n½ cinnamon stick\n1 tbsp garam masala\n400g carrots, peeled and ½ coarsely grated, ½ sliced on an angle\n300g basmati rice, rinsed well\n600ml hot vegetable stock\nlarge bunch of coriander, finely chopped (stalks included)\n60g cashews, toasted and chopped\n\n\nMethod\nSTEP 1\nHeat the oil in a large pan that has a tight-fitting lid. Fry the onions with a pinch of salt over a medium heat for 10-15 mins until golden and crisp. Remove from the pan with a slotted spoon and drain on kitchen paper, leaving the oil in the pan.\n\nSTEP 2\nAdd half the ginger, half the chilli, all the garlic, spices, and both types of carrots to the pan, and fry for 6-8 mins until the carrot slices are starting to turn golden. Add the rice, stir briefly, then add the stock, a handful of the coriander, a good pinch of salt and grinding of black pepper. Bring to a simmer, and as soon as it starts to boil, turn the heat down to low, cover with a lid and leave to cook for 12-15 mins.\n\nSTEP 3\nMeanwhile, put the remaining ginger and green chilli, most of the cashews and most of the remaining coriander in a small blender with 50ml water. Blend until smooth, adding another 2-3 tbsp water, if needed, to make a spoonable sauce.\n\nSTEP 4\nWhen all the liquid has been absorbed into the pilaf and the rice is tender, fluff up the grains with a fork. Spoon over the coriander chutney, and sprinkle with the fried onions, reserved coriander and remaining cashews to serve.",
"json_metadata": "{\"tags\":[\"food\"],\"image\":[\"https://cdn.steemitimages.com/DQmcSPUuGAWWBWjuLFSv8DiQwVVx6jU9C9apADSGJju8i4P/Carrot-Pilaf-With-Coriander-Chutney-8b7acf4.webp\"],\"app\":\"steemit/0.2\",\"format\":\"markdown\"}"
}
]
}squbeupvoted (1.00%) @yenterey / 5bvw5c-broccoli-pesto-and-pancetta-pasta2021/10/06 14:23:15
squbeupvoted (1.00%) @yenterey / 5bvw5c-broccoli-pesto-and-pancetta-pasta
2021/10/06 14:23:15
| voter | sqube |
| author | yenterey |
| permlink | 5bvw5c-broccoli-pesto-and-pancetta-pasta |
| weight | 100 (1.00%) |
| Transaction Info | Block #57875764/Trx ad8f88f11ce1506a53fab587967c4f5ca9ab8016 |
View Raw JSON Data
{
  "trx_id": "ad8f88f11ce1506a53fab587967c4f5ca9ab8016",
  "block": 57875764,
  "trx_in_block": 7,
  "op_in_trx": 0,
  "virtual_op": 0,
  "timestamp": "2021-10-06T14:23:15",
  "op": [
    "vote",
    {
      "voter": "sqube",
      "author": "yenterey",
      "permlink": "5bvw5c-broccoli-pesto-and-pancetta-pasta",
      "weight": 100
    }
  ]
}yentereypublished a new post: 5bvw5c-broccoli-pesto-and-pancetta-pasta2021/10/06 14:23:06
yentereypublished a new post: 5bvw5c-broccoli-pesto-and-pancetta-pasta
2021/10/06 14:23:06
| parent author | |
| parent permlink | food |
| author | yenterey |
| permlink | 5bvw5c-broccoli-pesto-and-pancetta-pasta |
| title | Broccoli pesto & pancetta pasta |
| body |  Ingredients 300g head broccoli , broken into florets 300g pasta (we used orecchiette) 1 tbsp pine nuts 1 large bunch of basil 1 large garlic clove 2 tbsp parmesan , finely grated 1 tbsp olive oil 50g smoked pancetta , diced 200g cherry tomatoes , halved Method STEP 1 Bring a pan of lightly salted water to the boil. Add the broccoli and boil for 5 mins. Scoop out with a slotted spoon and set aside. STEP 2 Put the pasta in the same pan and cook following pack instructions. Meanwhile, tip the broccoli into a food processor with the pine nuts, basil, garlic, parmesan and oil, and blitz until smooth. Season with black pepper and a little salt (the pancetta is very salty). STEP 3 Set a frying pan over a medium heat and cook the pancetta for 2 mins. Add the tomatoes and cook for 3 mins, or until softened. Toss the pasta with the broccoli pesto, tomatoes and pancetta, and loosen with a splash of pasta water, if needed. Spoon into bowls and serve. |
| json metadata | {"tags":["food"],"image":["https://cdn.steemitimages.com/DQmcYMShj5DRyxEmb2YgU2fBYZ2BwR4G4D1BS9mHxCHLmPW/broccoli-pesto-pancetta-pasta-75e3452.webp"],"app":"steemit/0.2","format":"markdown"} |
| Transaction Info | Block #57875761/Trx 08769616595c9d6c3bf525ea051071e34d9feaac |
View Raw JSON Data
{
"trx_id": "08769616595c9d6c3bf525ea051071e34d9feaac",
"block": 57875761,
"trx_in_block": 15,
"op_in_trx": 0,
"virtual_op": 0,
"timestamp": "2021-10-06T14:23:06",
"op": [
"comment",
{
"parent_author": "",
"parent_permlink": "food",
"author": "yenterey",
"permlink": "5bvw5c-broccoli-pesto-and-pancetta-pasta",
"title": "Broccoli pesto & pancetta pasta",
"body": "\n\n\nIngredients\n300g head broccoli , broken into florets\n300g pasta (we used orecchiette)\n1 tbsp pine nuts\n1 large bunch of basil\n1 large garlic clove\n2 tbsp parmesan , finely grated\n1 tbsp olive oil\n50g smoked pancetta , diced\n200g cherry tomatoes , halved\n\nMethod\nSTEP 1\nBring a pan of lightly salted water to the boil. Add the broccoli and boil for 5 mins. Scoop out with a slotted spoon and set aside.\n\nSTEP 2\nPut the pasta in the same pan and cook following pack instructions. Meanwhile, tip the broccoli into a food processor with the pine nuts, basil, garlic, parmesan and oil, and blitz until smooth. Season with black pepper and a little salt (the pancetta is very salty).\n\nSTEP 3\nSet a frying pan over a medium heat and cook the pancetta for 2 mins. Add the tomatoes and cook for 3 mins, or until softened. Toss the pasta with the broccoli pesto, tomatoes and pancetta, and loosen with a splash of pasta water, if needed. Spoon into bowls and serve.",
"json_metadata": "{\"tags\":[\"food\"],\"image\":[\"https://cdn.steemitimages.com/DQmcYMShj5DRyxEmb2YgU2fBYZ2BwR4G4D1BS9mHxCHLmPW/broccoli-pesto-pancetta-pasta-75e3452.webp\"],\"app\":\"steemit/0.2\",\"format\":\"markdown\"}"
}
]
}squbeupvoted (1.00%) @yenterey / chicken-with-crushed-harissa-chickpeas2021/10/06 13:47:57
squbeupvoted (1.00%) @yenterey / chicken-with-crushed-harissa-chickpeas
2021/10/06 13:47:57
| voter | sqube |
| author | yenterey |
| permlink | chicken-with-crushed-harissa-chickpeas |
| weight | 100 (1.00%) |
| Transaction Info | Block #57875065/Trx 7b192859aa0811756cde03db28353a6a0dad9629 |
View Raw JSON Data
{
  "trx_id": "7b192859aa0811756cde03db28353a6a0dad9629",
  "block": 57875065,
  "trx_in_block": 0,
  "op_in_trx": 0,
  "virtual_op": 0,
  "timestamp": "2021-10-06T13:47:57",
  "op": [
    "vote",
    {
      "voter": "sqube",
      "author": "yenterey",
      "permlink": "chicken-with-crushed-harissa-chickpeas",
      "weight": 100
    }
  ]
}yentereypublished a new post: chicken-with-crushed-harissa-chickpeas2021/10/06 13:47:51
yentereypublished a new post: chicken-with-crushed-harissa-chickpeas
2021/10/06 13:47:51
| parent author | |
| parent permlink | food |
| author | yenterey |
| permlink | chicken-with-crushed-harissa-chickpeas |
| title | Chicken with crushed harissa chickpeas |
| body | 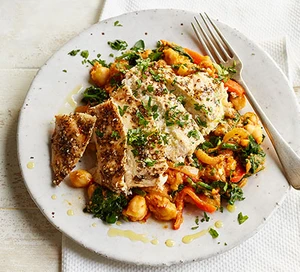 Ingredients 2 tbsp rapeseed oil 1 onion , chopped 1 red pepper , finely sliced 1 yellow pepper , finely sliced 4 chicken breasts 1 tbsp za'atar 400g can chickpeas 1½ tbsp red harissa paste 150g baby spinach ½ small bunch of parsley , finely chopped lemon wedges, to serve Method STEP 1 Heat 1 tbsp of oil in a frying pan over a medium heat and fry the onions and peppers for 7 mins until softened and golden. STEP 2 Meanwhile, put the chicken between two sheets of baking parchment and lightly bash until about 2cm thick. Mix together the remaining oil and the za'atar, then rub over the chicken. Season to taste. STEP 3 Heat the grill to high. Put the chicken on a baking tray lined with foil, and grill for 3-4 mins each side, or until golden and cooked through. STEP 4 Heat the chickpeas in a pan with the harissa paste and 2 tbsp water until warmed through, then roughly mash with a potato masher. Wilt the spinach in a pan with 1 tbsp of water or in the microwave in a heatproof bowl. Stir the pepper and onion mixture, spinach and parsley through the chickpeas. Serve with the sliced chicken and the lemon wedges for squeezing over. |
| json metadata | {"tags":["food"],"image":["https://cdn.steemitimages.com/DQmWZ56UsazRKTdgoFCG9sNhCr32q7tgmbKFWeAbii1QsDw/chicken-with-crushed-harissa-chickpeas-f009cb0.webp"],"app":"steemit/0.2","format":"markdown"} |
| Transaction Info | Block #57875063/Trx 3bfe850b7886672cb4d5fcb082e896a499de3f13 |
View Raw JSON Data
{
"trx_id": "3bfe850b7886672cb4d5fcb082e896a499de3f13",
"block": 57875063,
"trx_in_block": 0,
"op_in_trx": 0,
"virtual_op": 0,
"timestamp": "2021-10-06T13:47:51",
"op": [
"comment",
{
"parent_author": "",
"parent_permlink": "food",
"author": "yenterey",
"permlink": "chicken-with-crushed-harissa-chickpeas",
"title": "Chicken with crushed harissa chickpeas",
"body": "\n\n\nIngredients\n2 tbsp rapeseed oil\n1 onion , chopped\n1 red pepper , finely sliced\n1 yellow pepper , finely sliced\n4 chicken breasts\n1 tbsp za'atar\n400g can chickpeas\n1½ tbsp red harissa paste\n150g baby spinach\n½ small bunch of parsley , finely chopped\nlemon wedges, to serve\n\nMethod\nSTEP 1\nHeat 1 tbsp of oil in a frying pan over a medium heat and fry the onions and peppers for 7 mins until softened and golden.\n\nSTEP 2\nMeanwhile, put the chicken between two sheets of baking parchment and lightly bash until about 2cm thick. Mix together the remaining oil and the za'atar, then rub over the chicken. Season to taste.\n\nSTEP 3\nHeat the grill to high. Put the chicken on a baking tray lined with foil, and grill for 3-4 mins each side, or until golden and cooked through. \n\nSTEP 4\nHeat the chickpeas in a pan with the harissa paste and 2 tbsp water until warmed through, then roughly mash with a potato masher. Wilt the spinach in a pan with 1 tbsp of water or in the microwave in a heatproof bowl. Stir the pepper and onion mixture, spinach and parsley through the chickpeas. Serve with the sliced chicken and the lemon wedges for squeezing over.",
"json_metadata": "{\"tags\":[\"food\"],\"image\":[\"https://cdn.steemitimages.com/DQmWZ56UsazRKTdgoFCG9sNhCr32q7tgmbKFWeAbii1QsDw/chicken-with-crushed-harissa-chickpeas-f009cb0.webp\"],\"app\":\"steemit/0.2\",\"format\":\"markdown\"}"
}
]
}squbeupvoted (1.00%) @yenterey / tuna-caper-and-chilli-spaghetti2021/10/06 13:34:06
squbeupvoted (1.00%) @yenterey / tuna-caper-and-chilli-spaghetti
2021/10/06 13:34:06
| voter | sqube |
| author | yenterey |
| permlink | tuna-caper-and-chilli-spaghetti |
| weight | 100 (1.00%) |
| Transaction Info | Block #57874790/Trx 60c01f214d41aab8e0ea65d8052640b86a366db0 |
View Raw JSON Data
{
  "trx_id": "60c01f214d41aab8e0ea65d8052640b86a366db0",
  "block": 57874790,
  "trx_in_block": 0,
  "op_in_trx": 0,
  "virtual_op": 0,
  "timestamp": "2021-10-06T13:34:06",
  "op": [
    "vote",
    {
      "voter": "sqube",
      "author": "yenterey",
      "permlink": "tuna-caper-and-chilli-spaghetti",
      "weight": 100
    }
  ]
}yentereypublished a new post: tuna-caper-and-chilli-spaghetti2021/10/06 13:33:57
yentereypublished a new post: tuna-caper-and-chilli-spaghetti
2021/10/06 13:33:57
| parent author | |
| parent permlink | food |
| author | yenterey |
| permlink | tuna-caper-and-chilli-spaghetti |
| title | Tuna, caper & chilli spaghetti |
| body |  Ingredients 150g spaghetti or linguine 1 tbsp olive oil 1 garlic clove, sliced 1 red chilli, deseeded and finely chopped, plus extra to serve (optional) 1 tbsp drained capers small bunch of parsley, finely chopped (stalks included) 145g tuna in spring water, drained 90g rocket or baby spinach leaves ½ lemon, juiced Method STEP 1 Cook the spaghetti for 9-11 mins in a large pan of well-salted water until al dente. STEP 2 Heat the oil in a wide frying pan over a very low heat, and gently cook the garlic and chilli to infuse the oil. Remove from the heat if the garlic is turning past light golden, as this will make it bitter. STEP 3 Drain the pasta, keeping a cupful of the cooking water, and tip the spaghetti into the frying pan. Toss the pasta in the oil over a low heat, adding a little of the pasta water to emulsify into a sauce that coats the pasta, then fold in the capers, parsley, tuna and some seasoning. Don’t stir too vigorously – you want to keep larger chunks of tuna. Toss the rocket and lemon juice through the spaghetti, and serve with extra chilli scattered over, if you like. |
| json metadata | {"tags":["food"],"image":["https://cdn.steemitimages.com/DQmTV9YgGz3kNepttJs3D13o1PGxmsLGHDRHYEXLi45dvEw/Tuna-Caper-Chilli-Spaghetti-0d409ad.webp"],"app":"steemit/0.2","format":"markdown"} |
| Transaction Info | Block #57874787/Trx 5b753b9be23a4628b60f6624b3bb3de237a8bf4a |
View Raw JSON Data
{
"trx_id": "5b753b9be23a4628b60f6624b3bb3de237a8bf4a",
"block": 57874787,
"trx_in_block": 2,
"op_in_trx": 0,
"virtual_op": 0,
"timestamp": "2021-10-06T13:33:57",
"op": [
"comment",
{
"parent_author": "",
"parent_permlink": "food",
"author": "yenterey",
"permlink": "tuna-caper-and-chilli-spaghetti",
"title": "Tuna, caper & chilli spaghetti",
"body": "\n\n\nIngredients\n150g spaghetti or linguine\n1 tbsp olive oil\n1 garlic clove, sliced\n1 red chilli, deseeded and finely chopped, plus extra to serve (optional)\n1 tbsp drained capers\nsmall bunch of parsley, finely chopped (stalks included)\n145g tuna in spring water, drained\n90g rocket or baby spinach leaves\n½ lemon, juiced\n\nMethod\nSTEP 1\nCook the spaghetti for 9-11 mins in a large pan of well-salted water until al dente.\n\nSTEP 2\nHeat the oil in a wide frying pan over a very low heat, and gently cook the garlic and chilli to infuse the oil. Remove from the heat if the garlic is turning past light golden, as this will make it bitter.\n\nSTEP 3\nDrain the pasta, keeping a cupful of the cooking water, and tip the spaghetti into the frying pan. Toss the pasta in the oil over a low heat, adding a little of the pasta water to emulsify into a sauce that coats the pasta, then fold in the capers, parsley, tuna and some seasoning. Don’t stir too vigorously – you want to keep larger chunks of tuna. Toss the rocket and lemon juice through the spaghetti, and serve with extra chilli scattered over, if you like.",
"json_metadata": "{\"tags\":[\"food\"],\"image\":[\"https://cdn.steemitimages.com/DQmTV9YgGz3kNepttJs3D13o1PGxmsLGHDRHYEXLi45dvEw/Tuna-Caper-Chilli-Spaghetti-0d409ad.webp\"],\"app\":\"steemit/0.2\",\"format\":\"markdown\"}"
}
]
}squbeupvoted (1.00%) @yenterey / speedy-butternut-squash-barley-risotto2021/10/06 12:55:48
squbeupvoted (1.00%) @yenterey / speedy-butternut-squash-barley-risotto
2021/10/06 12:55:48
| voter | sqube |
| author | yenterey |
| permlink | speedy-butternut-squash-barley-risotto |
| weight | 100 (1.00%) |
| Transaction Info | Block #57874027/Trx 0fa4713965f59876dab7efead3ba31d37309a37a |
View Raw JSON Data
{
  "trx_id": "0fa4713965f59876dab7efead3ba31d37309a37a",
  "block": 57874027,
  "trx_in_block": 1,
  "op_in_trx": 0,
  "virtual_op": 0,
  "timestamp": "2021-10-06T12:55:48",
  "op": [
    "vote",
    {
      "voter": "sqube",
      "author": "yenterey",
      "permlink": "speedy-butternut-squash-barley-risotto",
      "weight": 100
    }
  ]
}yentereypublished a new post: speedy-butternut-squash-barley-risotto2021/10/06 12:55:39
yentereypublished a new post: speedy-butternut-squash-barley-risotto
2021/10/06 12:55:39
| parent author | |
| parent permlink | food |
| author | yenterey |
| permlink | speedy-butternut-squash-barley-risotto |
| title | Speedy butternut squash barley ‘risotto’ |
| body | 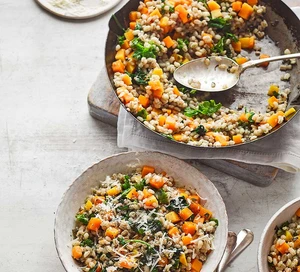 Ingredients 2 tsp olive oil 1 large shallot or small onion, finely chopped 300g squash or pumpkin, cut into 1cm cubes 2 garlic cloves, crushed small handful of sage leaves, finely chopped ½ tsp ground mace or a good grating of nutmeg 160g spinach leaves 2 x 400g cans barley in water, drained 300ml hot vegetable stock 40g parmesan or vegetarian alternative, finely grated Method STEP 1 Heat the oil in a deep frying pan over a medium heat, and fry the shallot with a pinch of salt for 5 mins until soft. Add the squash, garlic, sage and mace, and fry, stirring continually, for another 6-8 mins until the squash is starting to soften and the garlic is fragrant. STEP 2 Tip in the spinach and barley with some seasoning and the stock. Bring to a simmer and cook for 4-5 mins until the spinach has wilted. Add a splash more stock or water, if you like. When the ‘risotto’ is thick and creamy, taste to see if it needs a little more mace or nutmeg and seasoning. Stir in most of the parmesan, then top with the remaining parmesan and grind over some black pepper to serve. |
| json metadata | {"tags":["food"],"image":["https://cdn.steemitimages.com/DQmbmQ4xQTFMXvgN9u2pWvkfCimWkhgfsYz5PLmafRwwJWa/Speedy-Butternut-Squash-Barley-Risotto-775005e.webp"],"app":"steemit/0.2","format":"markdown"} |
| Transaction Info | Block #57874024/Trx 2327f6995ea908a8eb9da854d438fd5fec0444e5 |
View Raw JSON Data
{
"trx_id": "2327f6995ea908a8eb9da854d438fd5fec0444e5",
"block": 57874024,
"trx_in_block": 7,
"op_in_trx": 0,
"virtual_op": 0,
"timestamp": "2021-10-06T12:55:39",
"op": [
"comment",
{
"parent_author": "",
"parent_permlink": "food",
"author": "yenterey",
"permlink": "speedy-butternut-squash-barley-risotto",
"title": "Speedy butternut squash barley ‘risotto’",
"body": "\n\nIngredients\n2 tsp olive oil\n1 large shallot or small onion, finely chopped\n300g squash or pumpkin, cut into 1cm cubes\n2 garlic cloves, crushed\nsmall handful of sage leaves, finely chopped\n½ tsp ground mace or a good grating of nutmeg\n160g spinach leaves\n2 x 400g cans barley in water, drained\n300ml hot vegetable stock\n40g parmesan or vegetarian alternative, finely grated\n\n\nMethod\nSTEP 1\nHeat the oil in a deep frying pan over a medium heat, and fry the shallot with a pinch of salt for 5 mins until soft. Add the squash, garlic, sage and mace, and fry, stirring continually, for another 6-8 mins until the squash is starting to soften and the garlic is fragrant.\n\nSTEP 2\nTip in the spinach and barley with some seasoning and the stock. Bring to a simmer and cook for 4-5 mins until the spinach has wilted. Add a splash more stock or water, if you like. When the ‘risotto’ is thick and creamy, taste to see if it needs a little more mace or nutmeg and seasoning. Stir in most of the parmesan, then top with the remaining parmesan and grind over some black pepper to serve.",
"json_metadata": "{\"tags\":[\"food\"],\"image\":[\"https://cdn.steemitimages.com/DQmbmQ4xQTFMXvgN9u2pWvkfCimWkhgfsYz5PLmafRwwJWa/Speedy-Butternut-Squash-Barley-Risotto-775005e.webp\"],\"app\":\"steemit/0.2\",\"format\":\"markdown\"}"
}
]
}squbeupvoted (1.00%) @yenterey / chicken-and-lemon-skewers2021/10/06 12:33:36
squbeupvoted (1.00%) @yenterey / chicken-and-lemon-skewers
2021/10/06 12:33:36
| voter | sqube |
| author | yenterey |
| permlink | chicken-and-lemon-skewers |
| weight | 100 (1.00%) |
| Transaction Info | Block #57873585/Trx 3ac0cc43c177c05adf11a950fe0b071b55d12337 |
View Raw JSON Data
{
  "trx_id": "3ac0cc43c177c05adf11a950fe0b071b55d12337",
  "block": 57873585,
  "trx_in_block": 8,
  "op_in_trx": 0,
  "virtual_op": 0,
  "timestamp": "2021-10-06T12:33:36",
  "op": [
    "vote",
    {
      "voter": "sqube",
      "author": "yenterey",
      "permlink": "chicken-and-lemon-skewers",
      "weight": 100
    }
  ]
}yentereypublished a new post: chicken-and-lemon-skewers2021/10/06 12:33:30
yentereypublished a new post: chicken-and-lemon-skewers
2021/10/06 12:33:30
| parent author | |
| parent permlink | food |
| author | yenterey |
| permlink | chicken-and-lemon-skewers |
| title | Chicken & lemon skewers |
| body |  Ingredients 1 small pack mint , leaves picked 150g natural yogurt , plus extra to serve (optional) 1 lemon , zested and juiced ½ tsp ground cumin ½ tsp ground coriander 2cm piece ginger , grated 4 skinless chicken breasts, each cut into 6 pieces 4 wholemeal flatbreads or pittas 2 Little Gem lettuces , sliced 1 small red onion , sliced, to serve pickled red cabbage , chilli sauce and hummus, to serve (all optional) You will need 4 metal or wooden skewers Method STEP 1 Chop half the mint and put in a bowl with the yogurt, half the lemon juice, all the lemon zest, spices and ginger. Mix well and season with lots of black pepper and a pinch of salt. Add the chicken pieces, mix well and put in the fridge for 20-30 mins. Meanwhile, soak 4 large wooden skewers in water for at least 20 mins (or use metal ones). STEP 2 When you’re ready to cook the chicken, heat your grill to a medium heat and line the grill tray with foil. Thread the chicken onto the soaked wooden or metal skewers and grill for 15-20 mins, turning halfway through, until browned and cooked through. STEP 3 Warm the flatbreads under the grill for a couple of seconds, then serve them topped with the lettuce, chicken, red onion, remaining lemon juice and mint, and any optional extras such as extra yogurt or pickled cabbage, chilli sauce and hummus. |
| json metadata | {"tags":["food"],"image":["https://cdn.steemitimages.com/DQmdy97YaNFC16dniU6CzU1FX6GX8TxYSEPEobiVgezKu4J/chicken-lemon-skewers-31bd4db.webp"],"app":"steemit/0.2","format":"markdown"} |
| Transaction Info | Block #57873583/Trx 4a93e46562f27575ae3a66f61e4f1a387ff2fe39 |
View Raw JSON Data
{
"trx_id": "4a93e46562f27575ae3a66f61e4f1a387ff2fe39",
"block": 57873583,
"trx_in_block": 0,
"op_in_trx": 0,
"virtual_op": 0,
"timestamp": "2021-10-06T12:33:30",
"op": [
"comment",
{
"parent_author": "",
"parent_permlink": "food",
"author": "yenterey",
"permlink": "chicken-and-lemon-skewers",
"title": "Chicken & lemon skewers",
"body": "\n\n\nIngredients\n1 small pack mint , leaves picked\n150g natural yogurt , plus extra to serve (optional)\n1 lemon , zested and juiced\n½ tsp ground cumin\n½ tsp ground coriander\n2cm piece ginger , grated\n4 skinless chicken breasts, each cut into 6 pieces\n4 wholemeal flatbreads or pittas\n2 Little Gem lettuces , sliced\n1 small red onion , sliced, to serve\npickled red cabbage , chilli sauce and hummus, to serve (all optional)\n\nYou will need\n4 metal or wooden skewers\n\nMethod\nSTEP 1\nChop half the mint and put in a bowl with the yogurt, half the lemon juice, all the lemon zest, spices and ginger. Mix well and season with lots of black pepper and a pinch of salt. Add the chicken pieces, mix well and put in the fridge for 20-30 mins. Meanwhile, soak 4 large wooden skewers in water for at least 20 mins (or use metal ones).\n\nSTEP 2\nWhen you’re ready to cook the chicken, heat your grill to a medium heat and line the grill tray with foil. Thread the chicken onto the soaked wooden or metal skewers and grill for 15-20 mins, turning halfway through, until browned and cooked through.\n\nSTEP 3\nWarm the flatbreads under the grill for a couple of seconds, then serve them topped with the lettuce, chicken, red onion, remaining lemon juice and mint, and any optional extras such as extra yogurt or pickled cabbage, chilli sauce and hummus.",
"json_metadata": "{\"tags\":[\"food\"],\"image\":[\"https://cdn.steemitimages.com/DQmdy97YaNFC16dniU6CzU1FX6GX8TxYSEPEobiVgezKu4J/chicken-lemon-skewers-31bd4db.webp\"],\"app\":\"steemit/0.2\",\"format\":\"markdown\"}"
}
]
}squbeupvoted (1.00%) @yenterey / tandoori-trout2021/10/06 12:18:33
squbeupvoted (1.00%) @yenterey / tandoori-trout
2021/10/06 12:18:33
| voter | sqube |
| author | yenterey |
| permlink | tandoori-trout |
| weight | 100 (1.00%) |
| Transaction Info | Block #57873286/Trx 1c3df88f6a02d4e22c7c7ef4c23e7d81df8076c0 |
View Raw JSON Data
{
  "trx_id": "1c3df88f6a02d4e22c7c7ef4c23e7d81df8076c0",
  "block": 57873286,
  "trx_in_block": 0,
  "op_in_trx": 0,
  "virtual_op": 0,
  "timestamp": "2021-10-06T12:18:33",
  "op": [
    "vote",
    {
      "voter": "sqube",
      "author": "yenterey",
      "permlink": "tandoori-trout",
      "weight": 100
    }
  ]
}yentereypublished a new post: tandoori-trout2021/10/06 12:18:24
yentereypublished a new post: tandoori-trout
2021/10/06 12:18:24
| parent author | |
| parent permlink | food |
| author | yenterey |
| permlink | tandoori-trout |
| title | Tandoori trout |
| body | 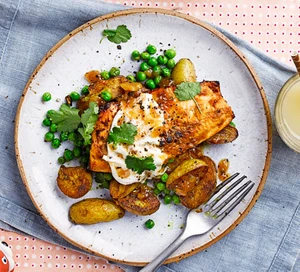 Ingredients 4 thick trout fillets 1 tbsp tandoori curry paste 500g new potatoes , larger ones halved 2 tbsp vegetable oil 1 garlic clove , chopped 1 tsp ground cumin 1 tsp garam masala (or ground coriander) ½ tsp ground turmeric 320g frozen peas yogurt , coriander leaves and mango chutney, to serve Method STEP 1 Coat the trout in the curry paste. Put the potatoes in a large pan of cold salted water, bring to the boil and cook for 15-20 mins until tender but still retaining their shape. Drain and leave to steam-dry. STEP 2 Heat the grill. Put the trout fillets on a baking tray lined with foil and cook until tender, about 6-8 mins. STEP 3 Meanwhile, heat the oil in a large frying pan and add the garlic and spices. Cook for a few mins until fragrant, then tip in the potatoes. Fry for 3 mins until crisp at the edges, then throw in the frozen peas. Cook for 2-3 mins more until warmed through. Season well and serve with the trout, coriander sprinkled over, and yogurt and chutney on the side. |
| json metadata | {"tags":["food"],"image":["https://cdn.steemitimages.com/DQmWgwMdc2HTu36ug1BRSgh1YVGRxME9zavRWAmCRCxZU4K/tandoori-trout-d6b35de.webp"],"app":"steemit/0.2","format":"markdown"} |
| Transaction Info | Block #57873283/Trx f09d99b1faabca14045c817bb1bcc1070c99b1a0 |
View Raw JSON Data
{
"trx_id": "f09d99b1faabca14045c817bb1bcc1070c99b1a0",
"block": 57873283,
"trx_in_block": 10,
"op_in_trx": 0,
"virtual_op": 0,
"timestamp": "2021-10-06T12:18:24",
"op": [
"comment",
{
"parent_author": "",
"parent_permlink": "food",
"author": "yenterey",
"permlink": "tandoori-trout",
"title": "Tandoori trout",
"body": "\n\n\nIngredients\n4 thick trout fillets\n1 tbsp tandoori curry paste\n500g new potatoes , larger ones halved\n2 tbsp vegetable oil\n1 garlic clove , chopped\n1 tsp ground cumin\n1 tsp garam masala (or ground coriander)\n½ tsp ground turmeric\n320g frozen peas\nyogurt , coriander leaves and mango chutney, to serve\n\n\nMethod\nSTEP 1\nCoat the trout in the curry paste. Put the potatoes in a large pan of cold salted water, bring to the boil and cook for 15-20 mins until tender but still retaining their shape. Drain and leave to steam-dry.\n\nSTEP 2\nHeat the grill. Put the trout fillets on a baking tray lined with foil and cook until tender, about 6-8 mins.\n\nSTEP 3\nMeanwhile, heat the oil in a large frying pan and add the garlic and spices. Cook for a few mins until fragrant, then tip in the potatoes. Fry for 3 mins until crisp at the edges, then throw in the frozen peas. Cook for 2-3 mins more until warmed through. Season well and serve with the trout, coriander sprinkled over, and yogurt and chutney on the side.",
"json_metadata": "{\"tags\":[\"food\"],\"image\":[\"https://cdn.steemitimages.com/DQmWgwMdc2HTu36ug1BRSgh1YVGRxME9zavRWAmCRCxZU4K/tandoori-trout-d6b35de.webp\"],\"app\":\"steemit/0.2\",\"format\":\"markdown\"}"
}
]
}squbeupvoted (1.00%) @yenterey / lentil-soup2021/10/06 12:11:00
squbeupvoted (1.00%) @yenterey / lentil-soup
2021/10/06 12:11:00
| voter | sqube |
| author | yenterey |
| permlink | lentil-soup |
| weight | 100 (1.00%) |
| Transaction Info | Block #57873135/Trx 6f9eeb13c79052418e302a9cd87cd936855a8102 |
View Raw JSON Data
{
  "trx_id": "6f9eeb13c79052418e302a9cd87cd936855a8102",
  "block": 57873135,
  "trx_in_block": 6,
  "op_in_trx": 0,
  "virtual_op": 0,
  "timestamp": "2021-10-06T12:11:00",
  "op": [
    "vote",
    {
      "voter": "sqube",
      "author": "yenterey",
      "permlink": "lentil-soup",
      "weight": 100
    }
  ]
}yentereypublished a new post: lentil-soup2021/10/06 12:10:54
yentereypublished a new post: lentil-soup
2021/10/06 12:10:54
| parent author | |
| parent permlink | soup |
| author | yenterey |
| permlink | lentil-soup |
| title | Lentil soup |
| body |  Ingredients 2l vegetable or ham stock 150g red lentils 6 carrots, finely chopped 2 medium leeks, sliced (about 300g) small handful of chopped parsley, to serve Method STEP 1 Heat the stock in a large pan and add the lentils. Bring to the boil and allow the lentils to soften for a few minutes. STEP 2 Add the carrots and leeks and season (don't add salt if you use ham stock as it will make it too salty). Bring to the boil, then reduce the heat, cover and simmer for 45-60 mins until the lentils have broken down. Scatter over the parsley and serve with buttered bread, if you like. |
| json metadata | {"tags":["soup"],"image":["https://cdn.steemitimages.com/DQmTDeR23Qm6miKt4LRHH7pF1PdnuxMiMSQfe4SsxFkejUi/lentil_soup-c6fa61c.webp"],"app":"steemit/0.2","format":"markdown"} |
| Transaction Info | Block #57873133/Trx 06f15ba8ce461eeebc15b5ee549b26ccf5efce43 |
View Raw JSON Data
{
"trx_id": "06f15ba8ce461eeebc15b5ee549b26ccf5efce43",
"block": 57873133,
"trx_in_block": 0,
"op_in_trx": 0,
"virtual_op": 0,
"timestamp": "2021-10-06T12:10:54",
"op": [
"comment",
{
"parent_author": "",
"parent_permlink": "soup",
"author": "yenterey",
"permlink": "lentil-soup",
"title": "Lentil soup",
"body": "\n\n\nIngredients\n2l vegetable or ham stock\n150g red lentils\n6 carrots, finely chopped\n2 medium leeks, sliced (about 300g)\nsmall handful of chopped parsley, to serve\n\nMethod\nSTEP 1\nHeat the stock in a large pan and add the lentils. Bring to the boil and allow the lentils to soften for a few minutes.\n\nSTEP 2\nAdd the carrots and leeks and season (don't add salt if you use ham stock as it will make it too salty). Bring to the boil, then reduce the heat, cover and simmer for 45-60 mins until the lentils have broken down. Scatter over the parsley and serve with buttered bread, if you like.",
"json_metadata": "{\"tags\":[\"soup\"],\"image\":[\"https://cdn.steemitimages.com/DQmTDeR23Qm6miKt4LRHH7pF1PdnuxMiMSQfe4SsxFkejUi/lentil_soup-c6fa61c.webp\"],\"app\":\"steemit/0.2\",\"format\":\"markdown\"}"
}
]
}yentereypublished a new post: mushroom-soup2021/10/06 11:37:30
yentereypublished a new post: mushroom-soup
2021/10/06 11:37:30
| parent author | |
| parent permlink | soup |
| author | yenterey |
| permlink | mushroom-soup |
| title | Mushroom soup |
| body | 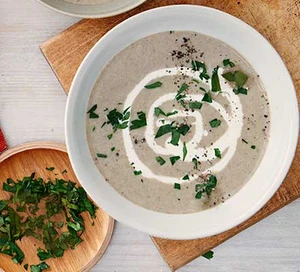 Ingredients 90g butter 2 medium onions, roughly chopped 1 garlic clove, crushed 500g mushrooms, finely chopped (chestnut or button mushrooms work well) 2 tbsp plain flour 1l hot chicken stock 1 bay leaf 4 tbsp single cream small handful flat-leaf parsley, roughly chopped, to serve (optional) Method STEP 1 Heat the butter in a large saucepan and cook the onions and garlic until soft but not browned, about 8-10 mins. STEP 2 Add the mushrooms and cook over a high heat for another 3 mins until softened. Sprinkle over the flour and stir to combine. Pour in the chicken stock, bring the mixture to the boil, then add the bay leaf and simmer for another 10 mins. STEP 3 Remove and discard the bay leaf, then remove the mushroom mixture from the heat and blitz using a hand blender until smooth. Gently reheat the soup and stir through the cream (or, you could freeze the soup at this stage – simply stir through the cream when heating). Scatter over the parsley, if you like, and serve. |
| json metadata | {"tags":["soup"],"image":["https://cdn.steemitimages.com/DQmaj6sFVzF7bXy9LqjXRtYbKoK78NFqTtsnhDkzWoEHiCx/mushroom_soup-9b55c55.webp"],"app":"steemit/0.2","format":"markdown"} |
| Transaction Info | Block #57872469/Trx a79e31022b5a8c4d454708f1cdbfd4e90ddd2f1b |
View Raw JSON Data
{
"trx_id": "a79e31022b5a8c4d454708f1cdbfd4e90ddd2f1b",
"block": 57872469,
"trx_in_block": 5,
"op_in_trx": 0,
"virtual_op": 0,
"timestamp": "2021-10-06T11:37:30",
"op": [
"comment",
{
"parent_author": "",
"parent_permlink": "soup",
"author": "yenterey",
"permlink": "mushroom-soup",
"title": "Mushroom soup",
"body": "\n\n\nIngredients\n90g butter\n2 medium onions, roughly chopped\n1 garlic clove, crushed\n500g mushrooms, finely chopped (chestnut or button mushrooms work well)\n2 tbsp plain flour\n1l hot chicken stock\n1 bay leaf\n4 tbsp single cream\nsmall handful flat-leaf parsley, roughly chopped, to serve (optional)\n\n\nMethod\nSTEP 1\nHeat the butter in a large saucepan and cook the onions and garlic until soft but not browned, about 8-10 mins.\n\nSTEP 2\nAdd the mushrooms and cook over a high heat for another 3 mins until softened. Sprinkle over the flour and stir to combine. Pour in the chicken stock, bring the mixture to the boil, then add the bay leaf and simmer for another 10 mins.\n\nSTEP 3\nRemove and discard the bay leaf, then remove the mushroom mixture from the heat and blitz using a hand blender until smooth. Gently reheat the soup and stir through the cream (or, you could freeze the soup at this stage – simply stir through the cream when heating). Scatter over the parsley, if you like, and serve.",
"json_metadata": "{\"tags\":[\"soup\"],\"image\":[\"https://cdn.steemitimages.com/DQmaj6sFVzF7bXy9LqjXRtYbKoK78NFqTtsnhDkzWoEHiCx/mushroom_soup-9b55c55.webp\"],\"app\":\"steemit/0.2\",\"format\":\"markdown\"}"
}
]
}ruthsanyupvoted (17.00%) @yenterey / lemon-and-raspberry-doughnut-pudding2021/10/05 21:16:54
ruthsanyupvoted (17.00%) @yenterey / lemon-and-raspberry-doughnut-pudding
2021/10/05 21:16:54
| voter | ruthsany |
| author | yenterey |
| permlink | lemon-and-raspberry-doughnut-pudding |
| weight | 1700 (17.00%) |
| Transaction Info | Block #57855365/Trx 7b94c53f78daed196a7ac092c0aba377c53339e3 |
View Raw JSON Data
{
  "trx_id": "7b94c53f78daed196a7ac092c0aba377c53339e3",
  "block": 57855365,
  "trx_in_block": 29,
  "op_in_trx": 0,
  "virtual_op": 0,
  "timestamp": "2021-10-05T21:16:54",
  "op": [
    "vote",
    {
      "voter": "ruthsany",
      "author": "yenterey",
      "permlink": "lemon-and-raspberry-doughnut-pudding",
      "weight": 1700
    }
  ]
}squbeupvoted (1.00%) @yenterey / lemon-and-raspberry-doughnut-pudding2021/10/05 21:13:54
squbeupvoted (1.00%) @yenterey / lemon-and-raspberry-doughnut-pudding
2021/10/05 21:13:54
| voter | sqube |
| author | yenterey |
| permlink | lemon-and-raspberry-doughnut-pudding |
| weight | 100 (1.00%) |
| Transaction Info | Block #57855306/Trx 69886054767dbc380639bdc390ddbe159cf77f90 |
View Raw JSON Data
{
  "trx_id": "69886054767dbc380639bdc390ddbe159cf77f90",
  "block": 57855306,
  "trx_in_block": 30,
  "op_in_trx": 0,
  "virtual_op": 0,
  "timestamp": "2021-10-05T21:13:54",
  "op": [
    "vote",
    {
      "voter": "sqube",
      "author": "yenterey",
      "permlink": "lemon-and-raspberry-doughnut-pudding",
      "weight": 100
    }
  ]
}yentereypublished a new post: lemon-and-raspberry-doughnut-pudding2021/10/05 21:13:48
yentereypublished a new post: lemon-and-raspberry-doughnut-pudding
2021/10/05 21:13:48
| parent author | |
| parent permlink | dessert |
| author | yenterey |
| permlink | lemon-and-raspberry-doughnut-pudding |
| title | Lemon & raspberry doughnut pudding |
| body | 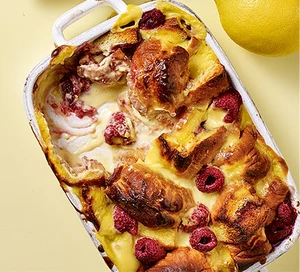 Ingredients butter , for the baking dish 8 raspberry jam doughnut 150g raspberries 500ml shop-bought fresh custard 250ml whole milk 150g lemon curd Method STEP 1 Heat the oven to 200C/180C fan/gas 6 and butter a 20 x 20cm baking dish. Quarter the raspberry jam doughnuts and arrange in overlapping layers in the prepared dish. Scatter over 100g raspberries. STEP 2 Heat the custard with the milk until steaming, then whisk through the lemon curd. Pour the lemon custard over the doughnuts, then leave to soak for 30 mins, ensuring some of the doughnuts stick out so they’ll crisp up when baked. STEP 3 Scatter over another 50g raspberries and bake for 35-40 mins, or until golden brown and just set. |
| json metadata | {"tags":["dessert"],"image":["https://cdn.steemitimages.com/DQmWij7xJhqbMMjUsXWPNZgeQ72QBS8GCQSXgqUJydy4f9i/lemon-raspberry-doughnut-pudding-a32bd3f.webp"],"app":"steemit/0.2","format":"markdown"} |
| Transaction Info | Block #57855304/Trx 353e66c8aa16c6f883477164ba12121af06763c4 |
View Raw JSON Data
{
"trx_id": "353e66c8aa16c6f883477164ba12121af06763c4",
"block": 57855304,
"trx_in_block": 21,
"op_in_trx": 0,
"virtual_op": 0,
"timestamp": "2021-10-05T21:13:48",
"op": [
"comment",
{
"parent_author": "",
"parent_permlink": "dessert",
"author": "yenterey",
"permlink": "lemon-and-raspberry-doughnut-pudding",
"title": "Lemon & raspberry doughnut pudding",
"body": "\n\n\nIngredients\nbutter , for the baking dish\n8 raspberry jam doughnut\n150g raspberries\n500ml shop-bought fresh custard\n250ml whole milk\n150g lemon curd\n\nMethod\nSTEP 1\nHeat the oven to 200C/180C fan/gas 6 and butter a 20 x 20cm baking dish. Quarter the raspberry jam doughnuts and arrange in overlapping layers in the prepared dish. Scatter over 100g raspberries.\n\nSTEP 2\nHeat the custard with the milk until steaming, then whisk through the lemon curd. Pour the lemon custard over the doughnuts, then leave to soak for 30 mins, ensuring some of the doughnuts stick out so they’ll crisp up when baked.\n\nSTEP 3\nScatter over another 50g raspberries and bake for 35-40 mins, or until golden brown and just set.",
"json_metadata": "{\"tags\":[\"dessert\"],\"image\":[\"https://cdn.steemitimages.com/DQmWij7xJhqbMMjUsXWPNZgeQ72QBS8GCQSXgqUJydy4f9i/lemon-raspberry-doughnut-pudding-a32bd3f.webp\"],\"app\":\"steemit/0.2\",\"format\":\"markdown\"}"
}
]
}yentereypublished a new post: treacle-tart2021/10/05 21:02:12
yentereypublished a new post: treacle-tart
2021/10/05 21:02:12
| parent author | |
| parent permlink | dessert |
| author | yenterey |
| permlink | treacle-tart |
| title | Treacle tart |
| body |  Ingredients For the pastry 250g plain flour ½ tsp fine salt 140g cold unsalted butter, cubed 3 tbsp icing sugar 2 medium egg yolks 2-3 tbsp cold water For the filling 400g golden syrup 1 ball stem ginger in syrup, finely chopped, plus 50g of the syrup 1 lemon, zested 2 medium eggs, lightly beaten 100g fine fresh white breadcrumbs STEP 1 Sieve the flour and salt into a large bowl. Add the butter and rub together with your fingers to a fine breadcrumb-like texture (you can also do this part in a food processor). Stir though the icing sugar, then quickly add the egg yolks and 2 tbsp water, mixing swiftly with a cutlery knife to combine. Form into a ball (add another tbsp water if you need to), wrap and chill for 30 mins. Roll out to the thickness of a pound coin, and line a 22cm fluted tart tin with the pastry, leaving an overhang. Return to the fridge for 30 mins. STEP 2 Heat the oven to 200C/180C fan/gas 6. Put a baking sheet into the oven to heat up. Line the pastry case with baking parchment and baking beans, then put in the oven on the baking sheet, and bake for 15 mins. Remove the parchment and bake for a further 10 mins or until the pastry is golden brown. Leave the pastry to cool before trimming off the overhanging edges with a small serrated knife. STEP 3 Lower the oven temperature to 160C/140C fan/gas 4. Combine the golden syrup, ginger, ginger syrup, lemon, eggs and breadcrumbs in a bowl, briefly whisking everything together until combined. Carefully pour the filling into the pastry case put in the lower part of the oven to bake for 35-40 mins or until the filling is just set. Remove from the oven and leave to cool down for 20 mins before serving with ice cream or thick clotted cream. |
| json metadata | {"tags":["dessert"],"image":["https://cdn.steemitimages.com/DQmRfDPoEpooVV5znkJ2aUzhDCDv42N4DRZzqa2fFRZTCf9/treacle-tart-6ed628f.webp"],"app":"steemit/0.2","format":"markdown"} |
| Transaction Info | Block #57855075/Trx 26b43c8c586a7563d58419f2150fec6bf2b98298 |
View Raw JSON Data
{
"trx_id": "26b43c8c586a7563d58419f2150fec6bf2b98298",
"block": 57855075,
"trx_in_block": 9,
"op_in_trx": 0,
"virtual_op": 0,
"timestamp": "2021-10-05T21:02:12",
"op": [
"comment",
{
"parent_author": "",
"parent_permlink": "dessert",
"author": "yenterey",
"permlink": "treacle-tart",
"title": "Treacle tart",
"body": "\n\n\nIngredients\nFor the pastry\n250g plain flour\n½ tsp fine salt\n140g cold unsalted butter, cubed\n3 tbsp icing sugar\n2 medium egg yolks\n2-3 tbsp cold water\n\nFor the filling\n400g golden syrup\n1 ball stem ginger in syrup, finely chopped, plus 50g of the syrup\n1 lemon, zested\n2 medium eggs, lightly beaten\n100g fine fresh white breadcrumbs\n\n\nSTEP 1\nSieve the flour and salt into a large bowl. Add the butter and rub together with your fingers to a fine breadcrumb-like texture (you can also do this part in a food processor). Stir though the icing sugar, then quickly add the egg yolks and 2 tbsp water, mixing swiftly with a cutlery knife to combine. Form into a ball (add another tbsp water if you need to), wrap and chill for 30 mins. Roll out to the thickness of a pound coin, and line a 22cm fluted tart tin with the pastry, leaving an overhang. Return to the fridge for 30 mins.\n\nSTEP 2\nHeat the oven to 200C/180C fan/gas 6. Put a baking sheet into the oven to heat up. Line the pastry case with baking parchment and baking beans, then put in the oven on the baking sheet, and bake for 15 mins. Remove the parchment and bake for a further 10 mins or until the pastry is golden brown. Leave the pastry to cool before trimming off the overhanging edges with a small serrated knife.\n\nSTEP 3\nLower the oven temperature to 160C/140C fan/gas 4. Combine the golden syrup, ginger, ginger syrup, lemon, eggs and breadcrumbs in a bowl, briefly whisking everything together until combined. Carefully pour the filling into the pastry case put in the lower part of the oven to bake for 35-40 mins or until the filling is just set. Remove from the oven and leave to cool down for 20 mins before serving with ice cream or thick clotted cream.",
"json_metadata": "{\"tags\":[\"dessert\"],\"image\":[\"https://cdn.steemitimages.com/DQmRfDPoEpooVV5znkJ2aUzhDCDv42N4DRZzqa2fFRZTCf9/treacle-tart-6ed628f.webp\"],\"app\":\"steemit/0.2\",\"format\":\"markdown\"}"
}
]
}squbeupvoted (1.00%) @yenterey / merlot-poached-pears-with-vanilla-and-cinnamon2021/10/05 20:47:00
squbeupvoted (1.00%) @yenterey / merlot-poached-pears-with-vanilla-and-cinnamon
2021/10/05 20:47:00
| voter | sqube |
| author | yenterey |
| permlink | merlot-poached-pears-with-vanilla-and-cinnamon |
| weight | 100 (1.00%) |
| Transaction Info | Block #57854775/Trx f5ee2a71e54140cb77c18ffd9a1c34c570f3e0e4 |
View Raw JSON Data
{
  "trx_id": "f5ee2a71e54140cb77c18ffd9a1c34c570f3e0e4",
  "block": 57854775,
  "trx_in_block": 9,
  "op_in_trx": 0,
  "virtual_op": 0,
  "timestamp": "2021-10-05T20:47:00",
  "op": [
    "vote",
    {
      "voter": "sqube",
      "author": "yenterey",
      "permlink": "merlot-poached-pears-with-vanilla-and-cinnamon",
      "weight": 100
    }
  ]
}Manabar
Voting Power100.00%
Downvote Power100.00%
Resource Credits100.00%
Reputation Progress34.76%
{
  "voting_manabar": {
    "current_mana": "5472996220",
    "last_update_time": 1769233872
  },
  "downvote_manabar": {
    "current_mana": 1368249055,
    "last_update_time": 1769233872
  },
  "rc_account": {
    "account": "yenterey",
    "rc_manabar": {
      "current_mana": "11221945121",
      "last_update_time": 1769233872
    },
    "max_rc_creation_adjustment": {
      "amount": "5584729704",
      "precision": 6,
      "nai": "@@000000037"
    },
    "max_rc": "11057725924"
  }
}
Account Metadata
| POSTING JSON METADATA | |
| profile | {"profile_image":"https://cdn.steemitimages.com/DQmW1y5YwXRWAE4J4UFHSP4jNe7Ju9jLmooJNgsXDzotyWB/ac07db51f450247f986c6291e72ec9fc-375.jpg","version":2} |
| JSON METADATA | |
| None | |
{
  "posting_json_metadata": {
    "profile": {
      "profile_image": "https://cdn.steemitimages.com/DQmW1y5YwXRWAE4J4UFHSP4jNe7Ju9jLmooJNgsXDzotyWB/ac07db51f450247f986c6291e72ec9fc-375.jpg",
      "version": 2
    }
  },
  "json_metadata": {}
}
Auth Keys
Owner
Single Signature
Public Keys
STM6RfgMyDSztDvyz3qFmbzv8yUPmTEwHYqyMbqmp9iy5AiToDe9r1/1
Active
Single Signature
Public Keys
STM6xiz3cccFRwXoJwYFDNfYEM1x27JruQrTe5MJeH7q1JRu2u5r71/1
Posting
Single Signature
Public Keys
STM5Yypv6hULD8KWyxHZKRfTuyCJNNZ97yHDW9hLLZNfVMLgjxEyV1/1
Memo
STM51B2Gw423aJCxjt8XHvch1ZXghXzv3VQ58ugJvvozjgNkqhqgu
{
  "owner": {
    "weight_threshold": 1,
    "account_auths": [],
    "key_auths": [
      [
        "STM6RfgMyDSztDvyz3qFmbzv8yUPmTEwHYqyMbqmp9iy5AiToDe9r",
        1
      ]
    ]
  },
  "active": {
    "weight_threshold": 1,
    "account_auths": [],
    "key_auths": [
      [
        "STM6xiz3cccFRwXoJwYFDNfYEM1x27JruQrTe5MJeH7q1JRu2u5r7",
        1
      ]
    ]
  },
  "posting": {
    "weight_threshold": 1,
    "account_auths": [],
    "key_auths": [
      [
        "STM5Yypv6hULD8KWyxHZKRfTuyCJNNZ97yHDW9hLLZNfVMLgjxEyV",
        1
      ]
    ]
  },
  "memo": "STM51B2Gw423aJCxjt8XHvch1ZXghXzv3VQ58ugJvvozjgNkqhqgu"
}
Witness Votes
0 / 30
No active witness votes.
[]